Table of Contents
Advertisement
Quick Links
Advertisement
Table of Contents

Subscribe to Our Youtube Channel
Related Manuals for nama M1

Summary of Contents for nama M1
- Page 2 To maximize the benefits of your new Nama M1 Plant-Based Milk Maker and understand how to use it, we recommend reading this manual first.
-
Page 3: Table Of Contents
TABLE OF CONTENTS IMPORTANT SAFEGUARDS ......SAFETY PRECAUTIONS ........PARTS AND ACCESSORIES . -
Page 4: Important Safeguards
ANY SAFETY INTERLOCK MECHANISMS. DO NOT OPERATE ANY APPLIANCE WITH A DAMAGED CORD OR PLUG, OR AFTER THE APPLIANCE MALFUNCTIONS, OR IS DROPPED OR DAMAGED IN ANY MANNER. CONTACT NAMA CUSTOMER SERVICE AT SUPPORT@NAMAWELL.COM (EMAIL) OR NAMAWELL.COM/CONTACT (WEBSITE) FOR REVIEW AND FURTHER INSTRUCTION. - Page 5 15. MAKE SURE THE MOTOR STOPS COMPLETELY BEFORE DISASSEMBLING. 16. DO NOT PUT YOUR FINGERS OR OTHER OBJECTS INTO THE CHAMBER WHILE IT IS IN OPERATION. IF FOOD BECOMES LODGED, STOP THE MILK MAKER, UNPLUG FROM THE POWER OUTLET BEFORE DISASSEMBLING TO REMOVE THE REMAINING FOOD.
-
Page 6: Safety Precautions
ATTEMPT TO REPAIR OR MODIFY IT CONTAINER SHOULD BE REMOVED YOURSELF. IT MUST BE REPLACED BY BEFORE USE. MANUFACTURER OR AUTHORIZED • FOR SAFETY, PLEASE KEEP PACKAGING DEALER. PLEASE CONTACT NAMA MATERIALS (BAGS, DRAWSTRINGS, CUSTOMER SERVICE. ETC.) OUT OF CHILDREN’S REACH. SAVE THESE INSTRUCTIONS... - Page 7 DAMAGED OR CRACKED. IF THE OVERHEAT THE MOTOR AND CAUSE A DEVICE IS DAMAGED, DO NOT USE IT MALFUNCTION. IF CONTINUED USE IS AND CONTACT THE NAMA CUSTOMER REQUIRED, ALLOW THE APPLIANCE TO SERVICE FOR AN INSPECTION, REPAIR COOL FOR 60 MINUTES OR LONGER OR REPLACEMENT.
- Page 8 SAFETY WHEN INSERTING YOUR PLEASE STOP OPERATION HANDS OR KITCHEN TOOLS INTO THE IMMEDIATELY AND CONTACT CHAMBER. ALWAYS STOP OPERATION NAMA CUSTOMER SERVICE. OF BLENDER COMPLETELY AND • DO NOT LEAVE MILK MAKER SEPARATE THE CHAMBER FROM THE UNATTENDED WHEN IN USE.
- Page 9 NAMA M1 OPERATION...
-
Page 10: Parts And Accessories
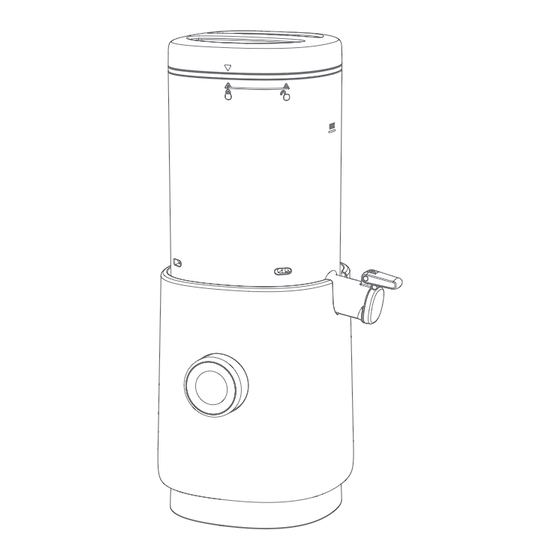
PARTS AND ACCESSORIES CHAMBER PARTS BASE PARTS Chamber Lid Blade Frame Filter Basket Power Cord Chamber Base ACCESSORIES Pitcher Lid Cleaning Brush Pitcher Pulp Pouch... - Page 11 CHAMBER AND BASE DETAILS BASE FRONT BLADE FRAME Funnel Drive Shaft Coupling Processing Blades Digital Display Control Knob START/CANCEL CHAMBER Button Chamber BASE BACK Spout Safety Interlock Power Switch Spout Cap Power Inlet Spout Outlet...
-
Page 12: Assembly
ASSEMBLY STEP 1 STEP 1 ASSEMBLE THE (CONT’D) CHAMBER SET M1Illustrations for placement/linked to U Insert the blade frame Place the chamber lid Do not scale line weights. into the filter basket, on top of the chamber then insert the set into with the arrow aligned the chamber. -
Page 13: Step 5 Turn The Power Switch On
STEP 2 STEP 3 ALIGN CHAMBER SET PLACE THE PITCHER TO BACK OF BASE UNDER THE SPOUT Place the chamber set onto TIP: Spout cap must be closed the base, with the spine aligned before adding ingredients and with the back of the base. starting operation. -
Page 14: Interface And Display
INTERFACE AND DISPLAY BLEND TIME The control knob can be rotated left and right to adjust the blend time. START/CANCEL BUTTON Press the START/CANCEL button to begin processing. If the START/CANCEL button is pressed during operation, it will stop and revert back to the beginning of the process. -
Page 15: Close Lid
The display can also show messages such as: CLOSE SPOUT CLOSE SPOUT will display when spout is open. Display 1 Display 2 CLOSE LID CLOSE LID will display until the lid is properly secured to chamber set. Display 1 Display 2 OPEN SPOUT OPEN SPOUT will display when blend cycle is over... -
Page 16: Sensors
SENSORS LID SAFETY INTERLOCK The Milk Maker will not operate when the lid is not properly secured on the chamber set. If the lid is opened any time during operation, the unit will automatically stop. When the lid is properly secured, unit will revert back to initial blending time. -
Page 17: Ingredients
Preparing ingredients for the best results. It is not necessary to pre-soak your nuts and seeds to make milk in the Nama M1 Plant- Based Milk Maker. All you need to do is measure your ingredients and add them to the filter basket. -
Page 18: How To Operate
Turn on the power Make sure the spout is switch on the back Note: If the M1 is idle closed before adding of the base. for 15 seconds, the water or liquid. Do not... - Page 19 Press the START button, When blending is Open the spout to blending will begin, and complete, the display release milk for a 0:10 will prompt the user second countdown, the timer will count down. to OPEN SPOUT. then the spin cycle will Note: Press the CANCEL automatically run for button at any time to...
-
Page 20: Tips
TIPS SPOUT CAP Close the lid completely to begin Make sure the spout cap is completely processing. If the lid is opened at any closed before adding ingredients. time during operation, the unit will stop and reset the program back to defaults. SPIN CYCLE PULP STORAGE The spin cycle’s purpose is to remove... -
Page 21: How To Disassemble / Clean
06. AIR DRY OR DRY WITH A CLEAN DISHCLOTH. 07. WHEN CLEANING BASE, USE DAMP CLOTH ONLY. DO NOT RUN BASE UNDER WATER. 08. MAKE SURE THE M1 IS FULLY DRY BEFORE REASSEMBLY. Note: We recommend cleaning immediately after use to prevent any buildup or bad smells. -
Page 22: Troubleshooting
TROUBLESHOOTING We want you to have the best experience with your M1 Milk Maker and are happy to help support you. If you have any questions or issues while using your M1 Milk Maker, you may find solutions on our list of troubleshooting tips below. For additional support, please contact our customer service team at namawell.com/contact. - Page 23 “ERROR SPIN” message will appear on the display. Make sure ingredients are not filled above the maximum fill line. If the problem persists, please contact Nama Customer Service. 06. THE PRODUCT IS VIBRATING DURING OPERATION.
- Page 24 07. UNUSUAL NOISE WHILE BLENDING OR SPINNING • It is normal to hear a variation of noises when product is blending or spinning. If you are concerned, contact Nama Customer Service to help. 08. PULP IS WET • It is normal to experience variations of wetness of pulp with a variety of ingredients.
-
Page 25: Warranty
Registration: Your Nama product is automatically registered for its warranty from the date of purchase, so you do not need to take this extra step. If you need assistance with your Nama product, please contact our support team. Be sure to keep the original order number and email address used to purchase. -
Page 26: Notes
N A M A W E L L . C O M Printed with sustainably sourced materials and soy inks. Please recycle. © 2024 NAMAWELL, LLC. All Rights Reserved. NAMA and the NAMA LOGO are registered trademarks of ADC Solutions Health and Wellness, LLC. ML-MM100-UL_V1...
Need help?
Do you have a question about the M1 and is the answer not in the manual?
Questions and answers