Table of Contents
Advertisement
Quick Links
Advertisement
Table of Contents

Subscribe to Our Youtube Channel
Summary of Contents for RENPHO R-Q004
- Page 1 User Manual Smart Treadmill Model: R-Q004...
-
Page 2: Important Safety Instructions
Special tips: 1. Before installation and operation, please read this user manual carefully. 2. Please save this manual for future reference. 3. Product may vary slightly from the item pictures due to model upgrades. Important Safety Instructions WARNING - Read all instructions before using this treadmill. It is important for your treadmill to receive regular maintenance to prolong its lifespan. - Page 3 Important Electrical Information WARNING! 1)DO NOT use a ground fault circuit interrupt (GFCI) wall outlet with this treadmill. Route the power cord away from any moving part of the treadmill including the elevation mechanism and transport wheels. 2)DO NOT operate treadmill on Generator or UPS power supply. 3)DO NOT remove any cover without first disconnecting AC power.
- Page 4 Warning: Please consult your physician or health professional before starting any workout regime, especially for the user over the age of 35 and/or with once-health issue. We take no responsibility for any troubles or damage due to non-compliance. About the Renpho Smart Treadmill Technical Parameters Model R-Q004 Max.
- Page 5 Assembly Instructions Step 1: Take out the treadmill and lay it on a flat surface.
- Page 6 Step 2: Lift both tubes (A04 & A05) up. Then tighten the D05 M8*55 bolts with B09 5# Allen wrench to fix the tube frames.
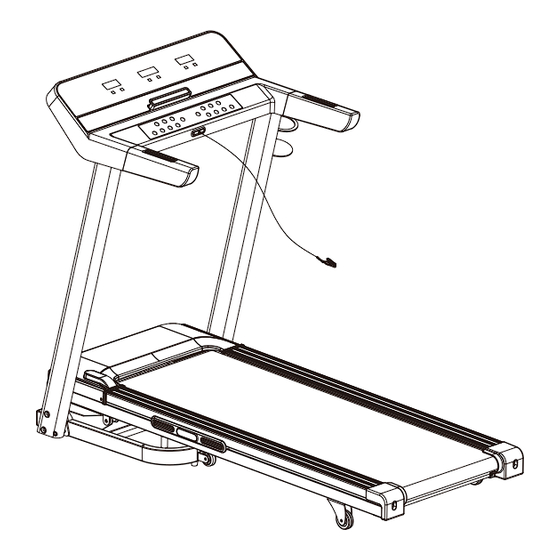
- Page 7 Step 3: Connect the console cable to the corresponding cable in the right tube frame. To install the console, align D24 Φ8 washers with D09 M8*15 bolts to the corresponding holes on the tube frames and then use B09 5# Allen wrench to tight- en them.
- Page 8 Step 4: Install the bottle holder. After you’ve completed the assembly, you may remove the packing belt.
- Page 9 Step 5: Insert the safety key.
- Page 10 Step 6: Remove bolt A and safety block B using B09 #5 Allen wrench...
-
Page 11: Folding & Moving
Folding & Moving Folding To fold the treadmill, lift the running board gently to the maximum until a click is heard. To unfold it, use your foot to lightly push against the “F” point (see image C-1) to unlock the folding mechanism. - Page 12 Moving If you want to move the treadmill, hold both sides of the running board to increase the incline of the treadmill, then use your foot to push the base frame forward through its rollers.
-
Page 13: Important Electrical Information
Important Electrical Information Warning: This treadmill requires a right power source to ensure proper operation. For your safety, as well as the safety of others, please verify that the power source is correct before plugging the equipment. Any incorrect power source could cause significant damage to the equipment and/or user. - Page 14 Operation Guide Power Switch Insert the power plug into the socket and switch on the machine. The treadmill boots with a beep sound and the console enters standby mode (the console will display 0/0:00/0). Safety Key Insert the safety key before use. The treadmill works only when the safety key is insert- ed.
- Page 15 Detailed Instructions Quick Start 1. Insert the safety key and turn on the power switch (the console will enter standby mode and display 0/0:00/0). 2. Press START button, there will be a 3 second countdown with beep sounds and the treadmill will run at the speed of 1km/h (0.6mph). 3.
- Page 16 Preset Program Chart: Section Set time/10 = exercise time of each section (Speed unit: km/h) Program SPEED INCLINE SPEED INCLINE SPEED INCLINE SPEED INCLINE SPEED INCLINE SPEED INCLINE SPEED INCLINE SPEED INCLINE SPEED INCLINE SPEED INCLINE SPEED INCLINE SPEED INCLINE SPEED INCLINE SPEED...
- Page 17 Section Set time/10 = exercise time of each section (Speed unit: mph) Program SPEED INCLINE SPEED INCLINE SPEED INCLINE SPEED INCLINE SPEED INCLINE SPEED INCLINE SPEED INCLINE SPEED INCLINE SPEED INCLINE SPEED INCLINE SPEED INCLINE SPEED INCLINE SPEED INCLINE SPEED INCLINE SPEED INCLINE...
- Page 18 Bluetooth Connection Activate the treadmill, enable Bluetooth on your smart phone, search for SYMK and connect to play your own music on the treadmill. Open the "RENPHO Health" app and connect to R-Q004 via Bluetooth to access smart features and workouts.
- Page 19 APP Instructions 1. Application Download Download and install the free "Renpho Health" App to your smartphone. 2. Register Use email address to register the account and complete the personal information; this information is intended for calculation only. 4. Add device 3.
- Page 20 1. Turn on Bluetooth on your smartphone. 2. Turn on the treadmill. 3. Click the device to connect. R-Q004 5. After paring successfully, it will enter the Home Page as shown. The data will be synchronized with the treadmill.
-
Page 21: Maintenance And Care
Maintenance & Care The following timetable is recommended: Light user (less than 3 hours/week) every six months Medium user (3-5 hours/week) every three months Heavy user (more than 5 hours/week) every two months... - Page 22 Lubrication Reminder Function Upon every 300km (186.4miles) of total running distance, a system beeping alert will sound every 10 seconds and TIME window will display “OIL”. This means that your treadmill needs to be lubricated with oil. Please add oil on both sides of the running board as instructed.
-
Page 23: Troubleshooting
Troubleshooting Problem Possible Cause Suggested Action Not plugged in. Plug cord into outlet. Treadmill does not start Safety Key not inserted. Insert Safety Key. Tighten the adjustment bolts Running belt tension not Running belt on the left and right side of correct on the left or right not centered the rear roller. - Page 24 Possible Cause Suggested Action Problem The incoming voltage is too Restart the treadmill. Check E05: Current low or too high. The control the incoming voltage to overload protec- board is damaged. ensure it is correct. tion (self pro- tecting system) A moving part of the treadmill 1.
-
Page 25: Assembly Parts List
Assembly Parts List 1... - Page 26 Assembly Parts List 2...
-
Page 27: Parts List
Parts List NO. Part Description Remark Part Description Remark Bottom frame Cylindrical cushion Main frame Button Console frame Button+ Right rear cover Button- Cushion Incline handpulse seat Incline frame Speed handpulse seat Front roller Button Acrylic Rear roller Safety key seat shrapnel Left handpulse sheet Right handpulse sheet Bolt... -
Page 28: Warranty Policy
MP3 wire Audio signal input wire Warranty Policy Your RENPHO product purchase is covered by a one-year limited manufacturer warranty from the date of delivery. For warranty terms and conditions, please visit : Note: Product registration is not required for the warranty. If you choose not to... -
Page 29: Customer Service
Customer Service Please feel free to contact us if you have any questions or concerns. RENPHO Cus- tomer Service Team guarantees a quick response and hassle-free solutions to any issue you may have within business hours. : 1(844) 417-0149(US ONLY) -
Page 30: Download The App
Download the App 1. Search Search for "RENPHO Health" on App Store/Google Play or scan the QR code below to download the app. 2. Register Register with your email address and fill in your personal information (this is required for calculating accurate health measurements). - Page 31 3. Signing in Log in with your RENPHO App account. Connect the Treadmill 1. Activate Bluetooth on your smartphone and a pop-up window will appear to allow you to pair your phone with the device.
- Page 32 Alternatively, click “Add device” on the right corner to connect manually. 1. Activate Bluetooth on your smartphone. 2. Power on the treadmill. 3. Click to connect. 2. After pairing successfully, you will be directed to the Home Page and the app will be synchronized with the treadmill.
- Page 33 3. Select the treadmill on the “Device” page to connect for next use. Swipe left and click to delete to disconnect the device. Note: The treadmill can be paired with one device only. If you want to connect the treadmill with another device, please ensure it is disconnected from any prior device.
- Page 34 1.2 The following page will then be shown. 1.2.1 Click to adjust the running speed. 1.2.2 Click to adjust the incline of the running board. 1.2.3 Click to turn on/off the music. Music: You can download and play 3 music tracks within the app or search and connect to SYMK via Bluetooth to play music from your smartphone.
- Page 35 2. Program Running 2.1 Click “Power Course” to select your unning program. There are 15 built-in preset programs tailored for beginners, intermediate and advanced runners.
- Page 36 2.2 After selecting a specific program, set the planned exercise time and confirm the details to start your run.
- Page 37 3. Countdown Running Click “Target Exercise” to begin a countdown run which completes after completing a preset “Distance” (running a set amount of km), “Workout” (running a set amount of time) or “Calories” (burning a set amount of calories). 4. Customized Running 4.1 Click “Create Exercise”...
- Page 38 4.3 Enter the following page and click “Edit” on the right corner. 4.4 Edit each section to your preference then save the data and click Start to run your track.
- Page 39 5. Set Weekly Running Goals Click “setting” on the main page to set your weekly goals. You can also go back to the main page and click “Adjust Goal” to customize the existing plan to fit your desired workout progress.
- Page 40 6. Check Running Progress Click “Total Running Time” on the main page to check your historic running data in a daily, weekly and monthly manner. Select specific data to check every detailed exercise report. Go back to the main page and click to clear the data if desired.
- Page 41 7. Fat Percentage Measurement 7.1 Click the icon on the right corner to enter the page. 7.2 Click “Start measuring” and confirm the personal information. Hold the hand pulse sensors as pictured in the app for a few seconds and the result will be dis- played on the page.
Need help?
Do you have a question about the R-Q004 and is the answer not in the manual?
Questions and answers