
Summary of Contents for RENLICON Out-In-About Box
- Page 1 OUT-IN-ABOUT BOX Instruction Sheet–941 1445 Fortress Street, Chico CA 95973 ● (530) 893-5244 www.Renlicon.com 27 September 2021 REV A...
-
Page 2: Foreword
Thank you for purchasing our Renlicon Out-In-About Box. Please read the following procedures carefully before starting assembly. This instruction sheet provides the necessary information for the assembly of the Renlicon Out-In-About Box. If you find something we missed or require any additional information, please feel free to contact our Customer Service team at (530) 893-5244. -
Page 3: Table Of Contents
Page 3 of _20_ TABLE OF CONTENTS FOREWORD................................. 2 NOTICE ................................. 2 TOOLS & SUPPLIES REQUIREMENTS ......................4 PARTS LIST/DIAGRAM ............................ 5 ASSEMBLY INSTRUCTIONS……………………………………………………………………………...….6 REV A... -
Page 4: Tools & Supplies Requirements
Page 4 of _20_ TOOLS & SUPPLIES REQUIREMENTS Before starting the assembly process, review all assembly instructions. If you have any questions, please contact Renlicon Customer Service at (530) 893-5244. Tool List: 1/16" hex key 1/8” hex key ... -
Page 5: Parts List/Diagram
Page 5 of _20_ PARTS LIST/DIAGRAM Before beginning assembly, verify all parts listed below are included in the installation kit. If there are any missing or damaged parts, please contact Renlicon at (530) 893-5244. Parts List: Base Left Panel Right Panel... -
Page 6: Assembly Instructions
Page 6 of _20_ ASSEMBLY INSTRUCTIONS Box Assembly Starting with the base. [A] Figure 1: Base NOTE: The long side with 18 small holes is the front of the box. REV A... - Page 7 Page 7 of _20_ Bolt left panel [B] to base Bolt right panel [C] to base REV A...
- Page 8 Page 8 of _20_ Bolt top panel [D] to side panels Secure frame Detail View REV A...
- Page 9 Page 9 of _20_ Apply the pre-cut weather stripping, door foam, underneath the lip of the top part of the box. Then apply to the side panels. (Ensure you have completed step 5.) REV A...
- Page 10 Page 10 of _20_ Bolt the handles to the side panels. Install the cable anchor bracket on top of the handle. Face the tab downwards on the front most bolt on the handle as shown on the next page. REV A...
- Page 11 Page 11 of _20_ REV A...
- Page 12 Page 12 of _20_ Install shelf mounting all-thread screw. REV A...
- Page 13 Page 13 of _20_ 10. Bolt back panel [F] to box REV A...
- Page 14 Page 14 of _20_ Slide the shelves onto the previously installed all-thread. This does not require hardware. REV A...
- Page 15 Page 15 of _20_ Secure shelves [G] REV A...
- Page 16 Page 16 of _20_ Install dividers [H] [I] REV A...
- Page 17 Page 17 of _20_ Fasten the door to the base of the box. REV A...
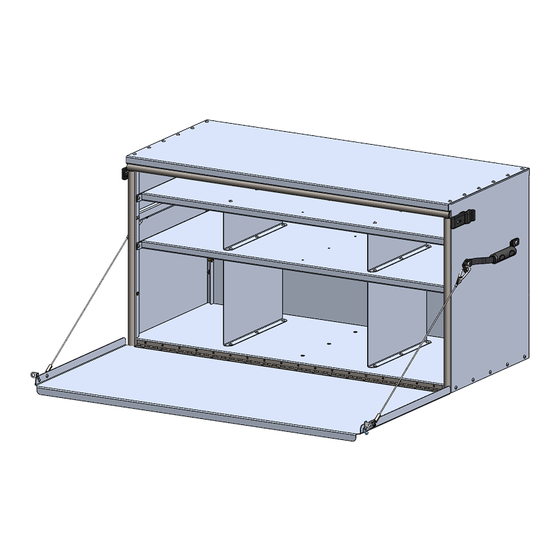
- Page 18 Page 18 of _20_ 15 Attach door cables Leave cable slightly loose for movement REV A...
- Page 19 Page 19 of _20_ REV A...
- Page 20 Page 20 of _20_ Attach the door cables to the anchor point Congratulations, you have completed assembly of your Out-In-About Box! Fill as needed and enjoy! REV A...
Need help?
Do you have a question about the Out-In-About Box and is the answer not in the manual?
Questions and answers