Advertisement
Quick Links
Skydroid C12 User Manual
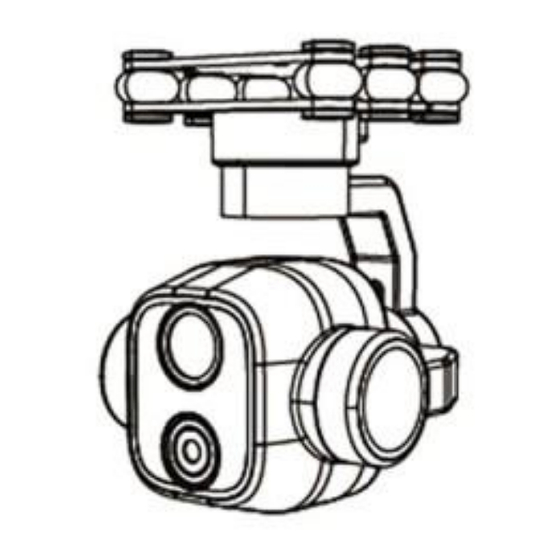
Product introduction:
C12 is a small high-definition dual light gimbal that uses a new generation imaging chip and a high-
definition distortion free camera, with effective pixels reaching 5 million. It has powerful 2K video
recording and photography capabilities, supports digital zoom, and captures clear images anytime,
anywhere, making distant scenery closer to you. Equipped with a high-resolution thermal imaging
camera, it has a wide field
of view, clear images, and can observe various heat sources from a long distance. Using an industrial
grade 3-axis stabilization structure, it significantly reduces image jitter and keeps the image in a
stable state. Can be used in fields such as fire rescue, animal protection, and safety monitoring.
Product packing List
Advertisement

Related Manuals for Skydroid C12

Summary of Contents for Skydroid C12
- Page 1 Skydroid C12 User Manual Product introduction: C12 is a small high-definition dual light gimbal that uses a new generation imaging chip and a high- definition distortion free camera, with effective pixels reaching 5 million. It has powerful 2K video recording and photography capabilities, supports digital zoom, and captures clear images anytime, anywhere, making distant scenery closer to you.
- Page 2 Overview of C12 C12 ports introduction...
- Page 3 Product specifications C12 gimbal parameters Video output signal interface LAN port Control signal input interface LAN port Working voltage 7.2V~72V Working current 210mA Working temperature -10℃~+50℃ Weight ( 117g includes quick disassemble shock absorber plate ) Size ( 62mm(L)*65mm(W)*86mm(H) includes quick disassemble shock absorber plate )...
- Page 4 C12 visible light camera parameters Lens resolution 500万 Focal length f=3.5~4.75mm Aperture F2.0 HFOV / VFOV / DFOV 100° / 52° / 122° Zoom magnification 4x Electron magnification Image transmission resolution 1280*720 Video record resolution 2560*1440 Video storage format Photography resolution...
- Page 5 Frame rate ≤25Hz <10ms Thermal time constant Focal length Aperture F1.0 24.8°*18.7° Pixel spacing 12μm Spectral range 8~14μm Installation and debugging The schematic diagram of the screw hole position and spacing is as follows:...
- Page 6 Note: The screw size used to fix the shock absorber plate is M3 * 8, with a quantity of 4 pieces. When the gimbal is not in use, do not hang it on the drone. Long time suspension will accelerate the deformation of the shock-absorbing ball, leading to a decrease in shock-absorbing effect and jelly phenomenon.
- Page 7 Install the latest version of gimbal FPV software on the remote control and open it. Software download address: http://file.skydroid.xin/SkydroidCameraFPV.apk ① Power on it After the installation of the gimbal is fixed, power on it. Please wait for power on to complete. ② Open the gimbal FPV, select the C12 connection, and click to enter.
- Page 8 ③ Introduction to the homepage of gimbal FPV ④FLY GCS settings APP homepage top left corner →Common settings →Other settings →User interface →Video window →C12 Note: C12 is a dual beam gimbal that requires both video windows to be set...
- Page 9 Parameter settings for C12 Image parameters...
- Page 10 Click on parameter settings →gimbal control, there are target tracking and other three control ways to choose, which can be chosen simultaneously. (Target tracking can be used simultaneously with gesture control). ①C12‘s’ target tracking, after selecting this function, C12 will automatically track the target...
- Page 11 ② Virtual joystick control, which can control C12 tilt through it, and supports one click return to center function. ③ Gesture control, controlling C12 tilt by sliding the screen.
- Page 12 ④ Use remote control channel to control it, using custom remote control channels to control C12, as well as functions such as photography and video recording. (The remote control channel can be viewed and queried through the Remote Control Assistant →Rudder View)
- Page 13 Temperature calibration: Calibrate the temperature of the C20 during use to avoid the inability of C20 due to significant differences between the ambient temperature and the operating temperature of the IMU. Horizontal calibration: Please place the gimbal on a horizontal plane and ensure that it is in a stationary state, and do not touch or shake the gimbal.
- Page 14 Can set the C12 Pro in hoist mode or upside down mode Note:Please place the gimbal correctly according to the working mode. Incorrect placement may cause damage to the gimbal motor. Gimbal speed The control speed of the gimbal includes constant speed mode and variable speed mode.
- Page 15 There are eleven optional imaging effects for adjustable thermal imaging cameras. Setting Encoding Mode You can set the screen to flip, view the camera firmware version, and display OSD. Firmware Upgrade...
- Page 16 Upgradeable the C12 firmware and camera firmware. Please do not power off or exit the upgrade interface during the upgrade process. (When upgrading camera firmware, C12 shall with a TF card inserted) C12 size, angle annotation Due to version evolution and changes in customer requirements, corresponding commands and controls may change.
Need help?
Do you have a question about the C12 and is the answer not in the manual?
Questions and answers