Table of Contents
Advertisement
Quick Links
ROBOTIC MOWER
Robot koszący
Robotic lawn mower
RMP300
S052398699
IPX5
SILENT WORK
<61
RAIN SENSOR
RMC300E20V
RMC500E20V
SECURITY PIN
Uwaga: Przeczytaj uważnie instrukcję obsługi przed użyciem narzędzia
Note: Read the manual carefully before using the device
DIGITAL
AUTOMATIC
DISPLAY
CHARGING AI
TILT/LIFT/
ROLLOVER
SENSOR
1 1 5 5
2 2 7 7
MAX. CLIMBING
EMERGENCY
ANGLE
BRAKING
Advertisement
Table of Contents

Summary of Contents for STALCO RMP300
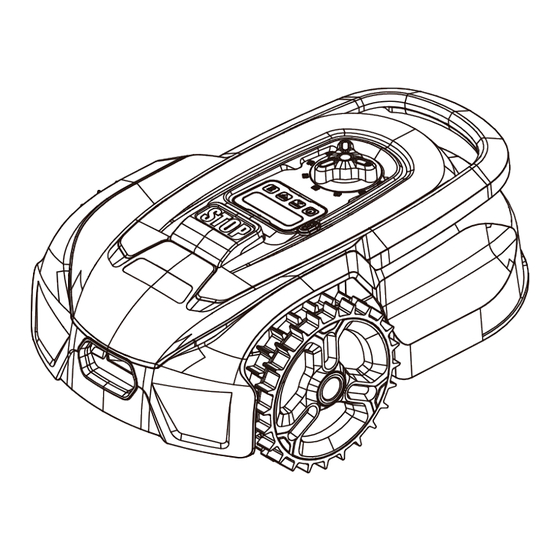
- Page 1 ROBOTIC MOWER Robot koszący Robotic lawn mower RMP300 S052398699 1 1 5 5 2 2 7 7 <61 IPX5 SILENT WORK DIGITAL MAX. CLIMBING RAIN SENSOR EMERGENCY RMC300E20V AUTOMATIC DISPLAY ANGLE BRAKING CHARGING AI RMC500E20V SECURITY PIN TILT/LIFT/ ROLLOVER SENSOR Uwaga: Przeczytaj uważnie instrukcję...
-
Page 2: Table Of Contents
17. Deklaracja zgodności .................................... 20 Schemat i lista części .................................... Uwaga: STALCO Spółka z ograniczoną odpowiedzialnością S.K.A. zastrzega sobie prawo do modyfikacji projektu oraz wyglądu produktów i ich instrukcji obsługi. Przyszłe zmiany w instrukcji użytkowania zostaną opublikowane bez uprzedniego powiadamiania. -
Page 3: Wstęp
Nie dopuszczaj do obsługi osób niezaznajomionych z instrukcją kompetentne. W razie wątpliwości należy skontaktować się z obsługi, dzieci oraz osób o ograniczonych zdolnościach fizycznych Centralnym Serwisem STALCO lub producentem. lub umysłowych. Obowiązujące przepisy mogą ograniczać wiek b. Sprawdzaj dokręcenie nakrętek, śrub i wkrętów, aby zapewnić że operatora. -
Page 4: Dodatkowe Instrukcje Bezpieczeństwa Podczas Użytkowania Elektronarzędzia
ZASADY BEZPIECZEŃSTWA DOTYCZĄCE AKUMULATORA ZAIN- lub wtyczka. Może dojść do porażenia prądem. STALOWANEGO W URZĄDZENIU d. Produkt może być użytkowany jedynie z oryginalnym wyposaże- 1. Nie wolno demontować, otwierać ani ingerować w budowę aku- niem zalecanym przez producenta. mulatora. e. Należy przestrzegać instrukcji i zaleceń producenta dotyczących 2. -
Page 5: Ryzyko Resztkowe
4. Ryzyko resztkowe Przycisk WŁĄCZ/WYŁĄCZ Nawet jeśli robot koszący jest używany zgodnie z przeznaczeniem uwzględniając wskazówki bezpieczeństwa, wciąż istnieje potencjalne ryzyko obrażeń i uszkodzenia urządzenia. Potencjalne zagrożenia mogą wystąpić w przypadku m.in.: Przycisk START/ wybór w górę - stosowania wyposażenia nierekomendowanego przez producenta - nagłego pojawienia się... -
Page 6: Przeznaczenie
Symbole na akumulatorze Symbole na ładowarce Zapoznać się z instrukcją obsługi. Zapoznać się z instrukcją obsługi. Nie wrzucaj baterii do ognia i nie wystawiaj SMPS (zasilacz impulsowy) baterii na działanie źródła ciepła. Nie zanurzać akumulatora w wodzie. Podwójna izolacja. Klasa ochronności II SMPS - odporny na zwarcia zasilacz impul- Symbol recyklingu. -
Page 7: Zakres Dostawy
Kołki do przewodu Zasilacz sieciowy Element dystansowy 11.8 13.8 inch ROBOTIC MOWER Wire pegs Power adapter Distance guide Robot koszący Robotic lawn mower RMP300 S052398699 <61 RMC300E20V IPX5 SILENT WORK RAIN SENSOR AUTOMATIC DIGITAL CHARGING AI DISPLAY RMC500E20V 1 1 5 5... -
Page 8: Pierwsze Użycie
UWAGA! Przed uruchomieniem urządzenia należy je całkowicie złożyć. KOSIARKA Instalacja kosiarki automatycznej jest łatwym zadaniem. Cała procedura nie zajmuje wiele czasu, w zależności od wielkości ogrodu. Film RMC300E20V demonstracyjny dotyczący instalacji można obejrzeć na stronie www.stalco.pl RMC500E20V Installation guide EN... -
Page 9: Dane Techniczne I Poziom Hałasu
9. Dane techniczne i poziom hałasu Model RMP300 DANE TECHNICZNE ROBOTA KOSZĄCEGO Obszar koszenia 300 m2 Napięcie maks. 20 V Prędkość bez obciążenia 3000 obr./min ± 100 obr./min Średnica obszaru koszenia 160 mm Wysokość koszenia 20-50 mm Pozycje wysokości koszenia Maksymalny kąt obszaru roboczego... -
Page 10: Instalacja
*Napięcie mierzone przy braku obciążenia; początkowe napięcie akumulatora osiąga maks. 20 V. Wartość nominalna wynosi 18 woltów. *Nie można uniknąć pewnego poziomu hałasu z urządzenia. Generowanie hałasu może podlegać ograniczeniom zależnie od pory dnia. Należy przestrzegać godzin ciszy nocnej oraz w możliwym stopniu ograniczać czas pracy urządzenia do minimum. W ramach ochrony indywidualnej osób pracujących w pobliżu, należy stosować... - Page 11 1.1 Stację ładującą można umieścić przy schowku ogrodowym lub samym domu; podczas układania przewodu granicznego, przed stacją ładującą należy pozostawić co najmniej 1m prostego odcinka bez przeszkód. UWAGA: Przewód graniczny przed stacją ładującą powinien być położony w prostym odcinku o długości 1m bez załamań i przeszkód, aby zapewnić...
- Page 12 wire, Stripping boundary wire about 10mm the other end, insert the other wire terminal(Black)---it’s an IN side. 2. Instalacja przewodu granicznego (UWAGA) Installation Boundary wire(NOTE) 2.1 When laying the boundary wire, use the distance gauge to keep a 35cm* space 2.1 Podczas układania przewodu granicznego, używając wskaźnika odległości, należy zachować...
- Page 13 2.4 Ensure the boundary wire is perfectly straight in each corner, and all angles formed by the boundary wire are 90°or larger. 2.4 Należy zapewnić, że przewód graniczny jest idealnie prosty w każdym rogu, a wszystkie tworzone przez niego kąty mają 90° lub więcej. >90。...
- Page 14 Zielona dioda świeci się Czerwona dioda miga Zielona dioda miga LED light status illustrate Action Stan diody LED Ilustracja Czynność Confirm that the power cord is connected properly Not turn on There is no power to the charger and that the charger is connected to a Nie włącza się...
- Page 15 WSKAZÓWKI Zalecane jest sprawdzenie poprawności działania kosiarki, szczególnie w miejscach krytycznych takich jak wąskie przejazdy, skarpy, szczeliny. W tym celu należy ustawić kosiarkę za stacją ładowania, pod kątem 90º względem przewodu ograniczającego, a następnie za pomocą przycisku polecić powrót do stacji ładowania. Kosiarka powinna wrócić do stacji ładowania jadąc wzdłuż przewodu ograniczającego. W razie problemu kosiarkę...
- Page 16 to select the number and press to confirm. Then finish the date HOME START to select the number and press to confirm. Then finish the date setting. Ikona ponownie zamiga, a na wyświetlaczu pojawi się liczba oznaczająca datę, na przykład 08.25, co oznacza 25 sierpnia. Gdy miga HOME START setting.
-
Page 17: Uruchamianie I Zatrzymywanie Kosiarki
6.6 Zmiana ustawień domyślnych czujnika deszczu Przytrzymać przycisk przez 3 sekundy, aż na wyświetlaczu pojawi się „ „. Nacisnąć przycisk , aby otworzyć interfejs konfiguracji. Następnie na wyświetlaczu pojawi się „ „ lub „ „; można wówczas zmienić ustawienia, naciskając przycisk , a następnie potwierdzając. -
Page 18: Komunikaty I Błędy Oraz Lista Samodiagnostyki
12. Komunikaty i błędy oraz lista samodiagnostyki Błąd Ilustracja Czynność Kosiarka poza 1. Sprawdzić, czy kosiarka znajduje się w obrębie obszaru roboczego. obszarem roboczym 2. Sprawdzić, czy stacja ładująca jest prawidłowo podłączona do ładowarki, a ładowarka do odpowiedniego zasilacza; jeśli są prawidłowo podłączone, możliwe, że przewody graniczne zostały nieprawidłowo podłączone i należy je zamienić. -
Page 19: Aktualizacja Oprogramowania
Aktualizacja przez USB. Instrukcje pobierania i instalacji oprogramowania przedstawiono poniżej: 1. Znaleźć najnowszą wersję oprogramowania na stronie: www.stalco.pl. Zapisać plik na pustym nośniku USB sformatowanym w systemie FAT32. Usunąć wszelkie inne pliki z pamięci i sprawdzić format plików. Jeśli pamięć nie jest sformatowana w systemie FAT32, należy ją sformatować. -
Page 20: Gwarancja
Uszkodzenia wynikające z normalnego zużycia, przeciążenia, niewłaściwego użytkowania lub przechowywania nie podlegają gwarancji. W przypadku reklamacji należy wysłać urządzenie w stanie całkowicie zmontowanym do sprzedawcy lub Serwisu Gwarancyjnego STALCO. Szcze- gółowe warunki gwarancji znajdują się w Karcie Gwarancyjnej dostarczonej wraz z urządzeniem. - Page 21 version English...
- Page 22 Diagram and parts list ..................................40 Note: STALCO Spółka z ograniczoną odpowiedzialnością S.K.A. reserves the right to modify the design and appearance of the products and the contents of product manuals. Future changes to the manuals will be published without prior notice.
-
Page 23: Introduction
Maintenance may be performed by trained and competent WARNING: Read all safety and operating instructions. Fa- persons. In case of doubt, contact the STALCO Central Service or ilure to follow the warnings and instructions can result in the manufacturer. -
Page 24: Additional Safety Instructions When Using A Device
5. In the event of battery leaking, do not allow the liquid to come warranty. into contact with the skin or eyes. If contact has been made, wash The power cords and extension cord must be kept outside the work the affected area with copious amounts of water and seek medical area to avoid damaging them. -
Page 25: Safety Symbols
5. Safety symbols OK button to confirm the selection The characters shown below are displayed on the device. Please read them carefully. Date and time setting WARNING: Read the user instructions before operating the product. European conformity mark. See the Declaration of Conformity for detailed information. -
Page 26: Designation
Symbols on the charger SMPS(Switch mode power supply unit) Read the user instructions before incorporating a short-circuit-proof safety operating the product. isolating switching power supply. Do not dispose of power tools, accessories SMPS(Switch mode power supply unit) and batteries with household waste. Used power tools should be collected separately and sent to an environmentally friendly recycling facility. -
Page 27: Delivery Range
Pins for the cable AC adapter Spacer 11.8 13.8 inch ROBOTIC MOWER Wire pegs Robot koszący Power adapter Distance guide Robotic lawn mower RMP300 S052398699 <61 RMC300E20V IPX5 SILENT WORK RAIN SENSOR AUTOMATIC DIGITAL CHARGING AI DISPLAY RMC500E20V 1 1 5 5... -
Page 28: First Time Use
ATTENTION! Before putting the device into operation, it must be completely assembled. LAWNMOWER Installing a robotic lawnmower is an easy task. The entire procedure does not take long, depending on the size of the garden. A demonstration film on the installation can be viewed at www.stalco.pl RMC300E20V RMC500E20V... -
Page 29: Technical Data And Noise Level
9. Technical data and noise level Model RMP300 TECHNICAL DATA OF THE ROBOTIC MOWER Mowing area 300 m2 Voltage max. 20 V No load speed 3000 rpm ± 100 rpm Mowing area diameter 160 mm Cutting height 20-50 mm Cutting height positions Maximum angle of the working area 15 °... -
Page 30: Installation
* Voltage measured with no load; the initial battery voltage is max. 20 volts. Nominal value is 18 volts. * A certain level of noise from the device cannot be avoided. The noise generation may be restricted depending on the time of day. The hours of curfew should be respected and the operating time should be kept to a minimum as much as possible. - Page 31 1.1 The charging station can be placed next to the garden shed or the house itself; when laying the boundary wire, leave at least 1m straight section unobstructed in front of the charging station. NOTE: The boundary wire in front of the charging station should be placed in a straight 1m length without kinks or obstacles to ensure that the device is properly docked.
- Page 32 wire, Stripping boundary wire about 10mm the other end, insert the other wire terminal(Black)---it’s an IN side. 2. Installation of the boundary wire (NOTE) Installation Boundary wire(NOTE) 2.1 When laying the boundary wire, use the distance gauge to keep a 35cm* space 2.1 When laying the boundary wire, use the distance indicator to keep a distance of 35 cm * between the boundary wire and the perimeter.
- Page 33 2.4 Ensure the boundary wire is perfectly straight in each corner, and all angles formed by the boundary wire are 90°or larger. 2.4 It should be ensured that the boundary wire is perfectly straight at every corner and that all angles it forms are 90 ° or more. >90。...
-
Page 34: Test The Installation
LED light status illustrate Action LED light status Illustration Action Confirm that the power cord is connected properly Not turn on There is no power to the charger and that the charger is connected to a Not turn on There is no power Confirm that the power cord is connected properly to the suitable power supply. - Page 35 TIPS It is recommended to check the correctness of the mower operation, especially in critical places such as narrow passages, slopes, gaps. To do this, position the mower behind the landing station at an angle of 90º to the boundary wire and then press the button recommend a return to the charging station.
- Page 36 to select the number and press to confirm. Then finish the date to select the number and press to confirm. Then finish the date HOME HOME START START setting. setting. Meanwhile, the icon will flash and the time will be displayed, for example, 13:25 Meanwhile, the icon will flash and the time will be displayed, for example, 13:25 Icon...
-
Page 37: Starting And Stopping The Mower
11. Starting and stopping the mower STARTING The product must be fully assembled before use. Check the electric cable frequently for damage. During the inspection, the electric cable should be disconnected from the mains. The arrow on the knob for cutting height adjustment points to the numbers outside the knob. The currently set altitude can be read. STOPPING THE MOWER To stop the mower, press the STOP button. -
Page 38: Software Update
USB update. Instructions for downloading and installing the software are provided below: (1) Find the latest version of the software on the website: www.stalco.pl. Save the file to an empty FAT32 formatted USB device. Delete any other files from memory and check the file format. If the memory is not FAT32 formatted, please format it. -
Page 39: Warranty
It is important to ensure that the blade is securely the STALCO Warranty Service. Detailed warranty conditions can be fastened and that the blade disc is balanced. Failure to use new bolts found in the Warranty Card delivered with the device. -
Page 40: Diagram And Parts List
MODEL: RMP300 S052398699... - Page 41 Nr./No. Nazwa części Part name Czujnik deszczu Rain sensor Zestaw pokrywy dekoracyjnej Decorative cover assembly Etykieta Label Górny zespół pokrywy Upper cover assembly Pasek uszczelniający Saling strip Pasek uszczelniający 2 Sealing strip 2 Przewód płyty głównej Mainboard cable Płytka dociskowa czujnika Sensor pressing plate Zespół...
Need help?
Do you have a question about the RMP300 and is the answer not in the manual?
Questions and answers