
Related Manuals for Konwin GD9315BCW-A6J


Summary of Contents for Konwin GD9315BCW-A6J
- Page 1 INFRARED ZONE HEATING SYSTEM OWNER’S MANUAL Model No. GD9315BCW-A6J PLEASE SAVE THESE INSTRUCTIONS WARNING: READ THIS OWNER’S MANUAL CAREFULLY BEFORE USE.
- Page 2 Thank you for choosing a Konwin Convection Heater. This owner’s manual will provide you with valuable information necessary for the proper care and maintenance of your new product. Please take a few moments to thoroughly read the instructions and familiarize yourself with all the operational aspects of your new heater.
-
Page 3: Important Safety Instructions
IMPORTANT SAFETY INSTRUCTIONS READ AND UNDERSTAND ALL INSTRUCTIONS, SAFETY WARNINGS, BEFORE USING THE HEATER WARNING! ! POTENTIAL FOR ELECTRICAL HAZARD IF NOT ADHERED TO! When using electrical appliances, basic precautions should always be followed to reduce the risk of fire, electric shock, and injury to persons, including the following: 1. - Page 4 11. A heater has hot and arcing or sparking parts inside. DO NOT use in areas where gasoline, paint, explosive and/or flammable liquids are used or stored. Keep unit away from heated surfaces and open flames. 12. Always plug heaters directly into a wall outlet receptacle. Never use with an extension cord or relocatable power tap (outlet/power strip).
-
Page 5: Specifications
SPECIFICATIONS Voltage Rating 120 V (60Hz) Power Consumption 1500W Unit Size 13.9 in. (W) x 17.2in. (D) x 17.3 in. (H) Unit Weight 25 lbs SAFETY FEATURES Tip-Over Safety Feature This heater is equipped with a tip-over safety feature. Once the heater is tipped over, an internal switch will automatically shut the heater off. -
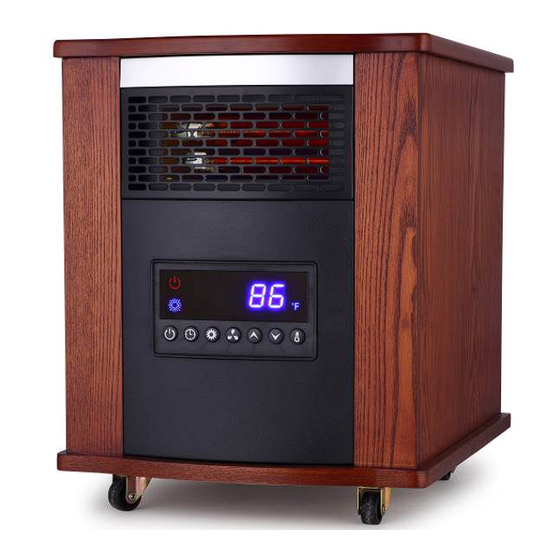
Page 6: Product Diagram
IN THE BOX ·INFRARED ZONE HEATING SYSTEM ·REMOTE CONTROL(2 AAA batteries not Included) ·INSTRUCTION BOOKLET PRODUCT DIAGRAM Remote Control Air Intake Temp Sensor Cord Clamp Air Outlet Wooden Cabinet Control Panel Power Switch Wheels... - Page 7 Control Panel 1、Power indication Light:Indicate when the unit connects to power supply. 2、Timer indication light:The light’s on when timer functions. 3、Fan indicator light: The light’s on when cooling fan functions. 4、Signal-receiving window: For receiving remote control signal. 5、Digital display:Indicate set room temperature or time value according to the timer. 6、Celsius indicating light 7、High mode indication light: The light’s on when in high mode.
- Page 8 Remote Control Fan button: For select fan mode. Mode button: Used for mode selection Temp up button: To make set temperature rise Temp down button: To make set temperature decline ON/OFF button: Used for power-on or power-off ℃/℉button : Button for alternating between Fahrenheit and Celsius. Timer button: Used for setting timer and adjust time value of timing PREPARATION Place the heater on a firm, level surface and plug into a grounded 120V 60Hz power outlet.
- Page 9 Select a heat Mode. Press the MODE button to toggle between the three heat settings. High Mode uses 1500W; Low Mode uses 1000W. ECO mode is an Economic Energy Saving Function. When ECO mode is chosen, the heater will set the temperature automatically to 68℉...
- Page 10 The digital display changes from the “temperature” to the “hours” option for the timer. Continue to press the timer button to change the number of hours you would like the heater to run before powering itself off. The hour options for the timer are from 0 to 12 hrs.
-
Page 11: Maintenance
6、 Select fan function mode Select the fan function mode by turn the “Fan” button on the heater’s control panel or the remote. MAINTENANCE 1. Turn off the power switch in the rear of the unit. 2. Unplug the unit and let it cool completely. 3. -
Page 12: Basic Troubleshooting
PUSH Battery STORAGE Store the heater in a cool, dry location when not in use. To prevent dust and dirt build-up, use the original packaging to repack the unit. BASIC TROUBLESHOOTING If the heater will not operate, please check the following before seeking repair advice: 1. -
Page 13: Limited Manufacturer Warranty
This limited warranty applies to products manufactured or distributed by the Konwin T brand name, are delivered in the continental United States, and extends to the original purchaser, or gift recipient. This warranty becomes valid at the time of purchase and terminates either by the specified time frame listed above and/or owner transfer (unless otherwise authorized by Konwin, as the manufacturer). -
Page 14: Customer Service And Support
72 hours with an answer or resolution. If after speaking with Konwin Technical Support, it is determined by one of our agents that your unit may need to be sent in to us to be evaluated/repaired, our representative will provide you with a reference number and provide you with details on how to send in your unit for repair.
Need help?
Do you have a question about the GD9315BCW-A6J and is the answer not in the manual?
Questions and answers