Advertisement
Quick Links
C
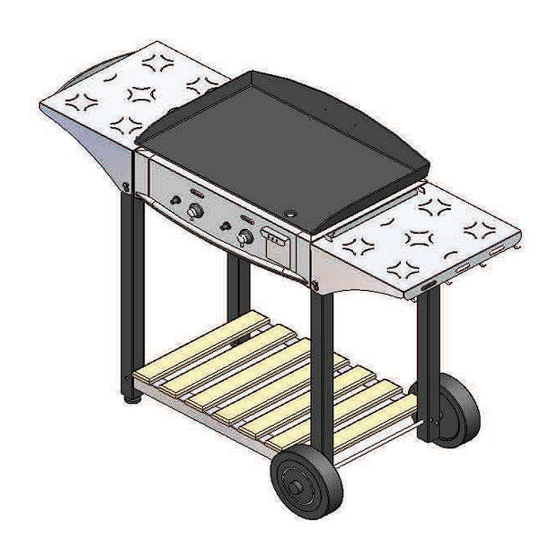
Stecken Sie die Radachse (Abb. 19) in die Löcher der Beine, montieren Sie die Räder (Abb. 20)
wie unten angegeben. Verwenden Sie einen Schraubenzieher, um die Anschlagscheiben (Abb. 8)
zu montieren.
Insert the wheel axle (pic 19) into the holes in the feet and fit the wheels (pic 20) as shown
below. Use a screwdriver to fit the stop discs (pic 8).
20
9
8
D
Entfernen Sie die 4 Füße der Plancha und die 4 umliegenden Schrauben. Legen Sie die Plancha
auf die Ablage der Tischbein-Distanzstücke und befestigen Sie diese mit den 4 Schrauben, die
Sie vorher herausgedreht haben.
Remove the 4 feet of the plancha and the 4 surrounding screws. Place the plancha on the table
leg spacer tray and secure it with the 4 screws that you unscrewed earlier.
19
7
E
Setzen Sie das Zubehör-Tablett (Abb. 17) ein, indem Sie die Seitenteile des Tabletts leicht
ausbreiten und vorsichtig (Abb. 6) in die Schlitze schieben.
Insert the accessory tray (pic 17) by slightly spreading out the
sides of the tray and carefully sliding them into the slots (pic 6).
Justierung: Nehmen Sie das Zubehör-Tablett heraus, lösen Sie die Hutmuttern (Abb. 5) und
verschieben Sie die Distanzstücke wie unten angegeben. Ziehen Sie die die Hutmuttern (Abb. 5)
wieder an.
Adjustment: Remove the accessory tray, loosen the cap nuts (pic 5) and move the spacers as
indicated below. Tighten the cap nuts (pic 5) again.
F
Schrauben Sie den Griff (Abb. 21) auf das Seiten-Tablett (Abb. 18) und montieren Sie es auf
die gleiche Weise wie das Zubehör-Tablett (Abb. 17).
Screw the handle (pic 21) onto the side tray (pic 18)
and fit it in the same way as the accessory tray (pic 17).
18
21
5
10
17
Advertisement

Related Manuals for Biber 542465


Summary of Contents for Biber 542465
- Page 1 Stecken Sie die Radachse (Abb. 19) in die Löcher der Beine, montieren Sie die Räder (Abb. 20) Setzen Sie das Zubehör-Tablett (Abb. 17) ein, indem Sie die Seitenteile des Tabletts leicht wie unten angegeben. Verwenden Sie einen Schraubenzieher, um die Anschlagscheiben (Abb. 8) ausbreiten und vorsichtig (Abb.
- Page 2 Lieferumfang/delivery Montage des Grilltisches/ Assembling the table grill Legen Sie das Tablett (Abb. 13) auf eine rutschfeste Unterlage und montieren Sie drei der vier Tischchbeine (Abb. 14/15). Vorsicht: Achten Sie darauf, dass Sie jeweils die beiden gleichen Innensechs- Tischbeine auf einer Seite montieren. Stellen Sie das Tablett (Abb. 13) nun auf die 3 Tischbeine und kantschraube/ Hexagon socket Unterlegscheibe/...
Need help?
Do you have a question about the 542465 and is the answer not in the manual?
Questions and answers