Table of Contents

Related Manuals for mavili MAXLOGIC ML-322

Summary of Contents for mavili MAXLOGIC ML-322
- Page 1 2831 EN 54-2:1997+A1:2006 DOP.23073101 EN 54-4:1997+A1:2002 +A2:2006 EN 12094-1:2003 926n/01 COMMISSIONING, OPERATING AND MAINTENANCE MANUAL MODEL: MAXLOGIC SERIES ML-322 SUB MODEL: CONVENTIONAL FIRE EXTINGUISHING CONTROL PANEL...
-
Page 2: Table Of Contents
1. CONTENTS: 2. LIST OF FIGURES ..................................................3 3. LIST OF TABLES ..................................................3 4. INTRODUCTION ..................................................4 5. TEST AND COMMISSIONING STEPS..........................................4 Please consider the followings during system design....................................4 Describe inputs/outputs on the panel..........................................4 Install equipment with making connections........................................4 Install panel.....................................................4 Program Scenarios (if available)............................................4 Start up the panel...................................................4 6. -
Page 3: List Of Figures
18.1 To do list for service personnel........................................37 19. USER CONTROLS AND FUNCTIONS.........................................38 20. EXTINGUISHING STATUS INDICATOR UNIT......................................41 21. OPERATIONS ON THE PERIODIC MAINTENANCE....................................42 ANNEX – ML-321 SERIES PANEL STRUCTURE........................................44 ANNEX – ML-322 SERIES PANEL STRUCTURE.........................................45 ANNEX - LCD MESSAGES................................................46 ANNEX - 2ND ACCESS LEVEL MENU STRUCTURE......................................53 ANNEX - 3RD ACCESS LEVEL MENU STRUCTURE......................................54 ANNEX - De�initions of the Terms............................................57 ANNEX - Abbreviations................................................57... -
Page 4: Introduction
Manufacturer Firm: MAVILI ELEKTRONIK TICARET VE SANAYI A.S. Address: SERIFALI MAHALLESI, KUTUP SOKAK NO: 27/1-2-4 UMRANIYE / ISTANBUL / TURKEY TEL: +90 216 466 45 05 FAX: +90 216 466 45 10 Web: www.mavili.com.tr Authorized Service Title, Address Details Authorized Service: TEKSIS TEKNIK ELEKTRONIK SIS. TIC. VE SAN. A.S. -
Page 5: General Descriptions
6.2.4 MLY-3202 Maxlogic ML-322 conv. extinguishing panel.back. MainBoard Main board that is used on ML-322 series panel s. 6.2.5 MLY-3203 Maxlogic ML-322 conv.panel.back.TR Front side Metallic Main Board Metallic mounted front side serigraphy of the main board that is used on ML-322 series panels. -
Page 6: Functional Specifications
7. FUNCTIONAL SPECIFICATIONS One flooding zone exists in Maxlogic ML-322 Conventional Fire Extinguishing Panel. These series have 4 conventional zone inputs. Max. 32 detector and button can be connected to each zone. Panel has power supply, automatic battery charge and control circuits. Fire and fault events are shown by different LEDs. -
Page 7: Optional Conditions That Is Provided According To En 12094-1
7.2 Optional conditions that is provided according to EN 12094-1 Description 4.17 Delaying the fire extinguishing signal 4.18 Signal that represent the extinguishing matter flowing 4.19 Component status monitoring 4.20 Emergency stop device 4.21 Covering time control 4.23 Only manual mode 4.26 Correct trigger signal to devices that located out of system 4.30... -
Page 8: Fire Extinguishing Panel Installation Steps
8.2.1 Fire extinguishing panel installation steps The mounting location must be easily accessible, does not effected any vibration, clean and dry area. Panel must be installed on a flat surface and the indicators must be on the eye level. Panel does not being installed inside another cabin or high temperature source. Remove panel from the box properly, and place it to a flat surface. -
Page 9: Zones' Commissioning
9.4.2 Zones’ commissioning 1. Shut down the panel. 2. Check 6K8 values end of line resistance at the end of the zone line. 3. Panel’s zone line’s polarization must be controlled and zone line input should be connected. 4. Energized the panel, fix any of the short or open circuit condition. 5. -
Page 10: Optional Card Features
18. Extinguishing display tripod 24. 2nd level sounder output’s nail 19. Fault relay’s nail group group 20. Fire relay’s nail group 25. External buzzer 21. Gas activate output’s nail group 26. Lithium battery, to keep event logs 22. Sounder 2 output’s nail group and real time clock’s continuity 23. -
Page 11: Ml-3202 Extension Card And Ml-3203 Network Card Connection To The Panel
11.3 ML-3202 Extension Card and ML-3203 Network Card Connection to the Panel - Make the connection from ML-322 panel network port to ML-3203 (with 10 2 connectors and 15 cm flat cable), from the extension port to ML-3202 (with 20 2 connectors and 15 cm flat cable) as follows. 24V DC EXT.O EXT.S... -
Page 12: Ml-3203 Network Card To Ml-3313 Status Display Unit Connection
11.4 ML-3203 Network Card to ML-3313 Status Display Unit Connection - Connect ML-322 extinguishing panel and ML-3313 extinguishing status indicator unit as given below. 24V DC Output 24V DC EXT.O EXT.S Sounder 1 Sounder 1 GAS R Fire R Fault R Mode R Hold R Hold... -
Page 13: Con�Iguration Procedures For Ml-3202 Extension Card
11.5 Configuration Procedures for ML-3202 Extension Card - Make the connection between ML-322 panel and computer as given below. ADAM-4562 ML-3610 Ex Manager Software ML-0920 Communication Cable 24V DC EXT.O EXT.S Sounder 1 Sounder 1 GAS R Fire R Fault R Mode R Hold R Hold... -
Page 14: Compatible Site Devices List
12. COMPATIBLE SITE DEVICES LIST Material Code Material Description ML-2710.MR Maxlogic extinguishant manual release button ML-2710.ES Maxlogic extinguishant emergency stop button MG-2100 MaviGard Conventional photo-electric smoke detector, white MG-2300 MaviGard Conventional combined heat detector, white MG-2400 MaviGard Conventional fixed heat detector, white MG-2500 MaviGard Conventional multi sensor detector (photo-electric smoke+heat), white MG-3500... -
Page 15: Menu Operations
13. MENU OPERATIONS 13.1. 2 ND ACCESS LEVEL (USER FUNCTIONS) During the normal operation mode, panel menu is at 1st access level. To pass 2nd access level: • “Key Lock” switch, should be switched to “Open” position. • “Enter” button should be pressed to enter menu screen. •... - Page 16 • “Disable” option should be selected by pressing “Right Arrow” • Adjustments should be installed by pressing “Enter” button When the fault relay output has been disabled, “Disable” LED illuminates. “Enable” option should be selected to enable fault relay output on the same menu.
- Page 17 • “Disable” option should be selected by pressing “Right Arrow” • Adjustments should be installed by pressing “Enter” button When Zone 2 switched to test operation mode , “Test enable” and “Zone 2 Fault” LED’s are permanently illuminated. “Disable” option should be selected to disable the test mode of Zone 2 on the same menu.
- Page 18 13.2. 3 RD ACCESS LEVEL (ENGINEERING FUNCTIONS) There is engineering level functions on the 3rd access level. To pass 3rd access level: • “3rd Access Level” menu on 2nd access level should be selected by arrow buttons. • “Enter” button should be pressed to enter password screen. •...
- Page 19 13.2.6. Delaying Zone 4 Input Fire alarm warning detections from panel’s Zone 4 input can be delayed as 30 seconds. • “Zone 4 Delay” menu screen should be chosen at 3rd access level. • “Enter” button should be pressed to enter menu screen •...
- Page 20 input has not been trigged. If it is trigged, “Gas Output Activated” LED is permanently illuminated and “Gas Activated” output has been activated. This feature can be enabled by the following steps: • “Unsuccessful Ext. Detected” menu screen should be chosen at 3rd access level. •...
- Page 21 If delay origin has been selected as call point or detector, the alarm resistance of the manual call point must be 270Ω. “No Delay” feature must be selected if sounder delay on Zone 3 is not being processed. 13.2.18. Determining Delay Source of the Zone 4 for First Level Sounder Output Delay origin should be selected to perform delay operation at Zone 4.
- Page 22 13.2.24. Printing Event Logs Panel’s event logs can be transmitted from RS-232 port if requested. Event logs which are received from RS-232 port can be printed by printer or displayed on PC program. To print event logs: • “Print Event Log” menu screen should be chosen at 3rd access level. •...
-
Page 23: Promgramming Panel Inputs/Outputs (Exmanager)
14. PROGRAMMING PANEL INPUTS/OUTPUTS (EXMANAGER) Ex manager is an improved computer software for assigning the different input/output functions to ML 322 Fire Extinguishing System Series. 14.1 MENUS New: It is used for creating a new configuration file with required features. Open: It is used for opening the previously saved configuration file whose extension is *.excm. -
Page 24: Input And Output Settings
Keeping the site versions in .exmc file Configuration files are saved as files with .exmc extensions. When the files are opened via making the extension of related configuration file into *.zip, site versions can be seen. Note: Every version file must be saved in different names with using “Save As” Menu for accessing the site versions afterwards. 14.3 INPUT AND OUTPUT SETTINGS Different input/output functions can be assigned to panel via PC software. - Page 25 Figure 5 - Selecting supervise condition of the fault relay output as “No” Example: The adjustment has been shown in 19th fault relay of “Figure-2 Fire extinguishing panel main board rear view” for energized output. J18,J21,J22 J17,J19,J20 J14,J15,J16 J6,J10,J11 Figure 6 - Fault relay output jumper group is connected - Output is energized Figure 7 - Selecting supervise condition of the fault relay output as “Yes”...
- Page 26 14.3.1. The Other Input Functions which can be Assigned to the Panel 14.3.1.1. "Abort" Input This input is used to abort extinguishing process during the countdown. Extingushing is aborted by triggering this input. Extinguishing is aborted if “abort” input is triggered or if there is fault on abort input, before the "Releasing condition" is provided. In order to disappear "aborting condition", panel should be reset, after the "Abort"...
- Page 27 14.3.2.7. Extinguishing Cancel Output When extinguishing has been cancelled Any other cases 14.3.2.8. Manuel Extinguishing Activated Output When “Start extinguishing” input has been activated condition Any other cases 14.3.2.9. Alarm Relay Fire Any other cases 14.3.2.10. Only Manuel Mode Activated Output When “Only Manuel”...
-
Page 28: Programmable Relay
14.3.2.21. Gas Blocked Output When “Gas blocked” input has been activated condition Any other cases 14.3.2.22. First Level Output “Pre-operation condition” “Operation condition” “Extinguishing Delay Condition” “Extinguishing Release Condition” “Post-extinguishing condition” “Unpredictable release condition” Any other cases 14.3.2.23. Programmable Relay Programmable relay’s condition and activity condition can be programmed at PC software. - Page 29 The configuration settings of the panel which are configured by Ex Manager can be printed. “File” and “Print” options should be clicked in sequence as shown below for this. After clicking the “Print” option, the print preview screen appears as shown below. From this field, the file can be saved or printed by selecting a valid printer.
-
Page 30: Battery Capacity Calculation
15. BATTERY CAPACITY CALCULATION This section contains the time calculations depend on the used load condition when main network’s supplied power is cut out for fault and alarm condition. 1. Ipanel_fault : It is the maximum measured current value on fault condition when there is no main network supply. During this value is measured, sounder outputs, 24 output, and printer output does not connected. -
Page 31: Panel Input/Output Connections
16. PANEL INPUT/OUTPUT CONNECTIONS 16.1 Reserve 24V output 24V DC Figure 8 - Reserve 24V DC output 24V DC 250 mA external power supply output is available. Exceeding this level may cause panels fault messages. This output can be used for external devices’... -
Page 32: Sounder Outputs
16.3 Sounder outputs "Release Condition" Any other cases + - + - - + - End of line resistor 10kΩ S1 * * 2SS connections are the same as S1 and S2 connection. Figure 12 - Sounder Outputs There are 2 pcs. of 24V DC 250mA first level sounder output, 1 pc. of 24V DC 250mA second level sounder output on the panel. Normally, there is a 16V DC negative voltage on the sounder outputs to control sounder line’s short/open circuit conditions. -
Page 33: Gas Activated Output
16.4 Gas Activated Output GAS R Figure 14 - Gas activated output When “Gas Activated” input has been trigged, “Gas Activated” output has been activated. There is no any “Gas Activated” input on the panel as default. This function can be assigned via panel’s main board or ML-3202 expansion card with PC software if requested. “Gas Activated” output’s condition depends on the selected feature from “Unsuccessful Ext. -
Page 34: Detection Zone Lines
16.6 Detection zone lines 0 - 500 m : 1x2x0,8+0,8JH(st)H 500 - 1500 m : 1x2x1,5+1,5JH(st)H Last detector of the zone . . . MG-2X00 MG-2X00 MG-2X00 * End of line resistor Z1 * * Z1 connections are the same as Z2, Z3 and Z4 connection. 0 - 500 m : 1x2x0,8+0,8JH(st)H 500 - 1500 m : 1x2x1,5+1,5JH(st)H... -
Page 35: Reset Input
16.8 Reset input Flow S Figure 19 - Flow Switch Input “Flow Switch” active the following outputs when the input is active. • Extinguishing Process Active LED • Gas Output Active LED • Flow Switch LED • Level 2 Sounder •... -
Page 36: Extinguishing Condition Switch Input
16.11 Extinguishing condition switch input Mode S Figure 22 - Extinguishing condition switch input This input has been used to select extinguishing mode remotely. Mode selection operation has been performed by extinguishing switch on the panel or “Extinguishing condition switch” input. The dominant mode is “Only Manual”... -
Page 37: System Fault Condition
Extinguishing delay condition After function condition has been completed, it is the condition when extinguishing delay countdown has been initiating. At this condition, countdown operation on the panel has been displayed on LCD screen. Release condition After countdown has been completed, it is the condition when “Extinguishing Delay Condition” has been completed. At this condition extinguishing output has been activated and extinguisher material has been released. -
Page 38: User Controls And Functions
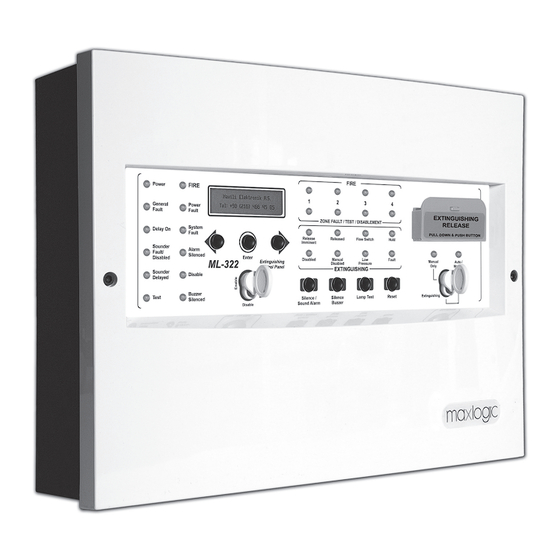
19. USER CONTROLS AND FUNCTIONS 24V DC EXT.O EXT.S Sounder 1 Sounder 1 GAS R Fire R Fault R Mode R Hold R Hold Flow S Man.R Low Pr Mode S FIRE Power FIRE General Power EXTINGUISHING Fault Fault ZONE FAULT / TEST / DIABLEMENT RELEASE PULL DOWN &... - Page 39 NAME 0.25s ON, 0.25s OFF “Activity condition” “Pro-activity condition” “Extinguishing Delay condition” “Release condition” Any other cases Release Imminent During extinguishing disabled and “Released “After extinguishing condition” condition” has been satisfied “Unpredicted Released condition” During extinguishing “Released condition” (1) disabled and “Released condition”...
- Page 40 19.2 CONTROL BUTTONS Enable Key “Enable key” should be ON to use “Silence / Sound Alarm” and “Reset” buttons on the panel and to enter panel’s menu. When “Enable key” is ON, panel’s buzzer sounds intermittently along 8 seconds. Silence / Sound Alarm If this button has been pressed when there is a fire alarm on the system, sounders have been silenced, “Alarm Relay”...
-
Page 41: Extinguishing Status Indicator Unit
20. EXTINGUISHING STATUS INDICATOR UNIT Status indicator units have been allowed to carry the indicators and controllers on ML-322 extinguishing panel to a different location. This unit operates by 24V DC supplied voltage and communicates with fire extinguishing panel via network card. The connection between panel and extinguishing panel’s network card has been performed by main card’s network socket. -
Page 42: Operations On The Periodic Maintenance
21. OPERATIONS ON THE PERIODIC MAINTENANCE Periodic maintenance operations must be done by qualified technical personal within 6 months periods to provide the continuity of the proper operation of fire alarm panel and detection systems. The periodic controls of the fire detection and alarm system includes the followings; 1. -
Page 43: Warning Signs
• This product should be stored as packed on indoor areas. • Storing ambient temperature should be (-30°C) to (+60°C) and relative humidity should not be exceed %95 as uncondensed. • Product’s transportation can be performed as packed by train, road, ship and air vehicles. •... -
Page 44: Annex - Ml-321 Series Panel Structure
KK-642.041 Rev.No:21 19.01.24 ML-322 User Manual Page 44/60... -
Page 45: Annex - Ml-322 Series Panel Structure
KK-642.041 Rev.No:21 19.01.24 ML-322 User Manual Page 45/60... -
Page 46: Annex - Lcd Messages
ANNEX - LCD MESSAGES LCD abbreviation definition: IN: Input PNL: Panel OUT: Output NT: Network Determine which input/output. (If “NT” statement has been displayed on the 1st part, it shows the event source’s address.) FRE: Fire ACT: Active FLT: Fault WRN: Warning I N 0 3 F L T 0 0 3 / 0 0 5... - Page 47 2.1.3 Delay input short circuit fault 2.1.2 Open circuit fault G R 0 5 0 0 1 / 0 0 1 G R 0 4 0 0 1 / 0 0 1 F a u l t F a u l t [Input] key is pressed, the following screen;...
- Page 48 2.2. Output fault messages 2.1.10 Low pressure input open 2.2.1 Extinguishing output short circuit fault circuit fault G R 0 8 0 0 1 / 0 0 1 C K S 0 1 0 0 1 / 0 0 1 F a u l t F a u l t [Input] key is pressed, the following screen;...
- Page 49 2.2.8 Gas Activation output open 2.3. Panel Faults circuit fault 2.3.1 Earth fault C K S 0 5 0 0 1 / 0 0 1 P N L 0 0 1 / 0 0 1 F a u l t E a r t h F a u l t [Input] key is pressed, the following screen;...
- Page 50 3.3 Extinguishing release activated condition 3.4 Low pressure activated condition G R 0 8 0 0 1 / 0 0 1 G R 0 7 0 0 1 / 0 0 1 M a n u e l E x t i n g u i s h i n g E n t e r t h e l o w...
- Page 51 4.2.4 Fire relay is disabled 4.2.5 Fault relay is disabled C K S 0 6 0 0 1 / 0 0 1 C K S 0 7 0 0 1 / 0 0 1 O f f O f f [Input] key is pressed, the following screen;...
- Page 52 5.2.5 Extinguishing status key input 5.2.6 Extinguishing status key input short circuit fault open circuit fault N T 0 1 0 0 1 / 0 0 1 N T 0 1 0 0 1 / 0 0 1 F a u l t F a u l t [Input] key is pressed, the following screen;...
-
Page 53: Annex - 2Nd Access Level Menu Structure
ANNEX - 2 ND ACCESS LEVEL MENU STRUCTURE 2 ND ACCESS LEVEL MENU Fan Output Cond. Active / Passive Sounder Enable / Disable Gas Akc. Output Enable / Disable Fire Relay Enable / Disable Enable / Disable Fault Relay Zone 1 Enable / Disable Zone 2 Enable / Disable... -
Page 54: Annex - 3Rd Access Level Menu Structure
ANNEX - 3 RD ACCESS LEVEL MENU STRUCTURE 3 RD ACCESS LEVEL Password Entry Screen Sounder Delay Enable / Disable Sound. Delay Time Enable / Disable Zone 1 Delay Enable / Disable Enable / Disable Zone 2 Delay Zone 3 Delay Enable / Disable Zone 4 Delay Enable / Disable... - Page 55 No Delay Zone 2 Dly. Device Cal Point Detector No Delay Zone 3 Dly. Device Cal Point Detector No Delay Zone 4 Dly. Device Cal Point Detector No Delay Res.Eng.Time 0 - 30 min. Ext. Delay 0 - 10 min. KK-642.041 Rev.No:21 19.01.24 ML-322 User Manual Page 55/60...
- Page 56 Ext. Time 30 - 300 sec. / Permenant Date xx/xx/xx xx:xx Time Print Event Log Delete Event Log Abort Type Abort / Res.and Abort KK-642.041 Rev.No:21 19.01.24 ML-322 User Manual Page 56/60...
-
Page 57: Annex - De�Initions Of The Terms
ANNEX - Definitions of the Terms Ampere - Current Electronic Circuit Card Alternating Current Voltage Ampere / Hour - Battery capacity. Watt - Power Direct Current Miliamper End of Line Resistance Second Input / Output Millimeter Liquid crystal display Peak to peak Light-emitting diode Meter Computer... -
Page 58: Battery Specifications
ANNEX - Mechanical and Outer Environment Specifications Mechanical Specifications Height 300mm Width 400mm Depth 100mm Battery Free Weight ~ 3,9 kg (*) Body Material 1mm DKp sheet Surface Epoxy Paint Mounting Type Surface, recessed Standard Color Grey tone (RAL 7015), white panel front side Ambient Condition Specifications Operating Temperature Interval (-5°C) - (+50°C) -
Page 59: Annex - Input / Output Speci�Ications
ANNEX - Input / Output Specifications Input Name Quantity Type Detection Zone 1 Supervised Detection Zone 2 Supervised Detection Zone 3 Supervised Detection Zone 4 Supervised Cable specifications for detection zones 1x2x0,8+0,8JH(st)H for 0 - 500 meters 1x2x1,5+1,5JH(st)H for 500 - 1500 meters Hold Input Supervised / trigged by 470R Flow Switch Input... -
Page 60: Annex - Power Supply And Connecitons
BATTERY BATTERY 12V DC 7Ah 12V DC 7Ah 2831 Mavili Elektronik Ticaret ve Sanayi A.Ş. Şerifali Mahallesi Kutup Sokak No: 27/1-2-4 Ümraniye TR-34775 İSTANBUL DOP No.: DOP.23073101 DOC No.: DOC.23073101 305/2011/EU (CPR): EN 12094-1 / EN 54-2 / EN 54-4...
Need help?
Do you have a question about the MAXLOGIC ML-322 and is the answer not in the manual?
Questions and answers