Table of Contents
Advertisement
Quick Links
Pro
Portable Water Heater
Installation and Operation Manual
WARNING
Improper installation, use, adjustment, alteration, service, or
maintenance can cause injury or property damage. Refer to this
manual. For assistance or additional information, consult a
qualified installer, service agency, or gas supplier.
Advertisement
Table of Contents

Related Manuals for FOGATTI InstaShower GO


Summary of Contents for FOGATTI InstaShower GO
- Page 1 Portable Water Heater Installation and Operation Manual WARNING Improper installation, use, adjustment, alteration, service, or maintenance can cause injury or property damage. Refer to this manual. For assistance or additional information, consult a qualified installer, service agency, or gas supplier.
- Page 2 DANGER BURN Water temperature over 125℉ (52℃) can cause severe burns instantly or death from scalds. Children, disabled and elderly are at highest risk of being scalded. See instruction manual before setting temperature at water heater. Feel water before bathing or showering. WARNING : CARBON MONOXIDE HAZARD This appliance can produce carbon monoxide...
- Page 3 WARNING : FIRE OR EXPLOSION HAZARD Failure to follow these instructions could result in fire or explosion, which could cause property damage, personal injury, or death. If you smell gas: 1. Do not attempt to light appliance and make sure appliance is in the OFF position.
-
Page 4: Table Of Contents
CONTENTS 1 Safety Information 1.1 Safety Definitions 1.2 Safety Warnings and Operation Safety Guidelines 2 General Information 2.1 Dimensions 2.2 Specifications 2.3 Understanding Appliance 3 Installation 3.1 Unpacking The Product 3.2 Charging The Battery 3.3 Shower Connection 3.4 Water Pump Connection 3.5 Gas Cylinder Installation 3.6 Gas Leak Check 4 Operation... -
Page 5: Safety Information
Safety Information 1 Safety Information 1.1 Safety Definitions This manual has safety information and instructions to help you eliminate or reduce the risk of accidents and injuries. DANGER Indicates an imminently hazardous situation which, if not avoided, will result in death or serious injury. WARNING Indicates a hazardous situation that, if not avoided, could result in death or serious injury. - Page 6 Safety Information This appliance is intended for the supply of heated water for the purpose Ÿ of washing and cleaning only. Check and confirm safe water temperature before using this appliance. Ÿ Water from this appliance may be very hot. DANGER Never store propane near high heat, open flames, pilot lights, direct Ÿ...
- Page 7 Safety Information WARNING Never leave heater unattended when hot or in use. Do not touch metal parts and venting holes of the heater, which may get very hot when in use. Keep out of reach of children. THIS APPLIANCE IS NOT INTENDED FOR THE SUPPLY OF DRINKING WATER.
-
Page 8: General Information
General Information 2 General Information 2.1 Dimensions Series FP19 FP22 Model No. FP19AG FP22AG Part No. Rating: BTU 19,000 22,000 Battery DC 12V battery DC 12V battery Run Time 80 minutes 80 minutes (Full Charge) Fuel Source Propane Propane Fuel Supply Pressure Max. -
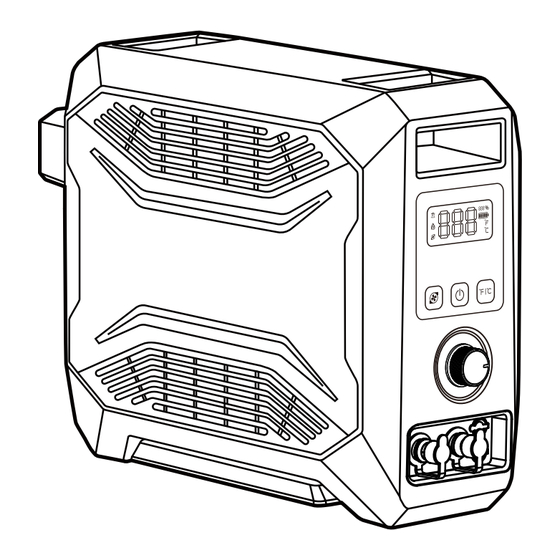
Page 9: Specifications
General Information 2.2 Specifications 6.5" (165 mm) 18.2" (462 mm) 13.5" (343 mm) 2.3 Understanding Appliance Control Panel Pump DC power input port Gas Adjustment knob Exhaust grid Gas inlet Hot water outlet Air intake Cold water inlet DC charging input port... -
Page 10: Installation
Installation 3 Installation 3.1 Unpacking The Product Unpack your new water heater from the carton and make sure that all of the parts are included. If you find that one of the components is missing, please contact the after-sales service for a replacement. Photo Name Portable Water Heaters... -
Page 11: Charging The Battery
Installation 3.2 Charging The Battery 1. Charge the battery before using your water heater for the first time. 2. (Fig. 1) Remove the rubber flap covering the charging port. 3. Plug either cigarette lighter power output line (12V) or battery charger (Input: 120 VAC/60 Hz Output: 12 VDC) into unit and the power source. -
Page 12: Shower Connection
Installation 3.3 Shower Connection Shower end: threaded connector screw the threaded connector on the Ÿ shower hose onto the end of the shower. Heater end: sleeved connector Ÿ A - Pull up & hold the sleeve on the connector. B & C - While holding the sleeve, push the connector into water outlet until it stops. D - Release the sleeve and the connector is locked. -
Page 13: Water Pump Connection
Installation 3.4 Water Pump Connection 1. Place the water carrier at a level below the water heater for proper drainage. 2. Submerge the pump in a suitable reservoir of water. Maintain pump fully submerged in water as the pump is being used as pump motor can be damaged if not. -
Page 14: Gas Leak Check
Operation Connecting to liquid propane tank (Fig.8): InstaShower GO series Use a propane adapter hose ( not included in the product, to be purchased separately) to firmly screw the gas hose (clockwise) onto the gas regulator. Check for leaks with soapy water. -
Page 15: Operation
Use for water heating only. Never alter in anyway or use with any device Ÿ or part not expressly approved by Fogatti. This appliance is designed to be used with a source water temperature of Ÿ... -
Page 16: Safety Features
Operation 4.2 Safety Features This appliance is equipped with the following safety features: Over Temperature Sensor – the appliance will not allow the burner to Ÿ remain in operation once the outlet water temperature reaches 125 °F. Water Flow Sensor – water must be flowing through the system to allow Ÿ... -
Page 17: Control Panel
Operation 4.3 Control Panel 1 Water flow icon 2 Flame icon 3 Water pump icon 4 Pump on/off button 5 Power button 6 Digital display 7 Battery level display Fahrenheit / Celsius temperature units 9 Temperature display switch button Pump on/off button: Starts and stops the operation of the water pump. -
Page 18: Use Of Water Heater
Operation 4.4 Use of Water Heater The water heater must not be exposed to flammable vapors or liquids during operation. Before lighting the heater, please make sure that the water supply is ready, the shower connection & pump connection is setup, the gas cylinder is installed and the rechargeable battery is not running low. - Page 19 Operation 5. At any time, you can stop the water flow from the showerhead by pressing the flow switch on the showerhead until it locks into the closed position. This will automatically turn off the burner, but the pump will continue to run. Fig.
-
Page 20: Shutting Off The Heater
Operation CAUTION Water remaining in the heat exchanger while the flow is stopped may become hot. When the flow is resumed the user must check the temperature output to ensure that it is suitable and not too hot. 4.5 Shutting Off The Heater After completed your shower, push the flow switch to the closed position to stop the water flow from the showerhead. -
Page 21: Helpful Hints
Helpful Hints 5 Helpful Hints Recycling water for extra heat: If your water temperature has not increased to the desired level after being run through the system once, simply recycle it back into your source reservoir via the faucet or the shower head attachment, and then run it through the system a second time. - Page 22 Fig.15 Fig.16 Fig.17 Replacing fuse Use only a Fogatti replacement fuse (current rating: 10 A). Unscrew the fuse from the fuse box next to the battery box, replace the faulty fuse with a new one and install it properly. Fig.18...
- Page 23 Maintenance Cleaning pump screen 1. Grip the nozzle at the end of the pump and rotate counter-clockwise to screw it off. 2. Clean the pump screen with a small brush. 3. After cleaning the screen, turn the ring cover clockwise back to the pump. Fig.19 Storage 1.
-
Page 24: Wiring Diagram
Wiring Diagram 7 Wiring Diagram This connection is for low-voltage battery or direct current only. Do not connect to 120 or 240 volts ac. CAUTION Label all wires prior to disconnecting when servicing controls. Wiring errors can cause improper and dangerous operation. The parts lists and wiring diagram show the appliance as it was constructed. - Page 25 Wiring Diagram...
-
Page 26: Troubleshooting
Troubleshooting 8 Troubleshooting 8.1 Error code Error code Description Water outlet probe malfunction: Open circuit or short circuit, the water heater does not start. Ignition abnormality: If unable to ignite or unexpected flameout occurs, please shut off the valve. False flame protection: If the flame signal is detected before ignition, the suction valve will not work. -
Page 27: Troubles Shooting Guide
Troubleshooting 8.2 Troubles shooting guide Problem Solution Check that appliance is switched on. Check sufficient water is available. Check that the pump is connected to the appliance. Water will not flow Make sure the battery has enough power. from shower head Check shower hose and pump hose for kinks. -
Page 28: Parts Diagram
Parts Diagram 9 Parts Diagram... - Page 29 Parts Diagram DC charging input terminal Pressure reducing valve bracket Pump DC power input terminal Module pressing plate Knob Power management module Control panel Pulse igniter Display module Right side bracket of the body Front panel Base bracket Screw decorative cover Heat insulation panel Handle flip cover Base...
-
Page 30: Packing List
Quick Installation and Operation Guide 1 piece Magnetic Shower Base 1 piece Shower Hooks 1 piece Pet Shower & Sprayer 1 piece InstaShower GO Pro Series (included with only) Propane Adapter Hose 1 piece InstaShower GO Pro Series (included with only) -
Page 31: Disposal
LIMITED ONE-YEAR WARRANTY Limited one-year warranty available at www.fogattiliving.com If you have questions, or to obtain a copy of the limited warranty free of charge, contact: Tel: 877-216-1818 E-mail: us@fogatti.com... - Page 32 E-mail: us@fogatti.com Tel: 877-216-1818 @2023 Fogatti Holdings Limited. Fogatti Holdings Limited continually updates materials, and as such, content is subject to change without notice.
Need help?
Do you have a question about the InstaShower GO and is the answer not in the manual?
Questions and answers