Table of Contents
Advertisement
Quick Links
Operator Manual
AIR COMPRESSOR
IMPORTANT – Please make certain that persons who are to use this equipment thoroughly read and
understand these instructions and any additional instructions provided before operation.
Record the model and serial numbers of your Air compressor below:
Model No._____________________ Serial No._______________________
Advertisement
Table of Contents

Related Manuals for Promate PC101506


Summary of Contents for Promate PC101506
- Page 1 Operator Manual AIR COMPRESSOR IMPORTANT – Please make certain that persons who are to use this equipment thoroughly read and understand these instructions and any additional instructions provided before operation. Record the model and serial numbers of your Air compressor below: Model No._____________________ Serial No._______________________...
-
Page 2: Table Of Contents
FOREWORD Thank you for purchasing Promate PC101506. This operator manual is for proper handling, minor checking, and maintenance of the PC101506. Before using your air compressor: Please read these instructions completely and carefully to operate it safely and make the best use of it. Due to constant efforts to improve our products, certain procedures and specifications are subject to change without notice, if you have any questions, please contact Promate Service. -
Page 3: Safety Precautions
1. Safety Precautions When handling this unit, please keep to the following matters. Please make sure you review each precaution carefully. You must also make sure that the procedure, work method, or operating technique that you choose does not render the compressor unsafe. Table 1. -
Page 4: Safety Instructions
1.1 Safety Instructions to hold work when practical. It is safer than using your hand and frees both hands to operate WORK AREA SAFETY the tool. Use safety equipment. Always wear eye Keep your work area clean and well-lit. protection. -
Page 5: Electrical Safety Guide
ELECTRICAL SAFETY As the distance from the supply outlet incre Avoid body contact with grounded surfaces you must use a heavier gauge extension such as pipes, radiators, ranges, and Using the extension cords with inadequately refrigerators. There is an increased risk of wire causes a serious drop in voltage, resulti electric shock if your body is grounded. -
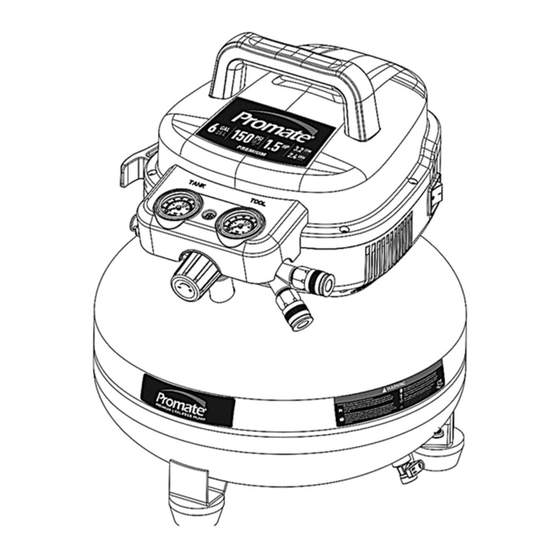
Page 6: Parts And Specifications
Read this owner’s manual before operating your air compressor. Familiarize yourself with the location and function of the controls and features. Save this manual for future reference. Diagram 3. Air Compressor Parts Table 2. General Specifications Model No.: PC101506 Motor: 220V’, 60Hz, Universal Running Horsepower: 1.5 HP... -
Page 7: Tool Compatibility Chart
3. Tool Compatibility Chart Table 3. Tool Compatibility Chart RECOMMENDED TOOL USAGE Refer to specific tool requirements Inflation/Recreation Finishing Nailer (16-gauge) Framing Nailer Flooring Nailer Air Ratchet Die/Angle Grinder Cut-off Tool Paint Sprayer Brad Nailer (18-gauge) 3-in-1 Brad/Finishing/Stapler Roofing Nailer Impact Wrench Drill/Hammer/Chisel/Shears Sander... -
Page 8: Important Information
The procedures described in this manual are solely for the Tank Drain PC101506 air compressor at a maximum pressure The tank drain is used to remove moisture from of 150 PSI. the air tank after the compressor is shut off. -
Page 9: Operation
Diagram 6. Figure C Diagram 4. Figure A 2. Turn the air pressure regulator knob counter- 7. OPERATION clockwise until it stops (Fig. D). 7.1 Before Starting Check Safety Valve Before starting the compressor, pull the ring on the safety valve to make sure that the safety valve operates freely. -
Page 10: Stopping The Compressor
4. Attach the hose and accessories (Fig. F). Diagram 11. Figure H 7.3 Stopping the Compressor Diagram 9. Figure F 1. Set the power switch (1) to the OFF position. 2. Unplug the power cord (2). 3. Reduce the pressure in the tank through the outlet hose. -
Page 11: Draining The Tank
7.4 Draining the Tank 4. Place a suitable container under the unit to 1. Set the power switch to the (OFF) position. catch any water. 2. Turn the regulator knob counter-clockwise 5. Slightly tilt the unit and turn the tank drain to set the outlet pressure to zero. -
Page 12: Troubleshooting
9. TROUBLESHOOTING Table 6. Troubleshooting PROBLEM POSSIBLE CAUSE SOLUTIONS The power cord is not plugged in. Plug the power cord into a grounded outlet. The power switch is in the O (OFF) Set the power switch to the ON position. position. -
Page 13: Service Information
The Company will not pay for repairs or To order replacement parts and consumable parts, adjustments to the product, or for any costs please contact Promate Service and be ready with of labor performed without the Company's the following information: prior authorization. -
Page 14: Exploded Diagram & Part List
11. EXPLODED VIEW AND PARTS LIST Diagram 13. PC101506 Exploded View Table 7. PC101506 Parts List Description Description Hex-Bolt M5x12 Assembly Motor/Pump Pressure Gauge Shroud Pressure Switch Pressure Gauge Screw M8x35 Safety Valve Washer Ø8 Pressure Regulator Cushion Pad...
Need help?
Do you have a question about the PC101506 and is the answer not in the manual?
Questions and answers