
Summary of Contents for Beissbarth BAC 5100yf
- Page 1 Original Instructions Original-Betriebsanleitung Istruzioni originali Instrucciones originales Instruções Originais Instructions d’origine Model BAC 5100yf Recover, Recycle, Recharge Machine for R1234yf A/C Systems...
- Page 2 The right is reserved to make changes at any time without obligation to notify any person or organization of such revisions or changes. Further, Beissbarth shall not be liable for errors contained herein or for incidental or consequential damages (including lost profits) in connection with the furnishing, performance, or use of this material.
-
Page 3: Table Of Contents
Disposal of Equipment . . . . . . . . . . . . . . . . . . . . . . . . . . . . . . . . . . . . . . . 48 BAC 5100yf... -
Page 4: Safety Precautions
Safety Precautions Explanation of Safety Signal Words Used in this Manual The safety signal word designates the degree, or level, of hazard seriousness. DANGER: Indicates an imminently hazardous situation which, if not avoided, will result in death or serious injury. WARNING: Indicates a potentially hazardous situation which, if not avoided, could result in death or serious injury. CAUTION: Indicates a potentially hazardous situation which, if not avoided, may result in minor or moderate injury. CAUTION: Used without the safety alert symbol indicates a potentially hazardous situation which, if not avoided, may result in property damage. These safety messages cover situations Beissbarth is aware of. Beissbarth cannot know, evaluate, and advise you as to all possible hazards. You must verify that conditions and procedures do not jeopardize your personal safety. Explanation of Safety Decals Used on the BAC 5100yf Carefully read the instructions. Do not use in open air in case of rain or high humidity. Wear gloves. Wear protection goggles. Alternating voltage. Grounding protection. Electrical shock hazard. - Page 5 WARNING : To prevent personal injury, ALLOW ONLY QUALIFIED PERSONNEL TO OPERATE THE MACHINE. Before operating the machine, read and follow the instructions and warnings in this manual. The operator must be familiar with air conditioning and refrigeration systems, refrigerants, and the dangers of pressurized components. If the operator cannot read this manual, operating instructions and safety precautions must be read and discussed in the operator’s native language. USE THE BAC 5100YF AS OUTLINED IN THIS MANUAL. Using the machine in a manner for which it was not designed will compromise the machine and nullify the protections provided. PRESSURIZED TANK CONTAINS LIQUID REFRIGERANT. Do not overfill the internal storage vessel (ISV), because overfilling may cause explosion resulting in personal injury or death. Do not recover refrigerants into nonrefillable containers; use only type-approved refillable containers that have pressure relief valves. HOSES MAY CONTAIN LIQUID REFRIGERANT UNDER PRESSURE. Contact with refrigerant may cause personal injury, including blindness and frozen skin. Wear protective equipment, including...
-
Page 6: Protective Devices
Safety Precautions CAUTION : To prevent equipment damage, TO PREVENT CROSS-CONTAMINATION, USE THIS MACHINE WITH R1234YF REFRIGERANT ONLY. The machine is equipped with special connectors to recover, recycle, and recharge only R1234yf refrigerant. Do not attempt to adapt the machine for another refrigerant. Do not mix refrigerant types through a system or in the same container; mixing of refrigerants will cause severe damage to the machine and the vehicle air conditioning system. DO NOT USE THIS MACHINE IN DIRECT SUNLIGHT. Position the machine far from heat sources, such as direct sunlight which can cause excessive temperatures. The use of this machine under normal environmental conditions (10°C to 50°C) keeps pressures under reasonable limits. DO NOT USE THIS MACHINE OUTDOORS DURING RAIN OR HIGH HUMIDITY. Protect the machine from conditions that may cause electrical failure or other hazards relating to ambient interaction. -
Page 7: Introduction
Weight . . . . . . . . . . . . . . . . . . . . . . . . . . . . . . . . . . . . .107 kg BAC 5100yf... -
Page 8: Features Of The Bac 5100Yf
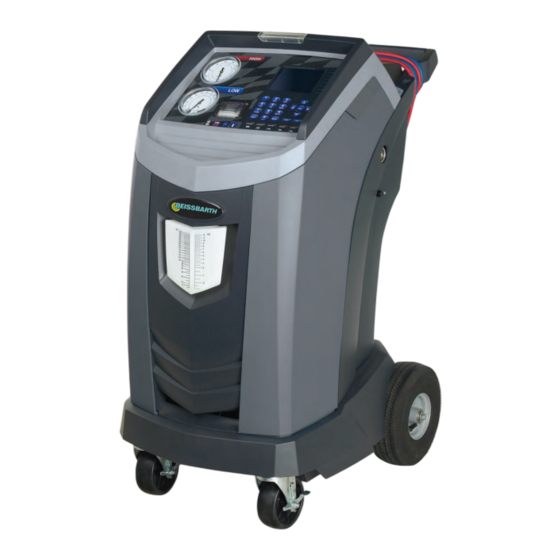
Introduction Features of the BAC 5100yf HELP MENU STOP DATABASE... - Page 9 Introduction Features of the BAC 5100yf continued Item Description Oil Drain Bottle Printer Low-side (blue) and High-side (red) Manifold Gauges Graphic Display and Keypad Power ON / OFF Switch Audio, ethernet, USB, mini-USB, and SD card Connections; 2224Vms double insulation in respect to main lines Vacuum Pump Oil Sight Glass Vacuum Pump Oil Oil Drain Fitting Wheel Lock Visual Alert Vacuum Pump Oil Fill Cap and Port Oil Inject Bottle 1 (white cover) Oil Inject Bottle 2 (green color on cover) Contaminant Recovery Port UV Dye Inject Bottle 3 (yellow color on cover) Lockout / Tagout Service Hose Storage Ports BAC 5100yf Rev. A...
-
Page 10: Control Panel Functions
Introduction Control Panel Functions ARROW UP moves selection of a menu item to the previous item; turns up audio volume. ARROW DOWN moves selection of a menu item to the following item; turns down audio volume. ARROW RIGHT scrolls to next screen; fast forwards the video. ARROW LEFT scrolls to previous screen; rewinds the video. AUTOMATIC activates a menu that helps the user set up an automatic recover / vacuum / leak test / charge sequence. CHARGE activates the sequence that charges the vehicle A/C system with a programmed amount of refrigerant. HELP MENU STOP ESC returns the test sequence to the previous screen; DATABASE or answers a query. HELP displays information related to the current display. Control Panel Keypad MENU accesses additional functions and parameters. -
Page 11: Setup Menu Functions
Maintenance section. Calibration Check in the Maintenance section. Tank Filling Change Vacuum Pump Oil Transfer refrigerant from the source tank to the Displays how long the vacuum pump has ISV. Refer to Tank Filling in the Maintenance operated since the last oil change, and the section. amount of time remaining until the next oil Unit of Measure change is needed. For maximum vacuum pump Program the machine to display units of measure performance, change vacuum pump oil every in kilograms or pounds. The default display is time the filter is replaced. Refer to the Change kilograms. Vacuum Pump Oil in the Maintenance section. Date and Time Setup Program the machine for current date and time. BAC 5100yf Rev. A... -
Page 12: Setup
Setup Unpack the Unit 1. Remove the bandings from the box. WARNING: To prevent personal injury while working with refrigerant, 2. Remove the top carton infold, the molded pulp tray, read and follow the instructions and the angle boards. and warnings in this manual, and 3. Remove the sleeve from the bottom carton infold. wear protective equipment such as 4. Gently roll the unit forward and off the pallet, goggles and gloves. avoiding any sudden shocks to the machine. -
Page 13: Install The Oil Drain Bottle
CAUTION: The machine is programmed to run the setup procedure as outlined here. To prevent personal injury, do NOT operate the machine without the oil fill port plug installed, because the vacuum pump is pressurized during normal operation. BAC 5100yf Rev. A... -
Page 14: Set Date & Time
Setup Date and Time Setup The machine is programmed at the factory for the local time zone, using a 24-hr. clock, and date. Note: The date changes only by scrolling through an entire day. 1. Use the LEFT and RIGHT arrow keys to modify the minutes displayed. 2. Use the UP and DOWN arrow keys to modify the hour displayed. 3. Press OK to accept the date and time. Service Installation Cleaning Service Hoses Connected to At this point the machine clears its internal plumbing Storage Ports before proceeding with setup. 1. When prompted, connect the service hoses from the machine to their storage ports as shown in Figure 3. 2. Open the service couplers. -
Page 15: Tank Filling
The display shows the amount of refrigerant that is available for charging, which is approximately 0.91 kg less than the total amount of refrigerant in the tank. BAC 5100yf Rev. A... -
Page 16: Garage Data
Setup Garage Data First Fill Field This machine has the capability to print out recovery, vacuum, charge, and flush information for each vehicle tested. The information entered in the fill fields on the Workshop Garage Data screen will appear on each printout. Address 1. The cursor is blinking in the first fill field. Refer to Figure 4. Town 2. Press the Menu key and a virtual keyboard appears as shown in Figure 5. Use the arrow keys on the machine’s keypad to move around the keyboard. Press OK to enter a E-mail character. The cursor will move to the next character. 4. Press the Menu key to exit the virtual keyboard. Figure 4 Press OK to save the data and move to the next field. Press ESC to return to the Setup Menu. A printout may be obtained any time the display screen shows OK=PRN. Then it will be possible to enter specific vehicle information, such as the VIN and license plate number. Use the arrow keys in the virtual keyboard to move the cursor within the fill field. -
Page 17: Operating Instructions
The machine displays GAS IDENTIFY If the refrigerant passes the purity test, the machine displays REFRIGERANT PURITY ACCEPTABLE and proceeds with the function requested. If the Refrigerant Fails the Purity Test If the refrigerant fails the purity test, the machine automatically repeats the test two more times. The machine displays REPEATING GAS IDENTIFY LAST GAS IDENTIFY as it repeats the purity test. • If the refrigerant passes the purity test after either of the two tests, the machine proceeds with the function requested. • If the refrigerant fails the purity test three times, the user has the option to test the operation of the refrigerant identifier in the machine or exit from the function. The machine displays TEST FAILED PRESS OK TO VERIFY REFRIGERANT IDENTIFIER IS WORKING CORRECTLY Select OK to test the refrigerant identifier, or select ESC to exit the function. BAC 5100yf Rev. A... - Page 18 Operating Instructions — Refrigerant ID Testing the Refrigerant Identifier If the refrigerant fails the purity test three times, the user has the option to verify that the refrigerant identifier in the machine is working correctly. This sequence may also retest up to three times. The machine displays DISCONNECT A/C SERVICE STATION FROM VEHICLE DRAIN SERVICE HOSES PRESS OK WHEN OPERATION IS COMPLETED 1. Disconnect the high- and low-side service couplers from the refrigerant supply, and drain the service hoses. Press OK . 2. The machine displays CONNECT TANK THAT CONTAINS 1234YF TEST REFRIGERANT PRESS OK TO CONFIRM Follow system prompts to connect the refrigerant identifier to a known pure (non-contaminated) source of R1234yf. Press OK to begin testing the refrigerant identifier. Testing Determines the Refrigerant Identifer is Working Correctly 1. If testing determines that the refrigerant identifier in the machine is working correctly, the machine displays...
- Page 19 Testing Determines the Refrigerant Identifer is Not Working Correctly 1. If testing determines that the refrigerant identifier in the machine is not working correctly, the machine displays REFRIGERANT IDENTIFIER IS DEFECTIVE PLEASE CONTACT EQUIPMENT MANUFACTURER SERVICE PRESS OK TO TERMINATE Press OK to terminate the function. 2. The machine displays DISCONNECT A/C UNIT DRAIN SERVICE HOSES PRESS OK WHEN OPERATION IS COMPLETED 3. Disconnect the high- and low-side service hoses from the refrigerant supply. Drain the service hoses. Press OK . 4. The machine cancels the requested function. 5. Contact a Beissbarth authorized service center for repair. BAC 5100yf Rev. A...
-
Page 20: Recover
Operating Instructions — Recover WARNING: To prevent personal Recover Refrigerant from a Vehicle injury while working with refrigerant, read and follow the instructions 1. Empty the oil drain bottle before starting a recovery. and warnings in this manual, and Remove the oil drain bottle from the machine by wear protective equipment such as pulling the bottle straight down — do not use a goggles and gloves. twisting or rocking motion. Refer to Figure 7. - Page 21 6. The machine runs a self-clearing cycle to clear any internal refrigerant from its internal plumbing. 7. When the system has recovered to 0 psi, the vacuum pump starts and runs until recovery is complete. 8. The machine displays CHECK OIL BOTTLE PRESS OK TO CONFIRM Press OK to start the oil drain—this may require up to 90 seconds to complete. 9. After the oil drain is complete, a summary is displayed of gas recovered and oil drained . At this point you may print out recovery information and pre-recover diagnostics by selecting OK . The displayed recovered weight can vary depending on ambient conditions and should not be used as an indicator of scale accuracy. 10. The amount of oil that was removed from the A/C system is the amount of new oil that can be charged into the A/C system after evacuation is complete. • Use only new oil to replace the oil removed during the recycling process. • Dispose of used oil according to government regulations. Recovery is complete. BAC 5100yf Rev. A...
-
Page 22: Vacuum
Operating Instructions — Vacuum Evacuate the Vehicle A/C System 1. Connect the service hoses from the machine to the vehicle’s service ports. WARNING: To prevent personal 2. Open the coupler valves by turning the collars injury while working with refrigerant, clockwise. read and follow the instructions 3. Press VACUUM . and warnings in this manual, and wear protective equipment such as 4. Press OK to accept the default evacuation time goggles and gloves. -
Page 23: Hose Flush
2. Open the coupler valves by turning the collars goggles and gloves. clockwise. 3. Select HOSE FLUSH from the Setup Menu. The machine displays CONNECT BOTH SERVICE HOSES TO STORAGE PORTS AND OPEN BOTH COUPLER VALVES. PRESS OK TO CONFIRM 4. Select OK to begin the hose flush process, which runs for three minutes, followed by a recovery. 5. When the hose flushing process is compete, the display reads HOSE FLUSHING OK PRESS OK TO CONFIRM Press OK to confirm the display messages. 6. Close the coupler valves by turning the collars counterclockwise. 7. Press OK to return to the Setup Menu. Storage Port Connections Figure 9 BAC 5100yf Rev. A... -
Page 24: Charge
Operating Instructions — Charge WARNING: To prevent personal Recharge the Vehicle A/C System injury while working with refrigerant, read and follow the instructions The charging process differs from vehicle to vehicle. and warnings in this manual, and Charge function for vehicles equipped with a single- wear protective equipment such as service fitting should be carried out manually. Refer to goggles and gloves. the vehicle service manual for specific instructions. -
Page 25: Automatic
HP + LP UV Dye Refrigerant Vacuum Extra Oil Extra Oil (2) 3. Use the number keys on the keypad to make selections 1–3 for the vehicle’s A/C system. For selections 4–8, enter a value and press OK . 4. The display shows an overview of the functions, with the selected functions highlighted. Select OK to start. 5. The machine checks the refrigerant in the vehicle to verify it is R1234yf and not contaminated. The machine displays the following screens: WARM UP CALIBRATION IN PROGRESS GAS IDENTIFY • If the machine detects a problem with the refrigerant in the vehicle, refer to the Operating Instructions — Refrigerant ID section of this manual. BAC 5100yf Rev. A... - Page 26 Operating Instructions — Automatic Automatic continued • If the machine does not detect a problem with the refrigerant in the vehicle, it continues with the requested functions. 6. Follow instructions on the display. The unit will pause prior to oil injection for the user to confirm oil quantity. After five seconds, the Automatic sequence begins. 7. When the sequence is complete, close the high- side (red) and low-side (blue) coupler valves. 8. When prompted, remove the service hoses from the A/C system, and install the hoses on the machine’s storage ports. 9. Select OK to begin clearing hoses. This prepares the machine for the next service. 10. The machine displays a summary of actions performed during the automatic sequence. Information About the Automatic Function • The CHARGE function for vehicles equipped with a single-service fitting should be carried out manually according to procedures in the vehicle manufacturer’s service manual. • The amount of oil recovered during RECOVER is automatically injected before the CHARGE cycle.
-
Page 27: System Flush
WARNING: To prevent personal to the instructions included with the adapter also as injury while working with refrigerant, you perform the following steps. read and follow the instructions 1. Verify the flusher filter and strainer are not plugged. and warnings in this manual, and wear protective equipment such as 2. Mount the flusher to the rear of the Beissbarth goggles and gloves. machine. Do not make any connections at this time. 3. Remove the oil drain bottle (see Figure 11) from the Beissbarth machine. Drain the oil bottle, and dispose of oil according to regulations in your area. 4. Recover all refrigerant from system to be flushed. - Page 28 Operating Instructions — System Flush included with the flush kit. 1 3. Refer to Figure 12 and select SYSTEM FLUSH Setup from the main menu . Press OK . Functions 14. Accept the default vacuum time or program a System Flush greater amount of time. Press OK . Pressure Decay Leak Test 15. The recovery machine pulls a vacuum for the Database programmed amount of time and then performs a 5-minute leak test. Failure of the leak test indicates Figure 12 a leak in the system or connections, or possibly a pressure rise due to system out-gassing. In that The Main Menu case, check and tighten all connections and restart the vacuum process. 16. After a successful vacuum and leak test, the machine automatically runs a pressure test and recovery of the flushing circuit using a small amount of refrigerant.
-
Page 29: Maintenance
Check machine for leaks shroud, and use an electronic leak detector to check fittings. Clean air intake panels Monthly. Use a clean cloth. Clean cabinet and control panel Monthly. Use a clean cloth. Inspect power cord and hoses for cuts and Daily. abrasions Lubricate wheel bearings and brake Monthly. components Every 10 years — performed by an authorized Pressure Test Beissbarth service center. BAC 5100yf Rev. A... -
Page 30: General Maintenance
Maintenance General Maintenance Wipe off the machine often using a clean cloth to WARNING: To prevent personal injury, remove grease and dirt. only qualified personnel may perform inspections and repairs to this machine. Electrical Protection The machine is equipped with a circuit breaker on the control panel above the ON/OFF switch. If the breaker trips, its button will pop out. A tripped circuit breaker will WARNING: To prevent personal cause the machine to lose all power. Press the circuit injury while working with refrigerant, breaker button to reset. read and follow the instructions and warnings in this manual, and Lockout / Tag Out wear protective equipment such as... -
Page 31: Tank Filling
FILL AMOUNT (KG) XX.XXX CONNECT LOW SIDE HOSE TO SOURCE TANK OK TO CONTINUE ESC TO QUIT 4. Enter the quantity to recover, and press OK. Add at least 3.6 kg of refrigerant to ensure enough is available for charging. 5. The machine checks the refrigerant in the source tank to verify it is R1234yf and not contaminated. The machine displays the following screens: WARM UP CALIBRATION IN PROGRESS GAS IDENTIFY • If the machine detects a problem with the refrigerant in the source tank, refer to the Operating Instructions — Refrigerant ID section of this manual. • If the machine does not detect a problem with the refrigerant, it begins filling the internal storage vessel (ISV). This process takes 15–20 minutes. 6. The machine automatically stops when the preset tank fill level is reached. To stop the tank fill before the preset level is reached, select ESC . 7. Close the valve and remove the hose from the source tank. BAC 5100yf Rev. A... -
Page 32: Filter Change
Check Remaining Filter Capacity 1. Select FILTER CHANGE from the Setup Menu or when the machine prompts. The machine displays Caution: To prevent equipment damage, FILTER LIFE TIME: X.XX KG use only authentic Beissbarth No. REPLACE FILTER? SP01100355 filters in this machine. All The machine displays the amount of filter capacity performance tests and claims are based remaining until the machine locks down. on using this specific filter. - Page 33 Filter Change continued 3. Hang the shroud on the back of the machine as shown in Figure 16. Figure 16 4. Remove the filter by turning it counterclockwise (as viewed from the bottom of the filter). 5. Refer to Figure 17 while examining the new filter. Verify both o-rings are lubricated, correctly located in the grooves as shown, and not damaged. (The Hang Filter o-rings have been lubricated with ISO6743-3 DVA / Shroud DVC oil.) Here 6. Install the new filter by threading it clockwise into place. Verify the filter is positioned correctly as shown in Figure 18. Tighten the filter to 20 N•m. 7. Recycle the filter that was removed from the machine according to the laws in your jurisdiction. O-rings Figure 17 Assembled Assembled Correctly Incorrectly Figure 18 BAC 5100yf Rev. A...
-
Page 34: Refrigerant Identifier
Replace the sample hose assembly power ON. The machine automatically clears the during every filter change. filter and performs a leak check. Calibration Check This function is used to ensure the machine’s internal scale is always calibrated. During this test, use only the calibration weight that is provided with the machine. 1. Select CALIBRATION CHECK in the Setup menu. The machine displays PLACE SAMPLE WEIGHT ON SCALE PRESS OK TO TEST PRESS ESC TO QUIT 2. Refer to Figure 20, and verify the magnet on the bottom of the machine is clean. 3. Attach the calibration weight to the magnet on the bottom of the machine. Select OK . • If the display shows PROCEDURE COMPLETED the scale is in calibration. Select OK . • If the display shows Magnet CALIBRATION REJECTED! Figure 20 the scale is out of calibration. Contact an authorized Beissbarth service center for assistance. 4. Remove the calibration weight from the scale. -
Page 35: Change Vacuum Pump Oil
Caution: It is the responsibility of the user to monitor vacuum pump oil level and Slowly add vacuum pump oil to the pump through clarity. If contaminated oil is not removed the oil fill port until the oil level rises to the center of from the vacuum pump and replaced, the sight glass. the vacuum pump will be permanently damaged. 7 . Install the cap on the oil fill port and close tightly . Press ESC. BAC 5100yf Rev. A... -
Page 36: Edit Print Header
Maintenance Edit Print Header To make changes to the text that appears in the header on each printout: 1. Select GARAGE DATA from the Setup menu. 2. The cursor is blinking in the first field. Press the Menu key to display a virtual keyboard. 3. Use the arrow keys to move around the keyboard. Press OK to enter a character. 4. Press the Menu key to exit the keyboard and move to the next fill field. 5. Press OK to save the data and press ESC to exit the keyboard. This procedure is explained in more detail in the Setup section of this manual under Garage Data. Replace Printer Paper Leading Edge of To install a new paper roll in the printer: Paper Over Roller 1. Remove the cover on the printer by pulling out on the tab as shown in Figure 22. 2. Remove the paper core. 3. Install the new roll of paper with the end of the paper at the top of the roll. 4. Assemble the cover onto the printer with the leading edge of the paper over the roller. -
Page 37: Calibrate Oil And Dye Inject Scales
Oil Drain 2. Hook the notch in the end of the oil drain calibration Calibration bracket (supplied) around the oil drain inlet fitting as Bracket and shown in Figure 24. Weight 3. Select CALIBRATE OIL DRAIN from the Setup menu. 4. When prompted for the first weight, enter 53 GRAMS as the default, and press OK . Oil Drain Inlet Fitting 5. When prompted for the second weight, place the calibration weight supplied with the unit on the bracket as shown, and enter the following value : 586 GRAMS 6. When prompted that the calibration is complete, press OK to exit. 7. Remove the calibration weight and bracket, and replace the oil drain bottle. Figure 24 BAC 5100yf Rev. A... -
Page 38: Pressure Decay Leak Test
LEAK TEST PASSED After a brief pause, the machine recovers refrigerant and then returns to the Main menu, ready for normal operation. • If an unacceptable pressure decay is detected, the machine displays LEAK TEST FAILED Take the machine to an authorized Beissbarth service center for repair. After the leak is repaired, select Leak Test from the Setup menu, and repeat WARNING: To prevent personal the test. injury should the machine require transport to a local Beissbarth service The machine will prompt to run the pressure decay leak center, follow local government test again after 10 days have passed. regulations regarding transportation of equipment containing R1234yf. -
Page 39: Parts List
Vinyl Dust Cover SP01100250 Glossary A/C System : The vehicle air conditioning system being serviced. Evacuation : Moisture and other non-condensables are removed from an A/C system by a vacuum pump capable of pulling the system to 5 mbar absolute. Internal Storage Vessel (ISV) : The refillable refrigerant storage tank designed specifically for this machine; 9.09 kg (20.04 lb.) capacity. Leak Test (Vacuum) : Components containing refrigerant are evacuated and monitored for pressure rise, which could indicate a leak. Machine : Model No. BAC 5100yf. Pressure Decay Leak Test : Components containing refrigerant are pressurized and monitored for pressure decay, which could indicate a leak. Recovery / Recycling : Refrigerant is recovered from an A/C system, filtered, and stored in the ISV. Refrigerant : R1234yf. BAC 5100yf Rev. A... -
Page 40: Software Flow Chart
Software Flow Chart... -
Page 41: Messages
Troubleshooting Messages Display Cause Solution Exit current test and contact a Fan is not working. Air flow is Beissbarth authorized service AIR FLOW ERROR blocked. center for repair. ANALYZER ERROR 1 Possible electromagnetic or RF Move unit away from any EMF UNSTABLE OUTPUT (radio frequency) interference. or RFI sources. Move unit away from any EMF ANALYZER ERROR 2 Possible electromagnetic or RF or RFI sources. - Page 42 Refer to Recover section in this manual. Connect a suitable Refrigerant in vehicle is external recovery device to PURITY TEST FAILED either not R1234yf, or it is access port on the back of contaminated. the BAC 5100yf, and recover refrigerant. After selecting CHARGE and Refer to Manually Fill the entering a desired weight, if the Internal Storage Vessel (ISV) in weight entered will leave less REFRIGERANT INSUFF.
-
Page 43: Procedures
1. Disconnect the high- and low-side refrigerant. couplers from the vehicle / refrigerant supply. 3. Start the recovery unit and run a recovery according to instructions supplied with the unit. 2. Connect the low-side coupler (blue) to the tank adapter fitting supplied with the 4. Upon achieving a vacuum (or per the contaminated machine. refrigerant recovery unit instructions), disconnect from the BAC 5100yf. 3. In a well-ventilated area, open the low- side coupler with the port pointed away from you, allowing the contaminated refrigerant in the hoses to vent. 4. Once the pressure has escaped, remove the high-side coupler from the hose. 5. Blow air in one hose through the high- and low-side hoses to remove all refrigerant. 6. Assemble the high-side coupler to the hose. 7. Disconnect the tank adapter fitting from the low-side coupler. 8. Press OK on the keypad. The machine will vacuum the hoses. BAC 5100yf Rev. A... - Page 44 Troubleshooting Procedures Recover Function & Automatic Function Display Message: PURITY TEST FAILED If the machine displays Connect contaminated TEST FAILED refrigerant VERIFY REFRIGERANT IDENTIFIER recovery IS WORKING CORRECTLY? machine here. OK TO CONTINUE ESC TO QUIT the refrigerant in the source tank or in the vehicle A/C system is either contaminated or it is not R1234yf. In either case, it should not be added to the internal storage vessel in the BAC 5100yf. The contaminated refrigerant sampled by the BAC 5100yf refrigerant identifier must be removed. There are two options to accomplish this. A second recovery machine dedicated to handling contaminated refrigerant is required for the Figure 26 following steps: 1. With the BAC 5100yf still connected to the vehicle...
- Page 45 SYSTEM EMPTY CHECK CONNECTIONS RECOVER ANYWAY Verify high-side (red) and low-side (blue) hoses are connected and coupler valves open. Press OK to recover, select VACUUM to bypass RECOVER, or press ESC to exit. Display Message: FILTER WEIGHT XXX LB If 125 kg (276 lbs.) or more of refrigerant has been recovered since last filter change, display reads FILTER WEIGHT XXX LB To meet requirements, it is mandatory to replace the filter after 150 kg (331 lbs.) of refrigerant has been filtered. The machine gives a warning to replace the filter when filter weight reaches 125 kg (276 lbs.); when filter weight reaches 150 kg (331 lbs.), the machine locks out and ceases to operate. Refer to Replace the Filter in the Maintenance section. Display Message: REPLACE IDENTIFIER FILTER If the machine displays REPLACE IDENTIFIER FILTER PRESS OK TO CONFIRM the filter inside the refrigerant identifier needs to be replaced. Press OK to confirm, and refer to the Maintenance section of this manual for instructions. BAC 5100yf Rev. A...
- Page 46 Troubleshooting Procedures Vacuum Function Display Message: PRESSURE TOO HIGH Before the machine begins evacuating the A/C system, it checks for pressure in the system that might damage the vacuum pump. If pressure greater than 0.7 bar is detected, the machine displays PRESSURE TOO HIGH CHECK CONNECTIONS Select OK, and recover refrigerant before proceeding. Display Message: VACUUM TIME X:XX MIN If a leak test was programmed, and a leak is detected, the machine displays VACUUM TIME X:XX MIN LEAK TEST RESULT NEGATIVE Press ESC to exit the automatic sequence and perform needed repairs. Press OK to continue the automatic sequence despite the failed leak test. To ensure an accurate leak test, it is imperative that a thorough recovery and evacuation of the system be performed. During the recovery process, cold spots can develop in the A/C system. Pockets of refrigerant in desiccant and in system oil will continue to vaporize as the A/C system temperature equalizes toward ambient. As this occurs, A/C system pressure will increase, which may be interpreted by the machine as a leak. This will vary somewhat with ambient temperature conditions.
- Page 47 Troubleshooting Procedures Charge Function The charge process includes a pre-charge leak test that fills the system with a small amount of refrigerant and then monitors pressure decay. — If the leak test passes, the refrigerant is automatically recovered and the selected charge is added. — If the leak test fails, the refrigerant needs to be recovered and the vehicle needs to be checked for leaks by using an electronic leak detector. System Flush Display Message: NO FLOW DETECTED If the external flushing filter is plugged, the machine displays POSSIBLE CLOGGED FLUSH FILTER PRESS OK TO REPLACE PRESS ESC TO ABORT The message repeats until the filter is replaced. BAC 5100yf Rev. A...
- Page 48 Troubleshooting Procedures Automatic Function Display Message: REFRIGERANT INSUFF If the weight entered is more than the refrigerant available in the ISV, the charge function will not start. The display reads REFRIGERANT INSUFF. Refer to Manually Fill the ISV in the Maintenance section. Display Message: PRESSURE TOO HIGH FOR VACUUM Before the machine begins evacuating the A/C system during the automatic sequence, it checks for any pressure in the system that may damage the vacuum pump. If pressure is detected, the machine displays PRESSURE TOO HIGH! X.XX BAR CHECK CONNECTIONS. Press ESC. Recover refrigerant before proceeding. Display Message: VACUUM TIME X:XX MIN If a leak test was programmed, and a leak is detected, the machine displays VACUUM TIME X:XX MIN LEAK TEST RESULT NEGATIVE Press ESC to exit the automatic sequence and perform needed repairs. Press OK to continue the automatic sequence despite the failed leak test.
-
Page 49: Storage And Transportation Of Equipment
Transportation of Equipment couplers connected to storage WARNING: To prevent personal injury should ports. the machine require transport to a local Beissbarth Figure 27 service center, follow local government regulations regarding transportation of equipment containing R1234yf. BAC 5100yf Rev. A... -
Page 50: Disposal Of Equipment
Disposal of Equipment Disposal of Equipment At the end of its useful life, dispose of the Beissbarth No. BAC 5100yf machine according to current government regulations. • Public administration and producers of electrical / electronic equipment (EEE) are involved in facilitating the processes of the re-use and recovery of waste electrical / electronic equipment through the organization of collection activities and the use of appropriate planning arrangements. • In accordance with European Directive WEEE 2002/96/EC, special collection sites are available for waste electrical / electronic equipment. • Do not dispose of this equipment as miscellaneous solid municipal waste. Arrange to have it collected separately. Unauthorized disposal of waste electrical / electronic equipment is punishable by law with appropriate penalties. • The reuse and correct recycling of electrical / electronic equipment (EEE) is required for the protection of the environment and the well-being of humans. Disposal of Recycled Materials It is the responsibility of the user to determine if a material is a hazardous waste at the time of disposal. The user must ensure compliance with all applicable laws and regulations. 1. Deliver the refrigerant recovered from A/C systems to gas suppliers for recycling or disposal. 2. Deliver the lubricants extracted from A/C systems to used oil collection centers. 3. Review the laws in your jurisdiction to determine correct disposal procedures for pump oil. Disposal of the Machine 1. Detach and vent the gas from the machine circuit. Completely discharge the refrigerant tank in compliance with current government regulations. - Page 51 The Beissbarth unit is designed to meet all applicable agency certifications, including Underwriter's Laboratories, Inc., SAE Standards, and CUL. Certain state and local jurisdictions dictate that using this equipment to sell refrigerant by weight may not be permitted. We recommend charging for any A/C service by the job performed. This weight scale provides a means of metering the amount of refrigerant needed for optimum A/C system performance as recommended by OEM manufacturers.
Need help?
Do you have a question about the BAC 5100yf and is the answer not in the manual?
Questions and answers