Table of Contents
Advertisement
Quick Links
Advertisement
Table of Contents

Summary of Contents for Yolink Uno YS1B01-UN
- Page 1 YoLink Uno WiFi Camera YS1B01-UN Installation & User Guide Revision Jul. 14, 2023...
-
Page 2: Table Of Contents
CONTENTS . Welcome! . Before You Begin . In the Box . Required Items . Get to Know Uno Camera . Install the App . Add Uno to the app & connect to WiFi . Camera Settings . Record Type Settings . -
Page 3: Welcome
Welcome! Thank you for purchasing YoLink products! We appreciate you trusting YoLink for your smart home & automation needs. Your 100% satisfaction is our goal. If you experience any problems with your installation, with our products or if you have any questions that this manual does not answer, please contact us right away. -
Page 4: Before You Begin
Before You Begin Visit our YoLink Uno WiFi Camera support page on our website, for the latest installation guides, additional resources, information and videos by visiting: https://shop.yosmart.com/pages/ uno-product-support Or by scanning the QR code: Download the most current version of the user... -
Page 5: In The Box
In the Box YoLink Uno WiFi Camera Quick Start Guide AC/DC Power Supply Adapter Anchors (3) Screws (3) Mounting Base USB cable(Micro B) -
Page 6: Required Items
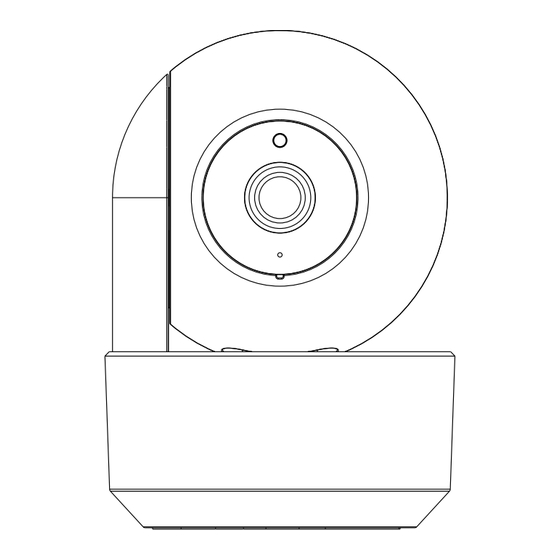
Required Items You may require these items: Drill with Drill Bits Medium Phillips Screwdriver Get to Know Uno Camera Speaker DC Power Port... - Page 7 Get to Know Uno Camera, Continued Photosensitive Detector Status LED Microphone MicroSD Card Slot Reset Button The camera supports a MicroSD card that is up to 128 GB. LED Behaviors Device Power Up The Configuration is Complete and Device Connected to Wi-Fi Received QR Code Information - Fails to Connect to Wi-Fi...
-
Page 8: Install The App
Install the App If you are new to YoLink, please install the app on your phone or tablet, if you have not already. Otherwise, please proceed to the next section. Scan the appropriate QR code below or find the “YoLink app” on the appropriate app store. -
Page 9: Add Uno To The App & Connect To Wifi
Add your Uno to the app & connect to WiFi 1. Tap Add Device (if shown) or tap the scanner icon: Scanner icon 2. Approve access to your phone’s camera, if requested. A viewfinder will be shown on the app. 3. - Page 10 Add your Uno to the app & connect to WiFi, Continued You can change the device name and assign it to a room later. Tap Bind device. If successful, the screen will appear as shown. Tap Done. 4. Leave the app open to this screen. 5.
- Page 11 Add your Uno to the app & connect to WiFi, Continued Plug in the USB cable to connect the camera and power supply. The camera will perform a start-up sequence, including rotating the lens assembly. Please pay attention to any spoken messages. The camera should say “WiFi hotspot mode.
- Page 12 Add your Uno to the app & connect to WiFi, Continued 7. Ensure your Wi-Fi SSID is displayed in the Current Wi-Fi SSID box. Enter you SSID name, if needed. 8. Enter your Wi-Fi’s password in the Password box. Tap Continue.
- Page 13 Add your Uno to the app & connect to WiFi, Continued 9. A QR code will be displayed. If your camera’s last message was “Waiting for WiFi Connection” proceed to step 10, otherwise, as instructed on the screen, press and hold the button on the camera for more than 5 seconds, to enter the hotspot mode.
- Page 14 Add your Uno to the app & connect to WiFi, Continued 11. The camera should beep, and play the message “WiFi connection successful” 12. Tap Done. Close any alert pop-ups that may appear. 13. From the Rooms screen, you should see your new camera.
-
Page 15: Camera Settings
Camera Settings 1. Tap here to view and edit camera settings. - Page 16 Camera Settings, Continued Here is a summary of the camera settings: Device Type Tap to edit the device name to assign your camera to a room Tap to assign your camera to a room Tap to video records Tap to view camera historical logs Tap to edit the camera’s WiFi credentials...
- Page 17 Camera Settings, Continued Tap to change the camera’s assigned Alarm Strategy Tap to edit recording settings Tap to edit motion detection settings See page 16 Tap to edit human detection settings See page 17 Tap to edit sound detection settings See page 17 Tap to edit night vision settings...
-
Page 18: Record Type Settings
Record Type Settings Select from the following settings to configure your camera’s record type settings: OFF: camera will not record Full Time: camera will record continuously Alarm: camera will only record alarm events Please note: at this time, recording to the cloud or to a network-attached drive are not available options –... -
Page 19: Human Detector Settings
Human Detector Settings Your camera can detect people. The people detection settings available are as follows: Low, Moderate, Medium, High, Critical. Select OFF to disable people detection. Sound Detector Settings Your camera can detect sound. The sound de- tection settings available are as follows: Low, Moderate, Medium, High, Critical. -
Page 20: Main Camera Screen
Main Camera Screen Tap to return to the previous screen Tap for support resources Tap for camera settings Date & time Camera image Play/pause button Tap for full screen Video bitrate Video resolution Enable/disable sound... - Page 21 Main Camera Screen, Continued Tap for the live video stream Tap to view Local Records Tap to change Location Tap to take a screenshot (Grant app access to photos, as needed) Microphone button (press and hold to speak or listen). Grant app access to mic, as needed Camera pan/tilt buttons...
-
Page 22: Automations
Automations The following automation features are available for the Uno Camera: The following camera events can trigger an au- tomation: Motion Detected Human Detected Sound Detected The following device actions are available as automation behaviors: Start Recording... -
Page 23: Warnings
Warnings 1. The camera must not be installed outdoors or in environmental conditions outside of the range specified. The camera is not water resistant. Refer to the environmental specifications on the product support page. 2. Ensure the camera is not exposed to excessive smoke or dust. -
Page 24: Installation
Installation It is recommended that you setup and test your new camera before installing it (if applicable; for ceiling-mounting applications, etc.) Location considerations (finding a suitable location for the camera): 1. The camera can be placed on a stable surface, or mounted on the ceiling. - Page 25 Installation, Continued If ceiling-mounting is desired, please make note of the following important information: 1. Use extra care to ensure the camera is mounted securely to the ceiling surface. 2. Ensure the USB cable is secured in such a way that the weight of the cable does not pull down on the camera.
- Page 26 Installation, Continued Ceiling-mounting: 1. Determine the location for the camera. Before permanently installing the camera, you may wish to temporarily place the camera at the intended location, and check the video images in the app. For example, hold the camera in position on the ceiling, while you or a helper checks the images and field of view and range of motion (by testing the pan and tilt positions).
- Page 27 Installation, Continued 3. Insert the plastic anchors in the holes. Drilling Position 4. Secure the camera mounting base to the ceiling, using the included screws, and tightening them securely with a Phillips screwdriver.
- Page 28 Installation, Continued 5. Place the bottom of the camera on the mounting base, and snap it into place with a clockwise twisting motion, as shown in Figures 1 and 2. Twist the base of the camera, not the camera lens assembly. Check that the camera is secure and that it does not move from the base, and that the base does not move from the ceiling or mounting surface.
-
Page 29: Replace Storage Card
Replace Storage Card The Uno Camera is shipped with a 64GB memory card. It can be replaced with a card with capacity up to 128GB. Avoid replacing the storage card while the camera is on. 1. Unplug the camera. 2. Rotate the camera lens assembly to gain access to the memory card slot. -
Page 30: Factory Reset
Factory Reset Factory reset will erase device settings and restore it to factory default settings. Doing a factory reset will not remove the device from your account and it will not harm the device, or lose any data or require you to redo your automations, etc. -
Page 31: Fcc Statement
FCC Statement This device complies with part 15 of the FCC Rules. Operation is subject to the following two conditions: (1) This device may not cause harmful interference, and (2) this device must accept any interference received, including interference that may cause undesired operation. - Page 32 The device has been evaluated to meet general RF exposure requirement. The device can be used in portable exposure condition without restriction. PRODUCT NAME: YOLINK UNO WIFI CAMERA PARTY: YOSMART, INC. TELEPHONE: 831-292-4831 MODEL NUMBER: YS-5002-UC...
-
Page 33: Contact Us
Contact Us We are here for you, if you ever need any assis- tance installing, setting up or using a YoLink app or product! Need help? For fastest service, please email us 24/7 at service@yosmart.com Or call us at 831-292-4831 (US phone support hours: Monday - Friday, 9AM to 5PM Pacific)
Need help?
Do you have a question about the Uno YS1B01-UN and is the answer not in the manual?
Questions and answers