Table of Contents

Summary of Contents for base engineering ProControl 3
- Page 1 ProControl 3 INTEGRATED FUEL DELIVERY SYSTEM HANDHELD 1 TO 11 FUNCTION RADIO REMOTE CONTROL FHSN/DSSN Installation & Operating Procedures REV. 3.5 THIS MANUAL SHOULD BE KEPT WITH THE TRUCK WHERE THE UNIT IS INSTALLED. UM-16-012...
- Page 2 THANK YOU FOR YOUR PURCHASE OF THIS PRODUCT. BASE Engineering Inc. strives to continuously improve its products and services. Customer feedback is an important part of this process. If you have suggestions for the improvement of this product, this document or the services we provide, we would like to hear from you.
-
Page 3: Product Warnings
PRODUCT WARNINGS PLEASE READ BEFORE OPERATING OR INSTALLING ANY BASE SYSTEM • Air solenoids used to control the tank internal valves should be connected to the same air supply for the DOT required MANUAL Emergency Stop switch(es). Following activation of the radio remote Emergency Stop feature, the operator MUST first close the manual internal valve switch prior to resetting the BASE system. - Page 4 PRODUCT WARNINGS • Unauthorized modifications to any BASE system or any unintended uses of BASE systems may void the manufacturer’s warranty for the product. This may include, but is not limited to, drilling holes in BASE product enclosures, adding auxiliary or bypass switches, changes to installation procedures, modifications to antennae configurations, or changes to the electronic or mechanical workings of the system.
-
Page 5: Table Of Contents
TABLE OF CONTENTS Product Warnings Handheld Components Handheld Overview Batteries & Charging Brake Interlock Alarm Charging Cradle Specifications Handheld Operation General Functions Data Entry Common Screens Standard Delivery Screen Preset Screen Compartment/Tote Screen RFID Scanning Screen Barcode Scanning Screen Barcode Support Main Menu Screen Handheld Settings Screen Register Setup Screen... -
Page 6: Handheld Components
A park-brake interlock switch for all air-brake truck applications is available from BASE Engineering at the time of order. AN UNINTENTIONAL ENGINE SHUT DOWN WHILE THE VEHICLE IS IN MOTION MAY RESULT IN SERIOUS INJURY OR DEATH. -
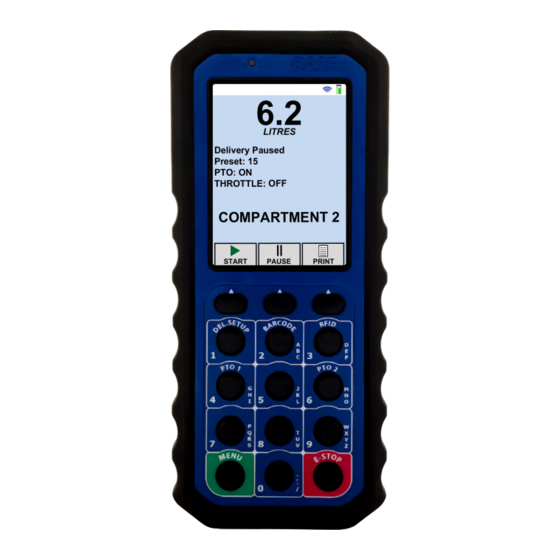
Page 7: Handheld Overview
3 navigation buttons will be mode/menu specific and displayed directly above the button. The ProControl 3 handheld can be equipped with Direct Sequence Spread (DSS) radio technology at an operating frequency of 2.4Ghz, or a Frequency Hopping Spread... -
Page 8: Batteries & Charging
BATTERIES & CHARGING The ProControl 3 handheld runs on a rechargeable lithium ion battery pack that can endure up to 12 hours of use. When the battery is exhausted, the handheld battery icon will change to a single red bar. At this point the... -
Page 9: Brake Interlock Alarm
BRAKE INTERLOCK ALARM There is an optional alarm in the charging cradle that will sound when the user drives away with the handheld undocked. To do this, the charging cradle must be interconnected with a brake-line pressure sensor and with the signal from the truck’s “Ignition ON/RUN”... -
Page 10: Charging Cradle Specifications
Please see your provided drawing for further descriptions. This operational manual will outline only the standard functionality of the ProControl 3 handheld. POWERING THE HANDSET ON / OFF The units are shipped with the handheld turned off. -
Page 11: General Functions
GENERAL FUNCTIONS Most screens can control any necessary truck functions. You can navigate back to your last screen by pressing the ‘Menu’ button. FUNCTION BUTTONS When a function is pressed, the handheld will communicate with the truck unit to turn the channel on or off. -
Page 12: Data Entry
DATA ENTRY NUMERIC ENTRY Some text fields will only accept number entires. For these fields, the keypad will only input numbers. For example, to enter the number “55”, simply press the “5” button twice in a row. ALPHANUMERIC ENTRY For fields that accept alphanumeric entries (0-9, A-Z), multi-tap input will be required. -
Page 13: Common Screens
COMMON SCREENS STANDARD DELIVERY SCREEN From this screen, you will be able to view the present volume from the truck’s meter register. Additional control of the register can also occur from this screen. < Preset Status To activate a delivery, press the navigation <... -
Page 14: Preset Screen
COMMON SCREENS PRESET SCREEN This screen allows you to enter a preset value. Use the alphanumeric keypad to enter the required volume or price on compatible registers. Once entered, press the navigation button under the ‘Select’ label. If a correction is required, press the navigation button under the back arrow to delete the last entered number. -
Page 15: Barcode Scanning Screen
COMMON SCREENS BARCODE SCANNING SCREEN This screen allows the user to read the local Barcode and verify its customer ID. What displays on the screen will change as the handheld processes the information. > > System is ready to scan the On the validating screen, Once the barcode has barcode. -
Page 16: Main Menu Screen
COMMON SCREENS MAIN MENU SCREEN This screen can be used to enter settings and diagnostics for the handheld and system. • Use the navigation buttons to select the desired function. • Press the ‘Select’ button to open the selected functions screen. Item Description Shut Down Handheld... -
Page 17: Register Setup Screen
When the register information is If no information is displayed on loaded into the ProControl 3, the the Register Synchronization user can return to the Delivery screen after 5 seconds, check to... -
Page 18: Compartment Setup Screen
COMMON SCREENS REGISTER SETUP SCREEN (CONTINUED) • Be sure that the register address specified is accurate for the register in use. The synchronization can be restarted by exiting and re-entering this screen. COMPARTMENT SETUP SCREEN Compartments can be renamed or hidden from the quick list (available from the dedicated Compartment button). -
Page 19: System Testing
SYSTEM TESTING DIAGNOSTICS MENU The diagnostics screen is useful when issues arise and/or further communication information is required. You can use the ’Diagnostics’ screen for radio diagnostics and handheld properties. Radio Diagnostics Radio diagnostics are used to verify the quality of the communication between the handheld and truck receiver. -
Page 20: Emergency Stop Testing
SYSTEM TESTING EMERGENCY STOP TESTING The system should regularly be powered up and tested in accordance with DOT documentation requirements. Power up the receiver unit and ensure the POWER/ACTIVITY LED is illuminated. 2. Power up the handheld by pressing the green menu button until the display is active. -
Page 21: Usb Firmware Updating
USB FIRMWARE UPDATING The firmware of the handheld can be updated in the field if it is necessary. To conduct the firmware updating, the following steps should be done. 1. Confirm USB Compatibility a. Place the handheld into the charging cradle and confirm that the green cradle light is illuminated. -
Page 22: System Pairing (Dedication)
SYSTEM PAIRING (DEDICATION) DEDICATION SCREEN The wireless control system is supplied from the factory fully programmed and ready for use, however, the following procedure can be used to re- program / dedicate a replacement handheld or receiver unit in the field. On the handheld, enter the main menu by pressing the green ‘Menu’... - Page 23 SYSTEM PAIRING (DEDICATION) 6. The pairing process will happen automatically and may take up to 1 minute to complete. > If the dedication process was successful, press the green ‘Menu’ button to return to the ’Main Menu’ screen. If an error occurs as shown, start the procedure from the beginning.
-
Page 24: System Maintenance
• If one of the system checks fails, contact BASE Engineering to troubleshoot your handheld unit. • Handheld repairs or modifications must be done by BASE Engineering to maintain your warranty or certification. -
Page 25: Warranty & Return Procedures
All parts and accessories purchased from BASE that were not purchased as a part of a system carry a one-year warranty. If a product is deemed defective by BASE Engineering, BASE will repair or replace (at its sole discretion) the product without charge for parts or labor. -
Page 26: Notes
NOTES UM-16-012... - Page 27 NOTES UM-16-012...
-
Page 28: Technical Support
TECHNICAL SUPPORT BASE Engineering systems are warranted to be free from manufacturing defects in materials and workmanship for a period of four years from the date of manufacture. All parts and accessories purchased from BASE that were not purchased as a part of a system carry a one-year warranty.
Need help?
Do you have a question about the ProControl 3 and is the answer not in the manual?
Questions and answers