Advertisement
Quick Links
packing list
1 - AutoPilot
1 - Power cord
1 - Connection Cable
1 - 1/4" OD Blue Tubing 10ft
1 - Tee Union
introduction
The AutoPilot allows you to control your dust collector and pneumatic valve automatically from a micromotor
or lathe workstation. When you start your micromotor, the dust collector will activate, and the pneumatic
valve will open, providing suction to the station. When you stop the micromotor, the dust collector will run
for a short time to clear any remaining dust, then turn off.
Note: The AutoPilot supports a micromotor, electric handpiece or lathe that operates at 5 amps, 115VAC,
or less. Plug the Autopilot into its own designated grounded outlet.
instructions
1. Connecting the Autopilot to your Dust Collector:
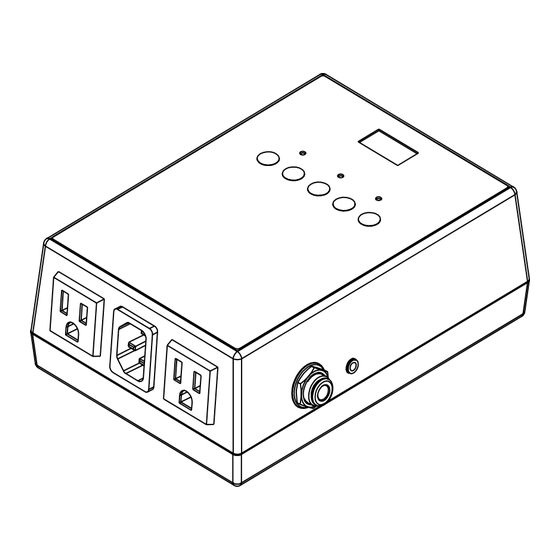
• Plug the provided connection cable into the jack on the right side of the AutoPilot.
• Connect the other end to one of the following:
• Combining Box (PN: 96069)
• Standard Remote Hub (PN: 96109)
• SmartSpeed Remote Hub (PN: 96111)
• Compatible Dust Collectors with 3.5mm remote ports:
• V6 SE (PN: 10281), StoneVac SC (PN: 10240), StoneVac II Plus (PN: 10202),
Vanguard Platinum (PN: 10330)
• Connect the Combining Box or Remote Hub to the dust collector's remote plug.
Note: Check your dust collector's manual to confirm the correct operation of the Remote
function.
• If your dust collector isn't compatible with the provided connection cable, you can connect it
directly to the Autopilot's Dust Collector Receptacle (115V, max 10 amps).
2. Pneumatic Connections:
• Operating Pressure: Recommended between 15-18 PSI (Max: 20 PSI).
• A 10ft length of 1/4" OD air tubing (PN: 2257) is included, with longer lengths available if needed.
Connect the tubing from your air supply to the quick-disconnect fitting on the left side of the AutoPilot.
• Connect a tube from the pneumatic valve (PN: 10518) to the quick disconnect on the right side
of the Autopilot.
3. Powering On the Autopilot:
• Connect the provided power cord into the Autopilot's Power Receptacle and flip the circuit breaker
to the ON position.
• The display should turn on and the Blue LED will light up, indicating Manual Mode.
25799 Jefferson Ave.
Murrieta, CA 92562
6
D
C
B
A
sales@vaniman.com
www.vaniman.com
autopilot
5
4
3
1-800-VANIMAN (826-4626)
Autopilot-i-10/24 pAge 1
96073
2
1
Advertisement

Related Manuals for Vaniman AUTOPILOT 96073

Summary of Contents for Vaniman AUTOPILOT 96073
- Page 1 • Connect the provided power cord into the Autopilot's Power Receptacle and flip the circuit breaker to the ON position. • The display should turn on and the Blue LED will light up, indicating Manual Mode. 25799 Jefferson Ave. Murrieta, CA 92562 sales@vaniman.com www.vaniman.com 1-800-VANIMAN (826-4626) Autopilot-i-10/24 pAge 1...
- Page 2 • Save your settings by holding the Manual button for a long press, or the Autopilot will automatically save after 5 minutes of inactivity. 25799 Jefferson Ave. Murrieta, CA 92562 sales@vaniman.com www.vaniman.com 1-800-VANIMAN (826-4626) Autopilot-i-10/24 pAge 2...
- Page 3 Ensure the Autopilot is plugged into its own outlet. • Compatibility Issues: Some high-speed brushless micromotors may not draw enough power to trigger the AutoPilot. Contact Vaniman if you experience this issue. NSK Ultimate XL-K and/or Z500 Series Handpiece Users From the NSK Ultimate XL-K and Z500 Users manual: “Vacuum-coupled Mode"...
- Page 4 Standard Remote Hub: P/N 96109 To Remote Port SmartSpeed Remote Hub: on Dust Collector P/N 96111 Smart Switch 96068 Connect to pneumatic valves (Requies separate power supply and compressed air) Smart Remote Switch 96068B Smart AutoPilot 96073 Connect micro-motors, handpieces, pneumatic valves...
Need help?
Do you have a question about the AUTOPILOT 96073 and is the answer not in the manual?
Questions and answers