Table of Contents
Advertisement
Quick Links
Polyhex Technology Company Limited
DEBIX Mini PC (BPC-iMX8MP-08)
User Guide
Version:V1.1 (2024-10)
Complied by:Polyhex Technology Company Limited (http://www.polyhex.net/)
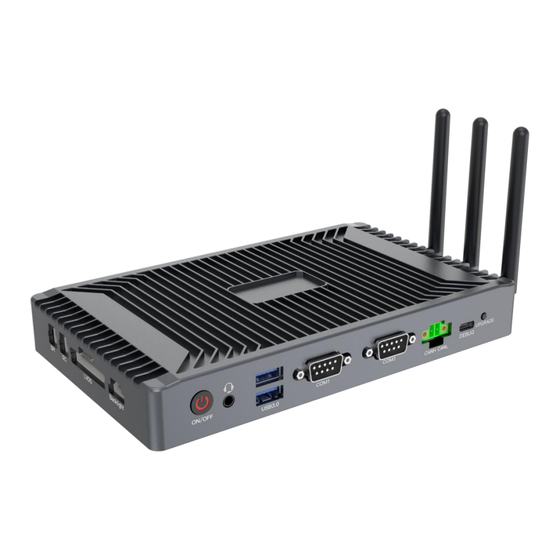
DEBIX Mini PC (BPC-iMX8MP-08) is a mini personal computer based on the SoC, NXP i.MX
8M Plus. It consists of the DEBIX motherboard (EMB-iMX8MP-07), an aluminum alloy
enclosure, and antennas. It provides rich interfaces for IoT gateways, edge computing,
security, building control and industrial applications. And it has a variety of anti-harsh
environment features, including robustness, dust, shock, shock, wide temperature,
portability and more.
Figure 1 DEBIX Mini PC (BPC-iMX8MP-08)
1 / 56
www.debix.io
Advertisement
Table of Contents

Related Manuals for DEBIX BPC-iMX8MP-08

Summary of Contents for DEBIX BPC-iMX8MP-08
- Page 1 Version:V1.1 (2024-10) Complied by:Polyhex Technology Company Limited (http://www.polyhex.net/) DEBIX Mini PC (BPC-iMX8MP-08) is a mini personal computer based on the SoC, NXP i.MX 8M Plus. It consists of the DEBIX motherboard (EMB-iMX8MP-07), an aluminum alloy enclosure, and antennas. It provides rich interfaces for IoT gateways, edge computing, security, building control and industrial applications.
-
Page 2: Revision History
Polyhex Technology Company Limited REVISION HISTORY Rev. Date Description 2024.10.17 First edition 1. Optimized the content 2024.10.29 2. Added the part of 2.3.12. RTC 2 / 56 www.debix.io... -
Page 3: Table Of Contents
2.3.4.1. HDMI Interface ................16 2.3.4.2. LVDS Interface .................17 2.3.4.3.LVDS Backlight Control Adjustment Interface ......18 2.3.4.4. LVDS PWR ..................19 2.3.5. Audio ......................21 2.3.6. Debug ......................21 2.3.7. RS232/RS485 ....................22 2.3.8. CAN ....................... 24 2.3.9. GPIO ......................25 3 / 56 www.debix.io... - Page 4 3.2. Hardware Connection ..................40 Chapter 4 Functional Examples ..................41 4.1. Usage of Ethernet ....................41 4.2. Usage of USB3.0 ....................41 4.3. Usage of 4G/5G Network ..................42 4.4. Usage of CAN ......................47 4.5. Usage of RS232/RS485 ..................49 4 / 56 www.debix.io...
- Page 5 Polyhex Technology Company Limited 4.6. Usage of Debug .....................52 4.7. Usage of I2C ......................55 4.8. Usage of SPI ......................55 4.9. Usage of GPIO ......................56 5 / 56 www.debix.io...
-
Page 6: Chapter 1 Security
Always ground yourself to remove any static electric charge before BPC-iMX8MP-08) touching DEBIX Mini PC ( . Modern electronic devices are very sensitive to electric charges. Use a grounding wrist strap at all times. Place all electronic components on a static-dissipative surface or in a static-shielded bag. -
Page 7: Technical Support
10.Due to the sensitive nature of the equipment, it must be stored in a restricted access location, and only accessible by qualified engineer. 1.3. Technical Support 1. Visit DEBIX website https://www.debix.io/ where you can find the latest information about the product. 2. Contact your distributor, sales representative or Polyhex’s customer service center for technical support if you need additional assistance. - Page 8 Polyhex Technology Company Limited The exact wording of any error messages Technical Support: Discord Community (recommended): https://discord.com/invite/adaHHaDkH2 Email: info@debix.io 8 / 56 www.debix.io...
-
Page 9: Chapter 2 Introduction
Polyhex Technology Company Limited Chapter 2 Introduction DEBIX Mini PC (BPC-iMX8MP-08) is a NXP i.MX 8M Plus based DEBIX Mini PC. It is designed for industrial applications, which can be used in a wide range of schemes that require high reliability, including machine vision and machine learning, advanced multimedia, smart cities, and edge computing. -
Page 10: Overview
Polyhex Technology Company Limited 2.1. Overview DEBIX Mini (BPC-iMX8MP-08) composed DEBIX motherboard (EMB-iMX8MP-07), an aluminum alloy enclosure and antennas (antennas are optional). Figure 2 DEBIX Motherboard (EMB-iMX8MP-07) Front View 10 / 56 www.debix.io... - Page 11 Polyhex Technology Company Limited Figure 3 DEBIX Motherboard (EMB-iMX8MP-07) Back View 11 / 56 www.debix.io...
- Page 12 Polyhex Technology Company Limited Figure 4 DEBIX Mini PC (BPC-iMX8MP-08) 12 / 56 www.debix.io...
- Page 13 Polyhex Technology Company Limited DEBIX Mini PC (BPC-iMX8MP-08) uses NXP i.MX 8M Plus as SoC, supporting Ethernet, wireless network, Bluetooth 5.3, 4G/5G module, etc. The specification is as follows: Table 2 Specification of DEBIX Mini PC (BPC-iMX8MP-08) System BPC-iMX8MP-08 Product Model i.MX 8M Plus/MIMX8ML4CVNKZAB, 4 x ARM Cortex-A53,...
- Page 14 Mechanical & Environmental Dimension 200.0mm x 121.0mm x 28.0mm(±0.5mm) (L x W x H) Net Weight 175g (±0.5g) (EMB-iMX8MP-07) Net Wright 610g (±0.5g) (DEBIX Mini PC) -20℃~70℃ Operating Temp. -40℃~85℃ (optional) Enclosure Color Grey (Black is optional) Enclosure Material...
-
Page 15: Interface
Polyhex Technology Company Limited 2.2. Interface 2.3.1. Power Interface DEBIX Mini PC (BPC-iMX8MP-08) provides one 5.5 x 2.1mm DC IN female. Default input: DC 12V/3A. 2.3.2. USB 3.0 DEBIX Mini PC (BPC-iMX8MP-08) provides six USB 3.0 interfaces: 2.3.3. Ethernet Interface DEBIX Mini PC (BPC-iMX8MP-08) provides two Gigabit Ethernet ports with independent MAC address:... -
Page 16: Display Interface
Polyhex Technology Company Limited Connect the DEBIX Mini PC (BPC-iMX8MP-08) to the network through a network cable in the RJ45 connector. A set of status indicators below the interface displays the status signal. The green one indicates Link, which is network connection indicator, and the yellow one does Active, which is signal transmission indicator. -
Page 17: Lvds Interface
Polyhex Technology Company Limited 2.3.4.2. LVDS Interface DEBIX Mini PC (BPC-iMX8MP-08) provides one LVDS interface: The refdes. is J7. The connector is the 2 x 15PIN wafer. It can be used to connect monitors, televisions or projectors. The resolution is 1080p@60Hz. -
Page 18: 3.Lvds Backlight Control Adjustment Interface
LVDS_VDD 2.3.4.3.LVDS Backlight Control Adjustment Interface DEBIX Mini PC (BPC-iMX8MP-08) provides one 6Pin/2.0mm LVDS backlight control adjustment Interface: The refdes. is J8. Through it, the LVDS backlight can be turned on or off and the backlight brightness can be adjusted. -
Page 19: Lvds Pwr
The range of DC:12-36V LVDS_BL_EN Backlight switch enabled LVDS_BL_PWM Backlight brightness PWM control To ground To ground 2.3.4.4. LVDS PWR DEBIX Mini PC (BPC-iMX8MP-08) provides one LVDS PWR interface on the DEBIX motherboard: The refdes. is J6. 19 / 56 www.debix.io... - Page 20 Polyhex Technology Company Limited The figure of the LVDS PWR’s PCBA pin sequence is shown as below: The pin sequence of the LVDS PWR interface is shown as below: LVDS PWR interface is defined as follows: Table 6 20 / 56 www.debix.io...
-
Page 21: Audio
DEBIX only supports four-segment headphone plug for using MIC. The definition is shown in the following figure, which includes left channel, right channel, GND, and MIC recording. It is necessary to connect to the DEBIX audio interface according to the definition of GND and MIC for normal use. -
Page 22: Rs232/Rs485
Polyhex Technology Company Limited debugging serial port. The connector is UART to USB Type-C. 2.3.7. RS232/RS485 DEBIX Mini PC (BPC-iMX8MP-08) provides two COM interfaces: COM 1 and COM 2. COM 1: 1 x RS232/RS485 COM 2: 1 x RS232/RS485 ... - Page 23 RS485 differential signal line A RS232_RXD RS232 receiving terminal The pin sequence of COM 1 (Left) and COM 2 (Right) is shown as below: 2 x COM interfaces (RS232/RS485) are defined as follows: Table 8 Definition Definition 23 / 56 www.debix.io...
-
Page 24: Can
Polyhex Technology Company Limited RS485_B- RS232_TXD-RS485_A+ RS232_RXD 2.3.8. CAN DEBIX Mini PC (BPC-iMX8MP-08) provides one 2Pin CAN interface: The refdes. is J17. The pin sequence of CAN interface is shown as below: The 2PIN CAN interface is defined as follows: Table 9 Definition... -
Page 25: Gpio
CAN_L HIGH-level CAN bus 1# line 2.3.9. GPIO DEBIX Mini PC (BPC-iMX8MP-08) provides one 4 x DI, 4 x DO GPIO interface:The refdes. is J18. The pin sequence of GPIO interface is shown as below: GPIO interface is defined as follows:... -
Page 26: I2C
GPIO5-IO10 GPIO5-IO11 GPIO5-IO12 GPIO5-IO13 2.3.10. I2C DEBIX Mini PC (BPC-iMX8MP-08) provides one I2C interface: The refdes. is J20. The pin sequence of I2C interface is shown as below: I2C interface is defined as follows: Table 11 26 / 56 www.debix.io... -
Page 27: Spi
VDD3V3_I2C TP-I2C-SCL TP-I2C-SDA TP-nRESET TP-nINT 2.3.11. SPI DEBIX Mini PC (BPC-iMX8MP-08) provides one 6Pin SPI interface: The refdes. is J19. The pin sequence of SPI interface is shown as below: SPI interface is defined as follows: Table 12 Definition Definition... -
Page 28: Rtc
Polyhex Technology Company Limited ECSPI1-SCLK 2.3.12. RTC DEBIX Mini PC (BPC-iMX8MP-08) provides one RTC interface on the DEBIX motherboard: The refdes. is J12. The figure of the RTC interface’s PCBA pin sequence is shown as below: 28 / 56 www.debix.io... -
Page 29: Led & Button
RTC_VDD3V3 3.3 voltage input To ground 2.3.13. LED & Button DEBIX Mini PC (BPC-iMX8MP-08) provides one ON/OFF button with LED (Red) and one UPGRADE button. The specific status is described as follows: Table 14 Description of the Button Status Function... -
Page 30: Dip Switch
Polyhex Technology Company Limited 2.3.14. DIP Switch DEBIX Mini PC (BPC-iMX8MP-08) provides three onboard DIP switches, each bit of which has two states, “ON” and “OFF”. Switch to the “ON” side indicating the on-state. BOOT DIP switch (Refdes.: SW1) ... -
Page 31: Com 1 Rs232/Rs485 Dip Switch (Refdes.: Sw2)
2.3.14.2. COM 1 RS232/RS485 DIP Switch (Refdes.: SW2) : The COM 1 interface has two serial port modes: 00110--RS232 11001--RS485 NOTICE “00110”--RS232 is the default configuration. Two modes of the COM 1 RS232/RS485 DIP switch are shown as below: 31 / 56 www.debix.io... -
Page 32: Com 2 Rs232/Rs485 Dip Switch (Refdes.: Sw3)
2.3.14.3. COM 2 RS232/RS485 DIP Switch (Refdes.: SW3) : The COM 2 interface has two serial port modes: 00110--RS232 11001--RS485 NOTICE “00110”--RS232 is the default configuration. Two modes of COM 2 RS232/RS485 DIP switch are shown as below: 00110--RS232 11001--RS485 32 / 56 www.debix.io... -
Page 33: Slot
Polyhex Technology Company Limited 2.3.15. Slot DEBIX Mini PC (BPC-iMX8MP-08) provides one Micro SD slot and one Nano SIM slot. (1) Micro SD Slot: The refdes. is J1. Micro SD card can be used as a system boot card, insert the Micro SD card with the system installed here, and then power on the device to start the system in the Micro SD card. -
Page 34: Mini Pcie Slot
Polyhex Technology Company Limited 2.3.16. Mini PCIe Slot DEBIX Mini PC (BPC-iMX8MP-08) provides one Mini PCIe slot:The refdes. is J22. It is used for 4G/5G modules, and the communication protocol is USB2.0/USB3.0. The pin sequence of Mini PCIe slot interface is shown as below:... - Page 35 Polyhex Technology Company Limited Definition Definition 4G-WAKEUP 4G_VDD3P3V 4G_USIM_VDD 4G_USIM_DATA 4G_USIM_CLK 4G_USIM_RST USB_SS_TX_M 4G_VDD3P3V USB_SS_TX_P USB_SS_RX_M USB_SS_RX_M 4G_USB_DM 4G_USB_DP 4G_VDD3P3V 4G_VDD3P3V 4G_VDD3P3V 4G_VDD3P3V 35 / 56 www.debix.io...
-
Page 36: Ngff Key E Slot
Polyhex Technology Company Limited 2.3.17. M.2 NGFF KEY E Slot DEBIX Mini PC (BPC-iMX8MP-08) provides one M.2 NGFF KEY E slot: The refdes. is J21. It is used for WIFI&BT module, and the communication protocols are PCIe, SDIO and UART. - Page 37 Polyhex Technology Company Limited The M.2 NGFF KEY E slot interface is defined as follows: Table16 Definition Definition VPCIe_3V3 M2_USB_DP VPCIe_3V3 M2_USB_DN M2_LED1# M2_PCM_CLK M2_SD_CLK M2_PCM_SYNC M2_SD_CMD M2_PCM_IN M2_SD_DATA0 M2_PCM_OUT M2_SD_DATA1 M2_LED2# M2_SD_DATA2 M2_SD_DATA3 M2_BT_WAKE 37 / 56 www.debix.io...
- Page 38 Polyhex Technology Company Limited M2_SD_WAKE_HOST M2_UART_RXD M2_SD_nRST M2_UART_TXD M2_UART_RTS PCIE_TXP M2_UART_CTS PCIE_TXN VDD_1V8 VDD_1V8 PCIE_RXP PCIE_RXN REF_CLKP_CN REF_CLKN_CN SUSCLK_3V3 M2_PERST PCIe_nCLKREQ_3V3 M2_DIS2 PCIe_nWAKE_3V3 M2_DIS1 M2_I2C_SDA M2_I2C_SCL VPCIe_3V3 VPCIe_3V3 38 / 56 www.debix.io...
-
Page 39: Packing List
Polyhex Technology Company Limited 2.3. Packing List 1 x DEBIX Mini PC (BPC-iMX8MP-08) 2 x phoenix terminal male (GPIO + CAN) 1 x packing box 1 x foam pouch 39 / 56 www.debix.io... -
Page 40: Chapter 3 Getting Started
Chapter 3 Getting Started 3.1. Software Installation DEBIX Mini PC (BPC-iMX8MP-08) is shipped with the operating system burned into eMMC, and the system will boot from eMMC. Connect the display monitor and power on. And then the device will boot up and work normally. -
Page 41: Chapter 4 Functional Examples
4.1. Usage of Ethernet Open the Terminal and run the command ifconfig to query the Gigabit Ethernet port LAN1: ifconfig 4.2. Usage of USB3.0 Write Speed Test Run the command below to mount the U disk: 41 / 56 www.debix.io... -
Page 42: Usage Of 4G/5G Network
Read speed: 26.7MB/s 4.3. Usage of 4G/5G Network Hardware Connection: Install the 4G/5G module to the Mini PCIe Slot interface (J22), and lock screws CM2.0x 4 to fix it. Then insert the Nano SIM card 42 / 56 www.debix.io... -
Page 43: Software Setting
Software Setting: 1. Dial-up: Click to open "Setting" application, select Network, enable "Mobile Broadband", set Network to Add new connection. And then the "Set up a Mobile Broadband Connection" dialog box pops u. Click Next. 43 / 56 www.debix.io... - Page 44 2. In the "Choose your Provider's Country or Region" dialog box, select the country as needed. Here "China" was chosen. Click Next. 3. In the "Choose your Provider" dialog box, select "China Mobile" and click Next. 44 / 56 www.debix.io...
- Page 45 Polyhex Technology Company Limited 4. In the "Choose your Billing Plan" dialog box, click Next. 5. In the "Confirm Mobile Broadband Settings" dialog box, make sure the settings are correct, and then click Apply. 45 / 56 www.debix.io...
- Page 46 Polyhex Technology Company Limited 6. Get the dial-up IP address. 4G network test: Open a PuTTY window, run the following command to verify whether the network connection is normal: /home/debix# ping -I ppp0 baidu.com 46 / 56 www.debix.io...
-
Page 47: Usage Of Can
Hardware Connection:Connect two CAN interfaces (H to H, L to L). Here, we take an example of DEBIX Mini PC’s CAN interface communicating with the CAN interface of the DEBIX Model A + IO Board, as shown in the following figure: 47 / 56 www.debix.io... - Page 48 Receive:candump can0 Transmit:cansend can0 123#1122334455667788 When the CAN serial port can receive and transmit the corresponding information (cano 123 [8] 11 22 33 44 55 66 77 88), the communication is successful. As shown below: 48 / 56 www.debix.io...
-
Page 49: Usage Of Rs232/Rs485
On one COM connector, only one kind of serial port can be used at a time, namely either RS232 or RS485. It is switched through the internal DIP switch. For details about DIP switch operations, please refer to parts of 2.3.14.2 2.3.14.3 of this user guide. 00110--RS232 49 / 56 www.debix.io... - Page 50 COM interfaces. As shown in the below: 11001--RS485 Software Setting: (1) Open a Terminal on the DEBIX Mini PC (BPC-iMX8MP-08). Run the following command to install cutecom serial port tool: sudo apt update sudo apt install cutecom qtwayland5...
- Page 51 Then click Open. (5) Send and receive data via cutecom: Type the test string in the cutecom input box, press the Enter key on your keyboard to send. Then you can see that the other cutecom 51 / 56 www.debix.io...
- Page 52 The IO level of the debug serial port is 3.3V. Hardware Connection:Using a USB Type-C cable to connect the Debug interface of DEBIX Mini PC (BPC-iMX8MP-08) with the USB interface of the PC. Open the Windows Device Manager and check the serial port number of the USB-TTL 3.3V device.
- Page 53 Open MobaXterm, click Sessions on the menu bar, select New session. Select Serial in the pop-up "Session settings" dialog box. Change the port number to the COM port found in the device manager, set the Speed (bps) to 115200, and click OK. 53 / 56 www.debix.io...
- Page 54 On the terminal, you can see the boot process log output by the Uboot, Kernel, and System. After the system is started, enter the default user name and password (both are “debix”) on the terminal to access the serial port console. 54 / 56...
- Page 55 Run the following command to verify I2C: EMB-IMX8MP-07_J20_i2c_gpio_test.sh 4.8. Usage of SPI The J19 connector is SPI communication interface, which can communicate with external slave devices. This test program is to attach the device with NOR-FLASH for reading and writing test 55 / 56 www.debix.io...
- Page 56 Polyhex Technology Company Limited Run the following command to verify SPI: EMB-IMX8MP-07_J19_spi 4.9. Usage of GPIO Run the following command, the GPIO pin cyclically outputs high and low levels: EMB-IMX8MP-07_J18_TEST.sh 56 / 56 www.debix.io...
Need help?
Do you have a question about the BPC-iMX8MP-08 and is the answer not in the manual?
Questions and answers