
Summary of Contents for VigilLink VLPT-AIOSPKH
- Page 1 User Manual All-in-one Speakerphone with Video Capability Presentation Switcher Product no: VLPT-AIOSPKH Document no: VL-UserManual_VLPT-AIOSPKH_Rev1...
- Page 2 Welcome, to the VigillInk User Manual! Thank you for your purchase. At VigilLink, we prioritize the end-user experience by focusing on ease of use, ensuring our solutions are straightforward to install and program for our valued dealers. Our mission goes beyond product development;...
- Page 3 To sfeguard and prolong the lifespan of yor equiptment, it is highly recommended to use surge protection systems. Caution The product requires the use of UTP connectors. Please connect in direct interconnection method and do not cross connect. Copyright 2024 VigilLink. All right reserved. www.vigillink.com...
-
Page 4: Table Of Contents
Table of Contents: Introduction Product Description Feature Highlights Included Compenents Specifications Operation Controls and Functions Applications Key Functions Video Switching Screen Mirroring • Screen Mirroring over Airplay • Screen Mirroring over Miracast • Screen Mirroring over Dongle Guide Screen Web UI General Page Device Name Network... - Page 5 Table of Contents: Wi-Fi Settings Soft AP BYOD Standby Video HDMI Out Resolution Output HDCP Video Mute Manage Alias Audio Advanced Setting Application Mode Network Security Login Password Lock Button Welcome Menu – Custom Web UI Logo Guide Screen Firmware Upgrade System Firmware Version...
-
Page 6: Introduction
• USB 3.0 Display-Link Technology:** Supports up to 1080P 60Hz. • BYOD Mode:** Supports up to 1080P 30Hz. For audio, the VLPT-AIOSPKH boasts an advanced 4x omnidirectional microphone array with echo cancellation, active background noise reduction, and speech enhancement, ensuring optimal performance in any meeting room. Its powerful 10W speaker delivers a full range of sound, perfect for both meetings and music playback. -
Page 7: Feature Highlights
2. Featured Highlights • All-in-One conferencing and collaboration solution integrating mic, speaker, and video connectivity to meet the needs of small to medium-sized conference rooms. • Plug-and-play functionality for simple deployment and easy use. • Powerful amplifier and speaker combination producing outstanding clarity, ensuring everyone can hear every word during meetings. -
Page 8: Included Compenents
3. Included Components Component Speakerphone DC 24V Power Adapter AC Power Cord (with US Pins) USB Type C to Type C Cable with Type C to USB 3.0 Type A Adapter Cable Fixing Bar (with Screws) Connecting for a Smarter Future... -
Page 9: Specifications
4. Specifications Technical Video Input 1 x USB-C In (Type-C or USB3.0 via Display link); 1 x HDMI In; 1 x LAN; 1 x WLAN Video Output 1 x HDMI Out; 1 x HDBT Out Video Resolution Input: supported (max) HDMI/USB Type-C: up to 4K@30Hz 4:4:4 8bit USB 3.0 (Displaylink): up to 1080P@60Hz Wi-Fi/Dongle: up to 1080P@30Hz... - Page 10 4. Specifications Mechanical Operating 0°C to 45°C (32°F to 113°F) Temperature Storage Temperature -20°C to 70°C (-4°F to 158°F) Humidity 10% to 90%, non-condensing ESD Protection Human-body Model: ±8kV (Air-gap discharge)/ ±4kV (Contact discharge) Power Supply DC 24V 5A Charging via Type-C 60W (Max) Port Power Consumption...
-
Page 11: Operation Controls And Functions
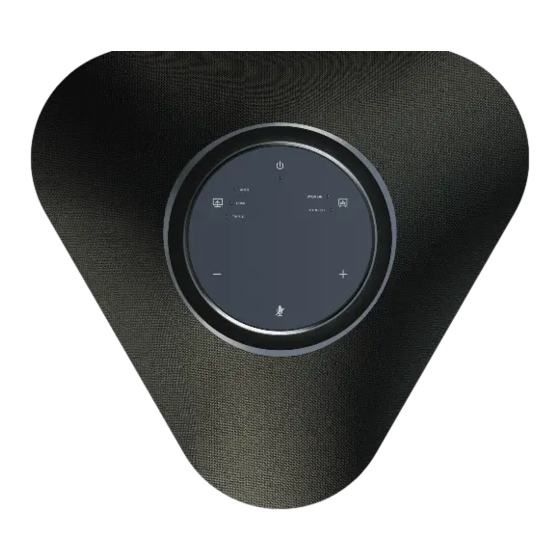
5. OPERATIAON CONTROLS AND FUNCTIONS 5.1 Speaker Side Bottom 13 14 15 16 17 18 19 20... - Page 12 NAME FUNCTION DESCRIPTION Speaker Outputs audio of input source. Source Switch Button Press to select the source: • AUTO: When there is no wire source or only showing Wireless source (default). • HDMI: Select HDMI source with USB host • TYPE-C: Select Type-C source with USB host •...
- Page 13 NAME FUNCTION DESCRIPTION HDMI IN &USB-B • HDMI IN: Connect to an HDMI source. & • USB-B: Connect to the USB host device using a mini USB to USB Type A cable. Note: USB-B is bound with HDMI IN. USB 3.0 •...
-
Page 14: Applications
Applications Application 1: BYOD Scenario HDBT Out HDMI Out USB-C/USB-A Member’s Computer USB Host Cable Display HDMI In Host’s Computer Application 2: Zoom Room Scenario HDBT Out HDMI Out HDMI Out USB-C HDMI ZOOM CAPTURE CARD Room PC Member’s Computer Display USB Host Cable 1. -
Page 15: Key Functions
Key Functions The device offers multiple functions such as Video switching, automatic signal switching, Guide Screen and OSD, allowing for easy control on the system. Video Switching The device supports full screen and split screen, as shown in the following figure. When BYOD is set to OFF, it is only working as full screen, and can switch sources between HDMI IN /USB Type-C / Type-C dongle, it will follow the rule: “Last-in-... - Page 16 When BYOD is set to ON, the device supports switching among all sources. • When one source is connected to the device, the device is in full screen mode. • When two or more sources are connected to the device, the device is in split screen and the latest inserted source will replace the earliest connected source to show in the corresponding split screen.
-
Page 17: Screen Mirroring
Screen Mirroring With screen mirroring support, the device allows users to wirelessly share multimedia from their devices on any HDMI displays. Screen mirroring can be performed over Airplay Mirroring, Miracast and Dongle. (1) Screen Mirroring over Airplay Take iPhone 8 (iOS 15.2) for example: Connect your iPhone to the soft AP of the device. -
Page 18: Screen Mirroring Over Miracast
3. The display device displays your iPhone’s screen. 4. To disconnect iPhone from the device: click Stop Mirroring, the display stops displaying your iPhone’s screen. (2) Screen Mirroring over Miracast For Android mobile (take Samsung Galaxy S9 for example): 1. Enable the Wi-Fi or WLAN feature of the mobile. 2. - Page 19 3. The Smart View window appears and starts to search for Miracast receiver. Click the device name in the search result, the display will output the mobile’ screen. For Windows 10 PC: 1.Enable the WLAN feature of your PC. 2.Click the icon on bottom right of the screen to open Action Center.
-
Page 20: Screen Mirroring Over Dongle
6. To disconnect PC from the device: click Disconnect, the display stops displaying PC’s content. Note: • The icon and interface of the Miracast function may vary on different computers. • Some Windows 10 computers may fail to perform screen mirroring with Miracast due to compatibility issues. -
Page 21: Osd
Note: • This Guide Screen picture can be changed though Web UI setting, please refer to Guide Screen section for more information. • By default, if Guide Screen picture is being output for 60 seconds, a countdown timer with the time period of 60 seconds will appear on the Guide Screen. - Page 22 Connecting for a Smarter Future...
-
Page 23: Web Ui
Note: • When the device outputs Guide Screen picture, the OSD will be displayed all the time. • When the device outputs specific video sources, the OSD will be displayed on the display device’s screen for 10 seconds and then disappear. •... -
Page 24: General Page
General Page Device Name UI Element Description Device Name Redefine the device name to names easy to remember. Note: The name must be 1~20 characters in length, including letters, numbers, “_” or “-”. Apply Click to perform settings. Network UI Element Description Network For network settings in the device’s LAN port. -
Page 25: Wi-Fi Settings
UI Element Description DNS Server 1 Set gateway address manually for the device to communicate with another network that uses different communication protocols when Static mode is selected. DNS Server 2 Set DNS server manually for the switcher to ensure normal network communication. -
Page 26: Soft Ap
Soft AP UI Element Description Setting • On: Enable the device’s soft AP function. • Off: Disable the device’s soft AP function. Soft AP Router • On: Enable the device’s soft AP router function so that wireless devices connected to soft AP are able to access the internet (in the condition that the LAN port of the device is connected to the internet). -
Page 27: Byod
UI Element Description BYOD Feature • On: Enable the device’s BYOD feature. • Off: Disable the device’s BYOD feature. Access Code Enter a four-digit access code to help prevent users from accidentally connecting to an unintended device and protect from an unauthorized access. •... -
Page 28: Standby
UI Element Description Power Off Click to power off the connected display through CEC command. CEC Edit Configure CEC Display On and Off commands for passing through them to HDMI Out and/or HDBT Out port. Command Testing Enter the CEC command of a controlled display device for click “Send”... -
Page 29: Video
UI Element Description Standby Set the device to standby or to wake up from the standby status. Manual • On: Set the device to standby status manually. • Off: Set the device to wake up from tandby manually. Auto • On: Enable automatic standby function for the device. -
Page 30: Output Hdcp
UI Element Description Resolution Set the output resolution for HDMI Out. Two opera- tion methods are offered. • Auto: select to output the maximum resolution supported by display based on the display’s EDID. E.g. If display supports up to 4K@60Hz, the device outputs 4K@60Hz. -
Page 31: Manage Alias
UI Element Description Video Mute • On: Set video mute on. • Off: Set video mute off. By default, it’s set as Off. Manage Alias UI Element Description Video Source Displays the video source name. Alias Enter a name to change the video source name to a new one. -
Page 32: Advanced Setting
UI Element Description Mic Mute • On: Set Mic mute on. • Off: Set Mic mute off. Volume Displays current audio volume. +: Press to increase volume. -: Press to decrease volume. Advanced Setting Application Mode Application Mode Please select the application topology: BYOD scenario HDBT Out HDMI Out... -
Page 33: Network Security
UI Element Description Application mode Perform networking according to application 1 or application 2, and click to select either of them. Source Status Shows the current selected source name. Network Security UI Element Description Telnet over TLS • On: Set telnet over TLS to on. •... -
Page 34: Lock Button
UI Element Description Login Password Set a new login password. Note: The new password must be 4 to 16 characters in length, alphanumeric only. Apply Click to perform current settings. Lock Button UI Element Description Lock Button On: Enable Lock Button function. Off: Disable Lock Button function. -
Page 35: Guide Screen
Guide Screen UI Element Description Browse Set a new picture for Guide Screen. Upload Click to upload the picture file to the device. Note: The picture must be in jp(e)g format that has 1920 x 1080 pixels. Firmware Upgrade UI Element Description Browse Click to browse for the local upgrade file for firmware... -
Page 36: System
System UI Element Description Factory Default Click to restore the device to its factory defaults. Note: You can also perform this task by sending the API command “gbcontrol --reset-to-default”. For more information, see the separate API document. Reboot Click to restart the device. Firmware Version Firmware version shows the current firmware in use. - Page 38 The terms HDMI and HDMI High-Definition Multimedia interface, and the HDMI Logo are trademarks or registered trademarks of HDMI Licensing LLC in the United States and other countries. Connecting for a Smarter Future...
- Page 39 Headquarters 46 Corporate Park #130 Irvine, CA 92606 949-701-4742 info@vigillink.com For order support, please contact your Distributor or Reseller. For technical support, check with the our website www.vigillink.com or contact info@vigillink.com...
Need help?
Do you have a question about the VLPT-AIOSPKH and is the answer not in the manual?
Questions and answers