
Summary of Contents for Dultmeier Sales DUPM900
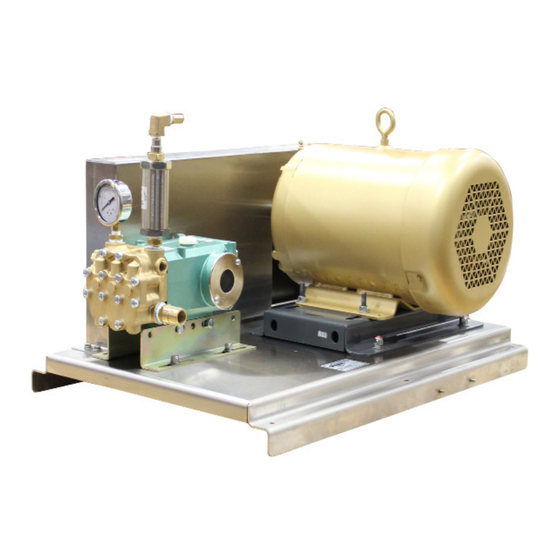
- Page 1 Wash Prep Unit w/ Balanced Relief Valve DUPM900 Owner’s Manual #M-0839 9.5.2023 Serial Number: Installation Date:...
-
Page 2: Table Of Contents
Consumers should notice that this manual may differ slightly from the actual product as more improvements are made to our products. Some of the pictures in this manual may differ slightly from the actual product as well. Dultmeier Sales reserves the right to update designs and / or change the specifications at any time without incurring any obligation to install them on units previously sold. -
Page 3: Safety Information
To avoid serious or fatal personal injury or major property damage, read and follow all safety and operation instructions in the manual. This is a Safety Alert Symbol - When you see this symbol in the manual, look for the following signal words & be alert to the potential for personal injury or property damage. -
Page 4: Specifications
Wash Prep Unit w/ Arimitsu Pump Specifications Model(s) ............DUPM900 Style..............High Pressure Plunger Pump Capacity............10 GPM ..............1000 PSI Maximum Inlet Pressure ........Flooded to 70 PSI Maximum Inlet Temperature ......175 F Motor ............... CEEM3710T 7.5 HP, 3 PH... -
Page 5: Installation
Installation 1. Select a location for your new unit. Place near floor drain, and electrical and water sources. Floor surface Motor Wiring Box must be level. Start Stop 2. Electrician to run power from main supply panel to Station motor starter or stop start station, and then to motor wiring box. -
Page 6: Operation
Operation 1. Check pump for proper oil level. The pump should be Dip Stick filled to or slightly above the double line on the dip stick, located on the top of the pump. (Fig. 3) 2. Turn on water to the system. allow air to purge, and fill supply tank.. -
Page 7: Maintenance & Storage
Maintenance & Storage 1. Change the oil after intial 30 hours. Use Arimitsu Oil, part number AJ30103 for 32 oz. bottles IMPORTANT This pump takes 19 oz. 2. The oil should be changed every 500 hours. 3. Regulating Unloader Valve should be serviced or replaced when leaks occur or if not functioning properly. 4. -
Page 8: Parts Breakdown
Parts Breakdown: DUPM900 Item Part Number Description 1.... AH2750-3 ....2300# Liquid Filled Pressure Gauge 2.... AJ508L ....... Arimitsu Plunger Pump, Left Hand 3.... GU22531A ....Safety Pop Off Valve 4.... UPBR10-1.5 ....Balanced Relief Valve 5.... GN3M281 ....Adjustable Motor Baseplate 6.... -
Page 9: Warranty Information
Notice Regarding Manufacturer’s Limited Warranty Dultmeier Sales Limited Liability Company (hereinafter Dultmeier), notifies you that component part(s) carry a manufacturer’s limited warranty provided by the manufacturer of said component part(s). These warranties do not pertain to normal wear of component part(s) that may occur within any specified period. While Dultmeier is not the manufacturer of any of the component part(s), Dultmeier will assist you in processing any and all manufacturer’s warranty claim if applicable and available. -
Page 10: Customer Checklist
Production Checklist Oil Level Pop-Off Valve Set Clamps Tight Unloader Valve Locked Bolts Tight & Anti-Seized Belts Tight Pump RPM Pulleys Aligned & Torqued to Specifications Motor Amps Fittings Straight Motor Wired For Tested Accessories Winterized Safety Pop Off Valve Trigger Gun High Pressure Hose Injector / Injector Hose...
Need help?
Do you have a question about the DUPM900 and is the answer not in the manual?
Questions and answers