Advertisement
Advertisement
Table of Contents

Summary of Contents for Brüel & Kjaer Vibro BKV Connect 1
- Page 1 BKV Connect 1 & 2 / BKV Collect 6 & 6 Ex Quickstart Guide, Safety, and Warranty...
-
Page 2: System Description
Depending on the configuration a BKV Connect 1 & 2 can be connected to the BKV Collect 6 & 6 Ex can send raw vibration internet over a wired Ethernet connection or... - Page 3 When using the BKV Collect • The installation for Ex-approved products must be made in conformity to the 6 Ex in potentially hazardous international or national standards (IEC/ environment EN 60079-17). WARNING! Treon Industrial Node 6 Ex is certified for use in Failure to follow the instructions in this guide could result in a serious potentially explosive atmospheres.
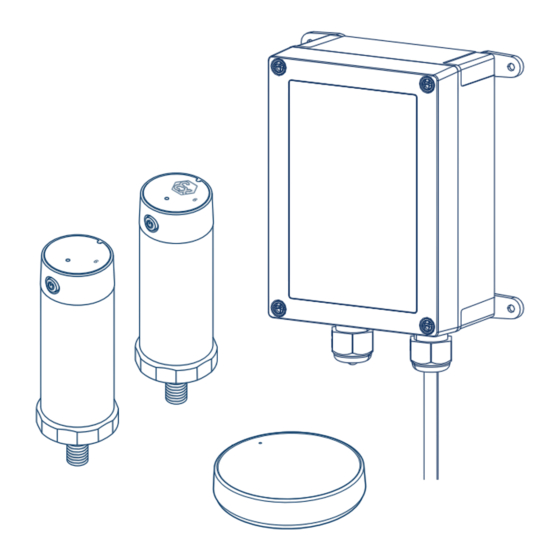
- Page 4 BKV Connect 2 Keys and parts BKV Connect 2 and BKV Connect 1 (next page) A. Status light Ethernet cable gland Air vent D. Power cable gland Power cable Adjustable mounting brackets G. Lid screws H. BKV Connect 1 USB A host port...
- Page 5 BKV Connect 1 BKV Collect 6 & 6 Ex Keys and parts BKV Collect 6 & 6 Ex A. Status light Orientation notch Power button D. NFC tag M8 bolt Nut adapter G. Magnetic epoxy mount adapter* H. Glue mount adapter *The adapter G is not included in the standard sales packaging.
- Page 6 (BKV Ignite) app (BKV Deploy) https://ignite.bkvbeyond.com After mounting the BKV Connect 1 & 2 and BKV Collect 6 & 6 Ex devices, you must install and Log into the BKV Ignite pre-configuration tool commission the devices. This is done with the...
- Page 7 Open the BKV Connect (2) Power up the BKV Connect (optional) Make sure that the power cable is attached to the BKV Connect (J) and close the BKV Connect DANGER! 2 lid. Plug the BKV Connect in a wall outlet. The Hazardous Voltage/Electricity BKV Connect switches on automatically.
-
Page 8: Connect Your Device
Connect your device Use an Ethernet cable connection Open the BKV Connect 2 lid as described in step 1 (Open the BKV Connect 2). You can connect the BKV Connect with - an Ethernet cable connection Unscrew the Ethernet cable gland cap (A). - a cellular connection Remove the sealing rubber (A1) and plug - a Wi-Fi connection. - Page 10 Use a cellular connection Open the BKV Connect 2 lid as described in step 1 (Open the BKV Connect 2). Configure and commission the Put your fingernail in the seam between the BKV Connect lid of the SIM card slot (M) and the back cover of BKV Connect and remove the lid.
- Page 11 • Do not install the gateway in a metal control cabinet. NOTE! NOTE! For mounting the BKV Connect 1 It is a good practice to start (gateway without enclosure) on the mounting the BKV Collect 6 & 6 Ex wall, read the detailed instructions...
- Page 12 For best measurement quality, the contact surface in the machine should be completely flat (within 1 mil), smooth (surface texture not greater than 32 microinches) and larger than Mount BKV Collect 6 & 6 Ex the base of the sensor. In cases where the surface of the machine is When mounting the BKV Collect 6 &...
- Page 13 CASE 2 CASE 3 Attach BKV Collect 6 & 6 Ex with Attach BKV Collect 6 & 6 Ex direct- nut adapter ly to machine surface Using a nut adapter enables attaching the BKV Direct attachment between the BKV Collect Collect 6 (Ex) to a spot with less available space 6 &...
- Page 14 Align the BKV Collect 6 & 6 Ex Commission the BKV Collect 6 & 6 Ex For accurate interpretation of the measurement data, the centerline of the BKV Collect 6 & 6 Go to BKV Deploy. Ex sensor is often aligned with the shaft of the rotating machine.
-
Page 15: Verifying The Connection
Switch on BKV Collect 6 & 6 Ex Verifying the Connection Press and hold the power button until the status To verify if the sensor is connected to the light turns green, then the status light goes off gateway, proceed as follows: again. -
Page 16: Product Info
Battery type: 3.6V A lithium thionyl chloride (LI-SOCI2) bobbin cell primary battery. The bat- tery is not replaceable. If the battery is empty, Maximum transmit power BKV Connect 1 & 2 replace the BKV Collect 6 & 6 Ex. WARNING! - Page 17 BKV Wireless Sensor Solution Instructions (C108377). Hereby, Treon Oy declares that the radio equipment Treon Industrial BKV Connect 1 Node is in compliance with Directive 2014/53/EU. The full text of the EU declaration Product name: Treon Gateway of conformity is available at the following...
- Page 18 • Keep a safe distance between the device and your medical devices Usage (BKV Connect 1+2) and stop using the device if you experience persistent interference The device must not be used without the finger with your medical device.
- Page 19 Storage WARRANTY AND SOFTWARE LICENSE AGREEMENT Always store and use the device with covers attached. By using BKV Connect, you are agreeing to be The storage temperature of the BKV Collect 6 & bound by the terms of BKV Software 6 Ex is +0...+30°C (+32...+86°F).
- Page 20 Phone: +49 6151 428 1400 Corporate E-Mail: Homepage: E-Mail: support@bkvibro.com info@bkvibro.com www.bkvibro.com BKV Connect 1 & 2 / BKV Collect 6 & 6 Ex Quickstart Guide ● © Brüel & Kjær Vibro GmbH ● 08/2023 ● C108376 / V04, EN ● Technical alterations reserved!
Need help?
Do you have a question about the BKV Connect 1 and is the answer not in the manual?
Questions and answers