
Related Manuals for Dickson CONNECT


Summary of Contents for Dickson CONNECT
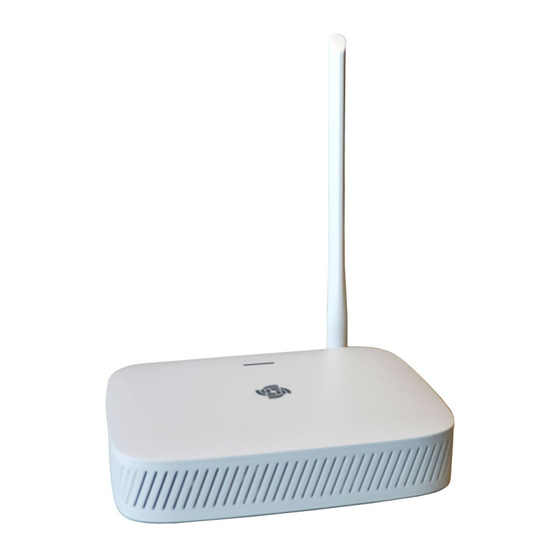
- Page 1 Dickson CONNECT Gateway LoRa-enabled gateway for DicksonOne and OCEAView monitoring platforms...
-
Page 2: Notices And Safety
Chapter 1 – Introduction > Features Notices and safety Disclaimer Dickson assumes no liability for any loss or claims by third parties which may arise through the use of this product. Users must not use the product in any manner not specifically limitation indicated by Dickson. -
Page 3: Certifications And Compliance
Chapter 1 – Introduction > Features Certifications and compliance Caution: Any changes or modifications made to this product not expressly approved in writing by Dickson could void the user's authority to operate the equipment. FCC statement This device complies with part 15 of the FCC rules. - Page 4 © 2024 Dickson. All rights reserved. Dickson, DicksonOne, OCEAView, the Dickson logo, RFL, Cobalt X, Cobalt X1, and Cobalt X2 are the exclusive property of Dickson. WisGate Edge Lite 2 is the property of RAKwireless Technology Limited All other brands mentioned are the property of their respective owners.
-
Page 5: Table Of Contents
OCEAView) ........................27 Updating firmware manually with DicksonOne .......... 28 Updating firmware automatically with DicksonOne ........29 3.4 User preferences .................... 30 4 Troubleshooting ..................31 4.1 FAQ ........................31 4.2 LED indicators ....................33 Dickson CONNECT LoRa Gateway User Guide Page 5... -
Page 6: Introduction
Chapter 1 – Introduction > Features 1 Introduction Thank you for choosing the Dickson LoRaWAN wireless monitoring solution. This document describes how to set up and use the Dickson CONNECT LoRaWAN gateway, a key part of your network infrastructure for collecting data from data loggers. -
Page 7: Features
• Integrated Web UI for setup and firmware updates The firmware in this gateway is customized by Dickson for WisGate Edge Lite 2 by RAKwireless Technology Limited. When performing firmware upgrades manually, you must only use firmware provided by Dickson. -
Page 8: How It Works
Chapter 1 – Introduction > How it works 1.2 How it works Installed at your site, the Dickson CONNECT LoRaWAN gateway forwards data to and from compatible Dickson data loggers within wireless range. Its role is to continually transfer data via the Internet or local network to the configured monitoring platform, which users access via the web application. -
Page 9: Setting Up Your Gateway
Plug the power cable into the gateway to boot the device. To use Power-over-Ethernet (PoE): Connect an Ethernet cable (configured for PoE) to the RJ-45 plug marked ETH(PoE) to boot the device. Figure 4 – Plug AC power cable into DC 12V input... - Page 10 When the gateway finishes booting for the first time, it is automatically configured as a Wi-Fi access point. Use your computer’s Wi-Fi network selection to connect to the gateway, whose network name is “DKSN-####”, where “####” represents the last four digits of the unit’s serial number, which you...
- Page 11 Chapter 2 – Setting up your gateway > Getting started Option 2: Connect with an Ethernet cable Follow these steps to connect to the gateway with an Ethernet cable: Plug an Ethernet network cable into the Ethernet port on the back of the gateway Figure 5 –...
- Page 12 Chapter 2 – Setting up your gateway > Getting started 5. When you first connect, you will be prompted to set a password for the default account: Figure 6 – Setting the password for the “root” account This password applies to the username “root” (which you will use on subsequent logins).
-
Page 13: Changing The Wi-Fi Access Point Key
Changing the Wi-Fi access point key Your gateway initially boots up as a Wi-Fi access point to make it easy for you to connect to the configuration interface. For security reasons, you should change the access point key (not to be confused with the system login name and password). - Page 14 Figure 8 – Platform and environment selection 3. Click in the Environment field and choose the appropriate option. This determines the LoRaWAN connector and data center to which the gateway connects. Dickson CONNECT LoRa Gateway User Guide Page 14...
- Page 15 4. Press Confirm at the bottom of the screen when done. As of this writing, a given gateway does not support the use of Dickson RFL and Cobalt data loggers at the same time. If you need to use both types of data loggers, you will need two gateways, one for each.
-
Page 16: Select Your Country To Set The Radio Frequency
Variations frequency Europe/Africa 868 MHz – India 865 MHz Russia 864 MHz Australia/Brazil 915 MHz – USA/Canada/Mexico Worldwide, Korea 920 MHz Other 923 MHz Asia Indonesia/Vietnam Cuba Israel China 470 MHz – Dickson CONNECT LoRa Gateway User Guide Page 16... -
Page 17: Network Settings (Wan)
2. Set Enable WAN and disable LAN to on ( Note: “WAN” refers to communications from the gateway to your monitoring platform; "LAN" refers to local communications between the gateway and your computer used during the initial setup process. Dickson CONNECT LoRa Gateway User Guide Page 17... - Page 18 4. Click on Save to apply your settings, or on Close to leave this page without saving changes. 5. Remember to plug the gateway and your computer (if necessary) into your Ethernet network when you are done. Dickson CONNECT LoRa Gateway User Guide Page 18...
-
Page 19: Configuring Wi-Fi Settings
Wi-Fi connectivity is not available for this gateway in China. To set up Wi-Fi: ) WAN Wi-Fi Settings 1. Click on Network ( Figure 11 –Wi-Fi settings for your network Dickson CONNECT LoRa Gateway User Guide Page 19... - Page 20 Static address or DHCP client enter address information manually or allow the gateway DHCP automate address configuration. Use DNS servers advertised by router Activate this option or enter DNS server information manually. Dickson CONNECT LoRa Gateway User Guide Page 20...
-
Page 21: Configuring Cellular Settings
2. The APN depends on the communication frequency used in your region: 868 MHz: iot.1nce.net 915 MHz: SUPER Figure 12 – Cellular network settings 3. Click on Save at the bottom of the screen when done. Dickson CONNECT LoRa Gateway User Guide Page 21... -
Page 22: Setting Up Fallback Communication Channels
2. Use the up and down arrows ) to change the order of your connectivity options. 3. Click on Save to keep your changes when done, or on Cancel to discard any changes. Dickson CONNECT LoRa Gateway User Guide Page 22... -
Page 23: Testing Your Lorawan Connection
OCEAView If you are using the OCEAView On-premises On-premises solution (with Environment set to Custom), enter the server and port information corresponding to your system. Set the Keepalive interval to 10 seconds. Dickson CONNECT LoRa Gateway User Guide Page 23... - Page 24 Figure 15 – Possible connection test results 4. Click on Save changes when done, if necessary, or click on any menu option in the left-hand menu bar to leave this page without saving changes. Dickson CONNECT LoRa Gateway User Guide Page 24...
-
Page 25: Settings
Figure 16 – Typical NTP settings Reboot You may use the Reboot button to reboot the gateway. Any unsaved changes will be discarded. Any data loggers currently communicating may lose their connection Dickson CONNECT LoRa Gateway User Guide Page 25... -
Page 26: Backup And Restore
Reset You may click on the Reset button to restore the gateway’s original factory settings. After you click on Reset, you will be prompted to confirm your action. Dickson CONNECT LoRa Gateway User Guide Page 26... -
Page 27: Firmware
Figure 18 – Firmware management tab To update the firmware: 1. Obtain a new “D1F” encrypted file from the Dickson technical support team. You must only use firmware provided by Dickson. If you try to load other firmware files, an “Invalid firmware” message is displayed and the process does not continue. -
Page 28: Updating Firmware Manually With Dicksonone
Update Firmware button ( ) is displayed when new firmware becomes available. 5. Click on Update Firmware and follow any on-screen instructions if you want to install the new firmware in your gateway. Dickson CONNECT LoRa Gateway User Guide Page 28... -
Page 29: Updating Firmware Automatically With Dicksonone
4. If you want updates to occur automatically, click on the Update automatically button. 5. Click on Update RF Gateway to apply any changes you make here. Changes are not saved if you leave this page without clicking this button. Dickson CONNECT LoRa Gateway User Guide Page 29... -
Page 30: User Preferences
The username remains “root”. Time settings You can set the gateway to the local time used by your computer’s browser, and/or modify the time zone if necessary. Dickson CONNECT LoRa Gateway User Guide Page 30... -
Page 31: Troubleshooting
I would like to see how well LoRaWAN wireless coverage works at my site. Is there an easy way to perform tests? Dickson Cobalt X data loggers include a Range test feature that enables you to test the LoRaWAN connection between a data logger and the gateway. For more information, or to conduct a more complete site survey, please contact your Dickson representative. - Page 32 4. You may then connect to the gateway using the default settings (and default IP address). Figure 22 – Restoring gateway factory settings I was making changes in my gateway’s network configuration, and after a while...
-
Page 33: Led Indicators
(functional only searching on models Slow flicker (200 ms high / 1800 ms low): idle equipped with Fast flicker (125 ms high / 125 ms low): ongoing data cellular data transfer functionality) Dickson CONNECT LoRa Gateway User Guide Page 33... - Page 34 Chapter 4 – Troubleshooting > LED indicators Dickson CONNECT LoRa Gateway User Guide Page 34...
Need help?
Do you have a question about the CONNECT and is the answer not in the manual?
Questions and answers