
Subscribe to Our Youtube Channel
Related Manuals for J-Tech Digital JTECH-P6


Summary of Contents for J-Tech Digital JTECH-P6
- Page 1 USER MANUAL 6 Button IP Control Panel Wall-Plate JTD ID: 2984 | Model: JTECH-P6 J-TECH DIGITAL INC. 9807 EMILY LANE STAFFORD, TX 77477 TEL: 1-888-610-2818 E-MAIL: SUPPORT@JTECHDIGITAL.COM...
- Page 2 SAFETY PRECAUTIONS To ensure the best from the product, please read all instructions carefully before using the device. Save this manual for further reference. • Unpack the equipment carefully and save the original box and packing material for possible future shipment. •...
-
Page 3: Table Of Contents
Table of Contents: 1. Introduction ........................4 1.1 Introduction to JTECH-P6 ...................... 4 1.2 Features ..........................4 1.3 Package List ........................... 4 2. Panel Description ......................5 3. System Connection ......................6 4. GUI Control ........................8 4.1 Log In ............................. 8 4.2 Home ............................. -
Page 4: Introduction
• Can be controlled and configured via GUI • Can be powered by PoE 1.3 Package List • 1 x JTECH-P6 Control Panel Wall Plate • 6 x Button caps • 2 x 3-Pin Pluggable terminal block • 1 x 2-Pin Pluggable terminal blocks •... -
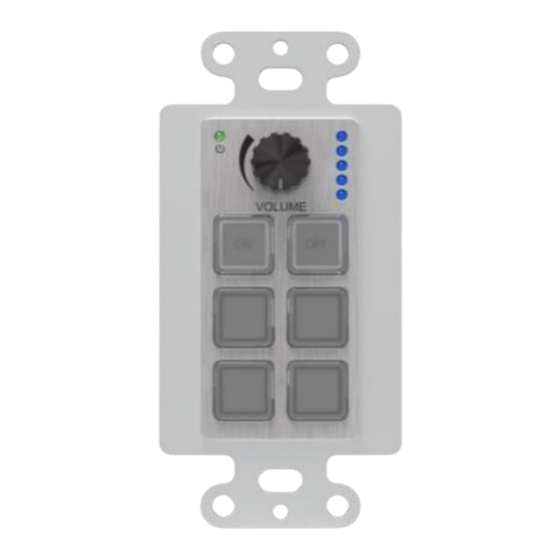
Page 5: Panel Description
2. Panel Description Page 5 of 19... -
Page 6: System Connection
3. System Connection The JTECH-P6 can active different ports at one time. It means every button can send the RS232 commands, IR code at the same time. The demo system diagram as below: Page 6 of 19... - Page 7 1. Connect the JTECH-P6 to the LAN port of Wireless Route, or control device (such as PC) to TCP/IP port. 2. Connect the third-party devices (such as Matrix Switcher, Compact Scaler Switcher or Projector) that need to be controlled to RS232 (1) ~RS232 (3) ports.
-
Page 8: Gui Control
4. GUI Control 4.1 Log In The JTECH-P6 is controlled by TCP/IP. The default settings are: IP Address: 192.168.0.178 Subnet Mask: 255.255.255.0 Type 192.168.0.178 in the internet browser, it will enter the below log-in webpage: Username: admin Password: admin Type the username and password, and then click the login to enter the GUI setting. -
Page 9: Home
4.2 Home • Click the volume icon to adjust the volume; or click the knob icon to implement the corresponding event; • Mouse operation click the corresponding button 4.3 Configuration 4.3.1 Knob Page 9 of 19... -
Page 10: Button
• Knob/Button: Choose the knob or button to enter the event setting page • Start up: Click to enter the starts up event setting page • Set the Knob events: Turn Left, Press Down Setting or Turn Right 4.3.2 Button •... -
Page 11: Tcp/Ip
4.3.3 TCP/IP • Set the TCP/IP event, such as IP, Port, Format, End Char for ASCII and Data 4.3.4 RS232 Page 11 of 19... -
Page 12: Relay
• Set the RS232 event, and then click save button to finish setting. 4.3.5 IR • In IR event, user can import or export the IR command • Set the Event Name, Port, Code or Custom and IR Code for the event •... -
Page 13: Led
• Set the Event Name, Port and the Action Mode • Click Save button to finish setting 4.3.7 LED • Set the Event Name, Button Select, Status and LED Color • Click the Save button to finish setting 4.3.8 Delay Page 13 of 19... -
Page 14: Network
• Set the delay event to trigger the event after how long to press • Click Save button to finish setting 4.4 Network • Select dynamic or static IP mode. Under static mode, then IP Address, Subnet Mask and Gateway can be reset. 4.5 Setting Page 14 of 19... -
Page 15: Upgrade
• Credentials: setting the username and new password and then click confirm button to perform the modification. • Update Profile: Import or export the setting file to implement the system configuration. • Factory Default: Click Factory reset 4.6 Upgrade • Firmware Upgrade: click the browse to choose the upgrade file (the file needs to be renamed as “WP6P.app”) and then click upgrade to execute upgrade. -
Page 16: Panel Drawing
Baud Rate 9600 baud, supports 9600, 19200, 38400, 57600, 115200 Power Consumption 2.5W (Max) Operation Temperature 0 ~ +40°C Storage Temperature -10 ~ +55°C Relative Humidity 10% ~ 90% Power Supply Input: 12V DC, PoE Net Weight 155g Case Dimensions (W x H x D) 50mm x 103.5mm x 50.5mm 6. -
Page 17: Maintenance
7. Maintenance Clean this unit with a soft, dry cloth. Never use alcohol, paint thinner, or benzine to clean. 8. Warranty If your product does not work properly because of a defect in materials of workmanship, our company (referred to as “the warrantor”) will, for the length of the period indicated as below, “Parts and Labor (18) Months”, which starts with the date of original purchase (“Limited Warranty period”), at its option either (a) repair your product with new or refurbished parts, or (b) replace it with a new or a refurbished product. - Page 18 USE OF THIS PRODUCT, OR ARISING OUT OF ANY BREACH OF THIS WARRANTY. (As examples, this excludes damages for lost time, cost of having someone remove or re-install an installed unit if applicable, travel to and from the service, loss of or damage to media or images, data or other recorded content.
- Page 19 WWW.JTECHDIGITAL.COM PUBLISHED BY J-TECH DIGITAL INC. 9807 EMILY LANE STAFFORD, TX 77477 TEL: 1-888-610-2818 E-MAIL: SUPPORT@JTECHDIGITAL.COM Page 19 of 19...
Need help?
Do you have a question about the JTECH-P6 and is the answer not in the manual?
Questions and answers