
Summary of Contents for Aginova Sentinel Next
- Page 1 Sentinel Next Reference Guide This guide describes the physical and functional attributes of the Sentinel Next line of sensors.
- Page 2 • Alarm management the data flow from the sensor to • Graphs / Data (exporting) the cloud. Sentinel Next APP provides a • Sensor Diagnostics quick view of the sensor reading, • Admin reports graph, health and status of the •...
-
Page 3: Software Specification
Software Specification Cloud Provider Google Sensor Communication WiFi Infrastructure Protocol MQTTS (secure connection for devices and sensors) ; HTTPS (Debugging and OTAP) IDS/IPS : Intrusion detection https://cloud.google.com/intrusion-detection-system WAF: Cloud Armor https://cloud.google.com/armor/ Vulnerability Test: https://cloud.google.com/security-command-center TLS Version: 1.2 Data: meets 21 CFR Part 11 Cloud Features Metrics and dashboards allowing visibility into the performance of your services with alerting. - Page 4 Once the changes above have been made on the network Firewall, you can download and install the Sentinel Config app from the Google Play Store or iOS App Store: https://play.google.com/store/apps/details?id=com.aginova.sentinelconfig https://apps.apple.com/ie/app/sentinel-config/id1457672545 After launching the app, simulate a sensor by pressing the MQTT TEST button. This will check whether the Publish &...
-
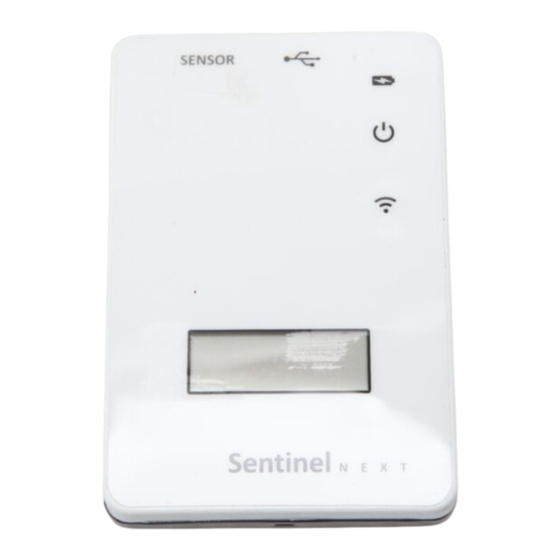
Page 5: Sensor Hardware
Sensor Hardware Sentinel NEXT 1S Product Number: XTEMP-3101-0000 Specifications Dimensions (HxWxD) 89mm x 60mm x 20mm (3.50” x 2.36” x 0.78”) Weight 102g (3.60 Oz) Connectors 10-pin Sensor Connector; micro USB for Charging Battery Integrated 1000mAh Rechargeable Li-Ion Battery Wi-Fi Protocols IEEE 802.11b/g/n... -
Page 6: Battery Status Led
1. Battery Status LED When a Micro USB cable is plugged into the Micro USB input (4) and connected to a charger the Battery Status LED will have the following behavior. Solid Green: Battery is fully charged. Solid Red: Battery is charging. If both Mode (3) and Battery LED (1) are blinking red: Battery is almost 100% depleted. -
Page 7: Probe Input
The probe input is keyed so it is only possible to connect the probe in the correct orientation. Make sure the sensor probe is connected securely and completely. Use only official Sentinel Next probes from Aginova. Below is pictured an example of a probe that is properly connected. -
Page 8: Internal Wi-Fi Antenna
5Ghz band. When installing, it is best to ensure the front of the Sentinel Next is facing the Wi-Fi access point as directly as possible. It is best to ensure there are as few obstacles between the Sentinel Next and the Wi-Fi access point as possible. - Page 9 Press button If the Mode Button (3) is pressed once for less than 5s, the sensor will display all live sensor value in sequence. Then it will show the min and max of each sensor value since the last reset (using the LO and HI symbol) Pressing the Mode Button (3) again during this sequence resets the Hi and Lo values stored on the sensor.
-
Page 10: Troubleshooting
Use the cloud portal or the Sentinel Config APP to configure or reconfigure the sensor. 8. Troubleshooting If there are unknown issues getting the Sentinel Next to connect to your network or report to the server, use the debug function (firmware version 7.1.42 or newer). Briefly press the Mode Button (3) and watch the Mode LED for any red blinking. - Page 11 (PDA, laptop) to verify that it can reach the internet. ● Ensure the sensor probe is properly connected to the Probe Input (5). ● Set the Sentinel Next back to Direct mode and use the Sentinel Next app to reconfigure it. 9. Support Send emails to support@aginova.com...
Need help?
Do you have a question about the Sentinel Next and is the answer not in the manual?
Questions and answers