Advertisement
Quick Links
Advertisement

Subscribe to Our Youtube Channel
Summary of Contents for OSI Go Direct OSI-DBCAM-AC
- Page 1 Wi-Fi Doorbell Camera (AC) QUICK GUIDE MODEL: OSI-DBCAM-AC Let’s get protected!
- Page 2 What's in the box Please consult this checklist for all parts. OSI Doorbell Cam (AC) Bracket A x 3 B x 3 D x 1 C x 2 Screw(4 kinds) Angle Wall Mount Manual Screwdriver Chime Kit SD Card...
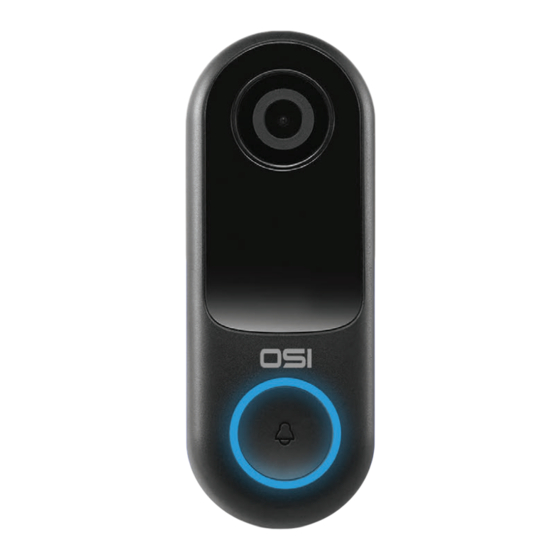
- Page 3 Description Lens External power port Microphone Status Light Button Reset Speaker SD card slot Micro USB Power Port AC 12~24V Doorbell button Press the button to activate the doorbell Status light Solid red light on: network is malfunctional Blinking red light: wait for network connection (quickly blinking) Solid blue light on: the camera is working correctly Captures sound for your video...
- Page 4 Mechanical Chime Installation Step 1 First turn off the power breaker at your fuse box for your existing doorbell and mechanical chime. Ring your doorbell again to confirm it is now off. Step 2 Find your mechanical chime that is a rectangular box,produces the sound when your doorbell is pressed.
- Page 5 Mechanical Chime Installation Step 3 Slightly unscrew both screw terminals and one hook from the Chime Kit under each screw(It does not matter which color wire from the Chime Kit connects to which screw). Locate the Chime Kit included in the smart doorbell's packaging, and the terminals on the inside of the chime.
- Page 6 Mechanical Chime Installation Step 4 Using the included doubles sided tape,affix the Chime Kit to your chime wherever there is space and replace the cover. Be careful not to interfere with any of the chime's moving parts. Ensure that the Chime Kit and wires DO NOT interfere with the mechanical parts of the chime.
-
Page 7: Installation
Installation Mode 1 Doorbell General Installation (with Mounting Bracket only) Video Mounting Doorbell Bracket Connect Wires to Doorbell Lock Bracket with Screw 1. Fix the bracket to the wall with the mounting screws 2. Connect the doorbell wires: Loop one doorbell wire around each of the screw terminals on the rear of your Video Doorbell, then tighten the terminals to secure. - Page 8 Installation Turn the doorbell power back on at the fuse box. The light on the doorbell button should turn on and after a few minutes become red slowly.
- Page 9 Connection Download SmartLife or Tuya Smart is available for both iOS and Android OS. Search the name 'SmartLife','Tuya Smart' in App Store or Google Play, or scan the QR- Code to download the App. You can select the App according to needs. ·Support iPad Android...
- Page 10 Connection Registration process Open the Smart Life App, click "Sign Up", read the "User Agreement Privacy Policy" and click "Agree" . Input a legal and valid Mobile number or Email address and click "Get Verification Code". Input the verification code to log in.
- Page 11 QR Code Configuration Click 'Add Device' and then Select 'Camera & Lock' on the left column and then select 'Smart Camera (Wi-Fi)' Step 5 Power on the device. And then reset the camera and click “Next” on App.
- Page 12 QR Code Configuration Select the WiFi network and input the password, and then click "Next". Make sure that your phone has connected to a fluent and steady WiFi already. (your network) (your password) Note: 1) Camera only supports 2.4GHz WiFi network. 2) If you possess a Smart Switching Router, a router capable of automatically switching between 2.4GHz and 5GHz frequencies, please choose the option 'Continue with Current Network.'...
- Page 13 QR Code Configuration In this interface, you should scan the QR code in your phone with the camera,when the camera comes out "dong dong dong". And you can complete the configuration about 30s.
- Page 14 QR Code Configuration When connecting, you should make sure your router,mobile,and camera are as close as possible. When camera added successfully,click " " you could also DIY the camera's name.
- Page 15 Settings In "Smart Camera" interface,click " ",you can set the camera common functions.
- Page 16 Functions Full-duplex audio When the visitor push the doorbell button, you will get a call. You can see and hear the vistor in your App from the doorbell if you answer. Motion detection Motion sensors will notify you when movement is detected. Shared device The doorbell device can be shared with friends, and friends can also preview online.
- Page 17 Q: In the network process, the process bar is always not 100%, add failure? A: This camera only supports 2.4GHz WiFi router, please make sure you are using a 2.4GHz WiFi router.And confirm the WiFi password again. Q: Repeated additions are failures? A: After adding a failure, it is recommended to restart the device or power off, and then try to add again.
-
Page 18: Need Help
Shop | Support More products for piece of mind Expand your security with OSI Go Direct's Wi-Fi cameras, including Floodlight, Bullet, Mini PTZ, and Video Doorbell options, plus the new Smart Wi-Fi Alarm System (Gen 2) and accessories for a tailored and robust setup!
Need help?
Do you have a question about the Go Direct OSI-DBCAM-AC and is the answer not in the manual?
Questions and answers