Table of Contents
Advertisement
Quick Links
Owners Manual
Assembly Instructions
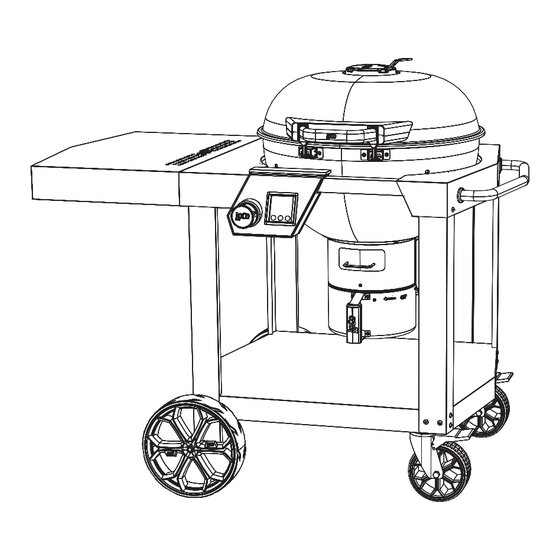
SmartTemp Kettle Grill with Cart
Model: 2023060125
WARNING
READ INSTRUCTION MANUAL BEFORE ATTEMPTING TO ASSEMBLE OR OPERATE THIS PRODUCT.
Adult assembly required. Keep screws and parts out of reach of children.
INSTALLER: Leave these instructions with consumer.
CONSUMER: Retain these instructions for future reference.
2023060125 • IM • 102224
Advertisement
Table of Contents

Related Manuals for LOCO COOKERS SmartTemp 2023060125


Summary of Contents for LOCO COOKERS SmartTemp 2023060125
- Page 1 Owners Manual Assembly Instructions SmartTemp Kettle Grill with Cart Model: 2023060125 WARNING READ INSTRUCTION MANUAL BEFORE ATTEMPTING TO ASSEMBLE OR OPERATE THIS PRODUCT. Adult assembly required. Keep screws and parts out of reach of children. INSTALLER: Leave these instructions with consumer. CONSUMER: Retain these instructions for future reference.
-
Page 2: Carbon Monoxide Hazard
CAUTION This instruction manual contains important information necessary for the proper Indicates a potentially hazardous situation assembly and safe use of the appliance. which, if not avoided, could result in moderate injury. Read and follow all warnings and instructions before assembling and using CARBON MONOXIDE the appliance. -
Page 3: Table Of Contents
TABLE OF CONTENTS Warnings 2, 4-5 Parts Diagram Parts List Hardware Assembly Instructions 9-17 Control Panel Operation Grilling Techniques 20-21 Care and Maintenance Troubleshooting Warranty Model Number: 2023060125 This device complies with part 15 of the FCC Rules. Operation is subject to the following two conditions: (1) This device may not cause harmful interference, and (2) this device must accept any interference received, including interference that may cause undesired operation. -
Page 4: Warnings
WARNINGS SAVE THESE INSTRUCTIONS • This appliance, when installed, must be • To avoid fl ashback, always use vent function electrically grounded in accordance with local prior to opening grill lid. codes or, in the absence of local codes, with the •... - Page 5 WARNINGS • Use only factory-authorized replacement • Never use charcoal lighting fl uid, gasoline, parts. The use of any part that is not factory- alcohol or other highly volatile fl uids to ignite authorized can be dangerous. charcoal. These fl uids can explode causing injury or death.
-
Page 6: Parts Diagram
PARTS DIAGRAM 14 15 16 17 18 19 20 21 22 23... -
Page 7: Parts List
PARTS LIST Part # Description Qty Part # Description Side Shelf Support Lid Assembly Side Shelf Assembly Lid Handle Side Shelf Support B Cooking Grate Controller Assembly Heat Defl ector Left Rear Leg Assembly Charcoal Bowl Left Front Leg Assembly Hinge Pin Retaining Screw 10”... -
Page 8: Hardware
HARDWARE M4x8 Screw M4x30 Screw M6x12 Screw M6x12 Screw M6x20 Screw M6x28 Screw Qty. 33 Qty. 1 Qty. 10 Qty. 3 (Silver) (Black) Qty. 18 Qty. 24 M6x12 Screw M6x16 Screw M4 Nut M6 Nut M10 Nut M4 Washer M6 Washer Qty. -
Page 9: Assembly Instructions
ASSEMBLY INSTRUCTIONS lococookers.com... - Page 10 ASSEMBLY INSTRUCTIONS Note: Do not over tighten screws.
- Page 11 ASSEMBLY INSTRUCTIONS Note: Do not over tighten screws. lococookers.com...
- Page 12 ASSEMBLY INSTRUCTIONS...
- Page 13 ASSEMBLY INSTRUCTIONS Plug power cord in here. Schematic Diagram of Connection Terminal lococookers.com...
- Page 14 ASSEMBLY INSTRUCTIONS...
- Page 15 ASSEMBLY INSTRUCTIONS Use provided hex wrench O for screws H. lococookers.com...
- Page 16 ASSEMBLY INSTRUCTIONS...
- Page 17 ASSEMBLY INSTRUCTIONS lococookers.com...
-
Page 18: Control Panel
CONTROL PANEL Meat Probe Control Knob 1. Press to start and light up screen. 2. Clockwise “+” 3. Counter-clockwise “–” 4. Long press for 3 seconds to turn off the system and turn off the screen. 5. After setting the temperature, if there is no action for 5 seconds, the set temperature will stop fl ashing and save. 6. -
Page 19: Operation
OPERATION START UP WARNING 1. Press control knob to start grill. To avoid fl ashback, always use vent function prior to opening grill lid. 2. Open grill lid and starter tray. • The safety switch will prevent the fan from MEAT PROBE running when lid is open. -
Page 20: Grilling Techniques
GRILLING TECHNIQUES GRILLING DIRECTLY GRILLING INDIRECTLY GRILLING INDIRECTLY OR NOT GRILLING DIRECTLY IS GREAT FOR COOKING OVER THE COALS, IS COMMON SMALLER CUTS OF MEAT AND OTHER FOR SMOKING FOOD LOW AND SLOW. FOOD THAT CAN COOK QUICKLY. YOU CAN ACHIEVE THOSE GREAT LOOKING GRILL •... - Page 21 GRILLING TECHNIQUES GRILL WITH LID OPEN 2. Press the “Cycle” button four times to display the meat probe temperature. After 15 TO GRILL WITH THE LID OPEN, FOLLOW seconds the display will return back to the THE START UP SECTION (PAGE 19) AND main menu showing the grill temperature.
-
Page 22: Care And Maintenance
CARE AND MAINTENANCE SEASONING • Use a standard grill brush to clean cooking grates and heat defl ector. Do this before and Pre-seasoning will rid your grill of after use. Mild dish soap can help remove food remnants. chemicals and oils left over by the •... -
Page 23: Troubleshooting
TROUBLESHOOTING PROBLEM POSSIBLE CAUSE SOLUTION Error code E1 is displayed Temp sensor connector unplugged Connect temp sensor plug to its connecting socket Temp sensor wiring has been cut Attempt to locate damage and contact customer service for replacement Temp sensor damaged or inoperable Contact customer service for replacement Error code E2 is displayed Temp sensor wiring has been pinched... -
Page 24: Warranty
LOCO LIMITED WARRANTY The appliance has been manufactured under the highest standards of quality and workmanship. We warrant to the original consumer/purchaser that all aspects of this product will be free of defects in material and workmanship for one (1) year from the date of purchase. A replacement for any defective part will be supplied free of charge (including regular shipping) for installation by the consumer for products that are covered by this Limited Warranty.
Need help?
Do you have a question about the SmartTemp 2023060125 and is the answer not in the manual?
Questions and answers