Advertisement
Advertisement
Table of Contents

Summary of Contents for ZIMBERG PZH-8135U
- Page 1 کارواش 59-531 بار 0081 وات 8135U مدل...
- Page 3 خدم ـ ـات پس از ف ـ ـروش زیمبرگ...
- Page 4 فهرست مطالب دستورالعمل های ایمنی اجزای دستگاه اطالعات فنی نگهداری ویژگی های اصلی نمودار جریان برق مونتاژ تنظیم نازل عیب یابی مشخصات فنی دستگاه نقشه انفجاری لیست قطعات...
- Page 5 قوانین ایمنی عمومی !هشدار تمامــی دســتورالعمل هــا را بــه دقــت مطالعــه نماییــد. عــدم بــه کار گی ـ ـری دس ـ ـتورات ذک ـ ـر ش ـ ـده در ای ـ ـن دفترچ ـ ـه، ممک ـ ـن اس ـ ـت منج ـ ـر ب ـ ـه .بــرق...
- Page 6 دستورالعمل های ایمنی لطفــا ایــن دفترچــه را بــه دقــت مطالعــه نماییــد و در زمــان اســتفاده از .دســتگاه، دســتورالعمل هــای آن را بــه کار گیریــد 1. از اس ـ ـتفاده ک ـ ـردن از دس ـ ـتگاه هم ـ ـراه ب ـ ـا مایع ـ ـات س ـ ـمی، قاب ـ ـل اش ـ ـتعال و ی...
- Page 7 موارد ایمنی الزم االجرا .1. تمامی قطعات الکتریکی باید از برخورد آب محافظت شوند .2. دستگاه باید به یک منبع برق مناسب متصل شود 3. اســتفاده از یــک قطــع کننــده جریــان (03 میلــی آمپــر) مــی توانــد ســبب .حفاظــت بیشــتر کاربــر شــود 4.
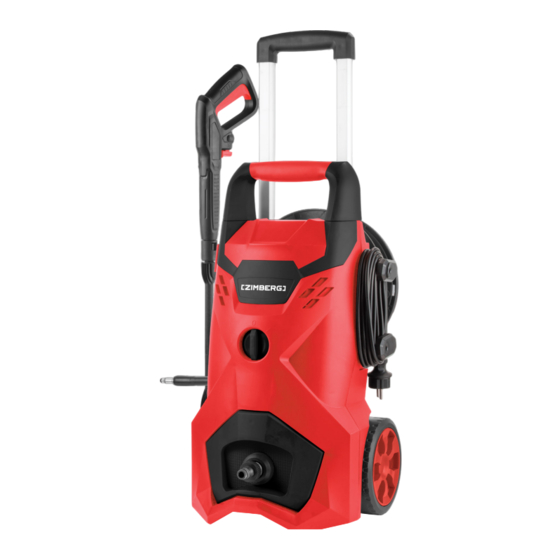
- Page 8 اجزای دستگاه 1. لنس و نازل آبپاش 2. تفنگی 3. مخزن مایع شوینده 4. آداپتور ورودی آب 5. کوپلینگ 6. نگهدارنده دسته 7. پوسته کارواش 8. نگهدارنده سیم 9. گیره نصب مخزن شوینده...
- Page 9 اطالعات فنی موارد استفاده ای ـ ـن دس ـ ـتگاه ب ـ ـه منظ ـ ـور تمی ـ ـز ک ـ ـردن وس ـ ـایل نقلی ـ ـه، ماش ـ ـین ه ـ ـا، قای ـ ـق ه ـ ـا و...
- Page 10 نگهداری مراحل نگهداری .1. دستگاه را خاموش کنید .2. شیر آب را ببندید .3. دوشاخه را از پریز خارج نمایید 4. فش ـ ـار باقیمان ـ ـده را از س ـ ـری لن ـ ـس خ ـ ـارج نمایی ـ ـد ت ـ ـا تم ـ ـام آب از ن ـ ـازل خ ـ ـارج .شود...
- Page 11 نمودار جریان برق مونتاژ پیش از استفاده نحوه مونتاژ پیش از استفاده بــه منظــور اجتنــاب از بــروز هرگونــه مشــکل در زمــان مونتــاژ و اســتفاده از دســتگاه، لطفــا دســتورالعمل هــای زیــر را بــه دقــت مطالعــه کــرده و بــه کار گیری ـ ـد. در صورتیک ـ ـه ب ـ ـه عل ـ ـت مناس ـ ـب نب ـ ـودم ل ـ ـوازم جانب ـ ـی، ق ـ ـادر ب ـ ـه آم ـ ـاده س...
- Page 12 4 2. نگهدارنده تفنگی را نیز نصب کنید. شکل 3 و .3. شیلنگ معمولی آب را به سری شیلنگی ورودی آب متصل نمایید .شکل 5 را ببینید...
- Page 13 4. ش ـ ـیلنگ فش ـ ـار ق ـ ـوی را از قرق ـ ـره دس ـ ـتگاه ج ـ ـدا کنی ـ ـد و آن را ب ـ ـه دس ـ ـته 7 تفن گ ـ ـی متص ـ ـل کنی ـ ـد. ش ـ ـکل 6 و .5.
- Page 14 .7. شیر آب را باز کنید .8. شاسی تفنگی را فشار دهید تا پیش از استفاده هوای داخل آن خارج شود .9. سوئیچ را بر روی وضعیت 0 قرار دهید. شکل 21 را ببینید .01. دوشاخه را وارد پریز کنید حاال...
- Page 15 عیب یابی راه حل علت عالمت .دوشاخه را به پریز وصل کند دوشاخه از پریز خارج شده دستگاه است شروع به کار نمی کند .پریز دیگری را امتحان کنید پریز کار نمی کند فیوز را تعویض کنید، دستگاه های دیگر را خاموش فیوز...
- Page 16 می کند اما آب از آن خارج نمی .شود با استفاده از یک سوزن و اسپری آب داخل نازل، آن را مسدود شدن نازل .تمیز کنید مشخصات فنی دستگاه PZH-8135U مدل 022 ولت ولتاژ 05 هرتز فرکانس 0081 وات قدرت...
- Page 17 نقشه انفجاری دستگاه...
- Page 18 جدول لیست قطعات دستگاه نگهدارنده باالیی کابل نام قطعه ردیف پیچ نگهدارنده کابل کاور روییU قاب پیچ اهرم کلید فیکس کننده سیم قاب باالیی جعبه کلید نگهدارنده پایینی کابل قاب زیرین جعبه کلید پیچ پیچ چرخ کلید کاور چرخ دسته...
-
Page 19: Part List
Part list Namev Bolt, hook (up), cord PLASTIC DECORATIO PART Tapping screw Main switch knob Fixing block, cord Main switch upper cover Hook (down), cord Main switch bottom cover Tapping screw TApping screw Wheel SWITCH Cover, wheel SHORT handle Power cord Short handle Cover Hook, soap bottle Tapping screw... - Page 20 Explosion map...
- Page 21 Clean the filter starts but no Nozzle blocked Clean the nozzle with a needle and by water comes spraying water backwards through the nozzle Specification Model PZH-8135U Voltage 220 V Frequency 50 Hz Power 1800 W Working pressure- Max 95-135 BAR...
-
Page 22: Troubleshooting
Troubleshooting Symptom CAUSE Recommended action Machine re- Machine not plugged in Plug in machine. fuses to start Defective socket Try another socket. Fuse has blown Replace fuse. Switch off other ma- chines. Defective extension cable Try without the extension cable. Fluctuating Pump is sucking air Check that hoses and connections are... -
Page 23: Adjusting The Spray
Adjusting the spray The lance nozzle is adjustable to allow you to adjust the spray shape from linear shape to fan-shape. To adjust the nozzle, proceed as follows: 1. Hold the lance in one hand. 2. Turn the nozzle with the other hand. See figure 13. Detergent Bottle The detergent bottle can only be connected to the standpipe. - Page 24 6. Connecting the gun lance to the gun handle. See figures 10 and 11. 7. Turning the tap on, making sure that the tap is fully open. 8. Triggering the gun to expel the air in the unit before its working. 9.
- Page 25 3. Connecting the water inlet hose to the water inlet adapter. See figure 5. 4. Pulling out the pressure hose from hose reel and connecting it to the gun handle. See figures 6 and 7. 5. Connecting the pressure hose to the gun handle. See figures 8 and 9.
-
Page 26: Electrical Diagram
Electrical Diagram Assembly before operation Please read the below Operation Instruction carefully and follow it to avoid any problems when installing and operating the appliance. Please go to the dealer for exchange if assembly fails for not-matching accessories. 1. Fixing the handle and cord hook with enclosed screw and fixing foam canon hook. -
Page 27: Main Features
Storage and environment Steps of storage 1. Switch the appliance off (OFF) 2. Turn off the water supply tap 3. Remove the plug from the socket 4. Discharge the residual pressure from the gun until all the water has come out of the nozzle 5. -
Page 28: Improper Use
Improper use Use by unskilled persons or those who have not read and understood the instructions in the manual is forbidden. The introduction of inflammable, explosive and toxic liquids into the appliance is prohibited. Use of the appliance in a potentially inflammable or explosive atmosphere is forbidden. -
Page 29: Main Parts
Main Parts 1.Gun lance + spray nozzle 2. Gun Handle 3. Foam Canon 4. Water Inlet Adapter 5. Quick Connector 6. Gun Holder 7. Pressure Washer 8. Cord Hook 9. Foam Canon Hook TECHNICAL INFORMATION (SEE DATA PLATE) Envisaged use This appliance has been designed for individual use for the cleaning of vehicles, machines, boats, masonry, etc, to remove stubborn dirt using clean water and biodegradable... - Page 30 SAFETY “MUSTS” 1. All electrical conductors MUST BE PROTECTED against the water jet. 2. The appliance MUST ONLY BE CONNECTED to an adequate power supply in compliance with all applicable regulations. 3. Use of a safety residual current circuit-breaker (R.C.C.B.) will provide additional protection for the operator (30 MA).
- Page 31 SAVE THESE INSTEUCTIONS SAFETY RULES/RESIDUAL RISKS SAFETY “MUST NOTS” 1. DO NOT use the appliance with inflammable or toxic liquids, or any products which are not compatible with the correct operation of the appliance. 2. DO NOT direct the water jet towards people or animals. 3.
- Page 32 GENERAL SAFETY RULES WARNING: Read and understand all instruction. Failure to follow all instructions listed below may result in electric shock, fire and/or serious personal injury.
- Page 33 List Safety Rules Main Parts Technical Information Storage Main Features Electrical Diagram Assembly before operation Adjusting The Spray Troubleshooting Specification Explosion Map Part List...
- Page 34 Zimberg After Sales Service...
Need help?
Do you have a question about the PZH-8135U and is the answer not in the manual?
Questions and answers