Table of Contents
Advertisement
Quick Links
Advertisement
Table of Contents

Summary of Contents for Thermoline TGD-80F
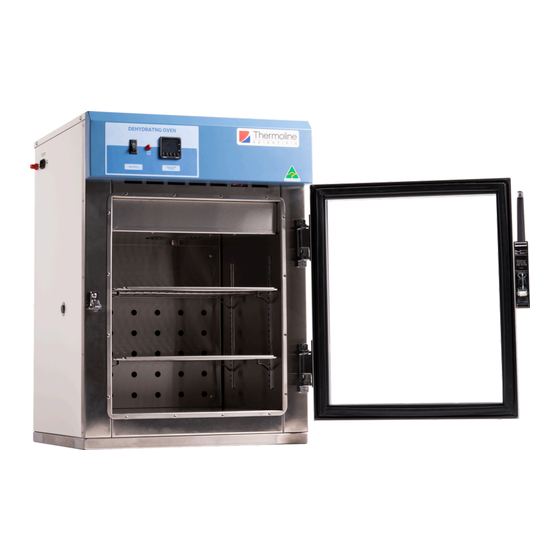
- Page 1 Glassware Drying Ovens User Manual & Setup Guide TGD RANGE Omron E5CC-T...
-
Page 2: Table Of Contents
TABLE OF CONTENTS GENERAL INFORMATION Symbols Product Specifications Operating Environment Electrical SETUP Unpacking Castors Location Shelves Exhaust Cleaning Port Hole OPERATION Start Up Loading Controller Programming MRST TROUBLESHOOTING Troubleshooting Warranty... -
Page 3: Symbols
Symbols Glassware Drying Oven User Manual By Thermoline Warning sign: signifies a general warning, and indicates a risk to people specified by the supplementary sign that if not avoided, may result in death or serious injury. General Warning Sign Warning; Flammable: signifies a flammable warning, and indicates a risk of flammable content as specified by the supplementary sign that if not avoided, may result in a fire by igniting flammable material. -
Page 4: General Information
Glassware Drying Oven User Manual By Thermoline This user manual is intended for Thermoline's glassware drying oven range. We recommend that you read this user manual the whole way through before you start using the cabinet. Consider this manual as a part of the cabinet and an integral part to its function. -
Page 5: Product Specifications
Product Specifications Glassware Drying Oven User Manual By Thermoline Dimensions External TGD-80F TGD-150F TGD-250F WxDxH (mm) 520x550x800 630x650x1010 630x650x1360 Note: Inlet and Exhaust ports extend the overall height of the ovens by approximately 40mm. Internal WxDxH (mm) 390x400x400 500x510x600 500x510x950... -
Page 6: Technical Specifications
Technical Specifications TGD-80F TGD-150F TGD-250F Technical Specification Temperature Range Ambient +10°C to 80°C Temperature Control Stability +/- 0.1°C Temperature Uniformity +/-1°C @ 80°C Heater Power 1400 watts 2000 watts Electrical 6A/230V 9A/230V Nominal Capacity 150L 250L Porthole Diameter 13mm Weight... -
Page 7: Operating Environment
• on top of each other (Fig 2). operate. Thermoline 150 litre ovens have removable castors for benchtop storage. To safely remove castors, simply tip the cabinet over gently onto it's back or side and Drying ovens should be stored inside at all times. Failure to... -
Page 8: Electrical
A dedicated outlet should be used for all ovens. Do not use power boards or the like. A 3-pin moulded plug is supplied as standard. Fig 2. 10amp IEC socket Electrical requirements TGD-80F 10A/230V TGD-150F TGD-250F Electrical Conditions: •... - Page 9 Operating Environment Warnings Do not store items on top of the cabinet as this will also affect ventilation! CAUTION: When installing more than one cabinet in the same location ensure that they are positioned in such a way that warm air exhausted from one cabinet, is not drawn directly into the other cabinet.
-
Page 10: Unpacking
Setup Glassware Drying Oven User Manual By Thermoline Unpacking Moving Unpacking process for foam wrapped or boxed Moving the glassware drying oven: • Ensure that the oven is rolled on an even and flat • The glassware drying oven will be delivered foam surface. -
Page 11: Castors
(Fig 3) and unlocked (Fig 2). Please contact Fig 2. Castor Unlocked your supplier or Thermoline should there be any damage to the castors. Fig 3. Castor Locked... -
Page 12: Location
• The glassware drying oven requires ventilation. Thermoline still suggests 100mm on the sides and back that also aids with accessibility (Fig 3). 300mm at the top to ensure the inlet and outlet vent is not obstructed in any way. -
Page 13: Shelves
To remove, repeat process. on the size of the cabinet ordered. Model Shelvex Length (mm) TGD-80F TGD-150F TGD-250F SAFETY NOTE: • The edges of the clips can be sharp. Thermoline recommends using protective gloves while adjusting or moving the clips (e.g. leather gloves). -
Page 14: Exhaust
Setup Inlet and Exhaust All glassware drying ovens feature an inlet and an exhaust port on top of the cabinet. The inlet regulates the amount of fresh (dry air) that enters the cabinet and the outlet regulates the amount of exhaust air that can exit the cabinet. In combination, this regulates the rate of drying. -
Page 15: Cleaning
If a gasket is to be replaced, please contact as required using a soft cloth and soapy water. Never use Thermoline. Regular inspection is recommended. abrasive cleaners or scouring pads as these will scratch the surface and may result in corrosion. Never use caustic type cleaning agents. -
Page 16: Port Hole
Setup Port Hole The port hole can be found on the left side of the glassware drying oven .The cabinet comes equipped with a plug that may be removed by simply pulling it out. Keep the plug safe in case the port hole needs to be closed again. Setup Warnings Ensure when placing the cabinet into place that the castors can be accessed so they can be locked and unlocked. -
Page 17: Start Up
Start Up Procedure Glassware Drying Oven User Manual By Thermoline Start Up Procedure Start Up process: • Before proceeding, please make sure that all internal and external packaging has been removed from the appliance and that all tape, plastic bags and foam pieces have been removed. -
Page 18: Loading
Start Up Procedure Loading Glassware drying ovens require constant airflow throughout the cabinet to maintain the desired temperature. Correct loading of the shelves must be considered for efficient cabinet performance. Loading Requirements: • Distribute the load evenly over all the shelves rather than stacking everything on one shelf. -
Page 19: Display Symbol
Omron Display Guide Glassware Drying Oven User Manual By Thermoline The controller is an Omron E5CC-T microprocessor based device with digital indication of set temperature and operating temperature as well as multi step programming as standard. Scroll Button: Used to view the set temperature target and start/reset the ramp/dwell function. -
Page 20: Sensor Calibration
General Controls Temperature Control Sensor Calibration There are a number of factors that will affect the accuracy of How to the temperature displayed in relation to the actual temperature inside the cabinet. These could include the following: Use the “ <<PF “ button to move the cursor. The digits in SV will flash, indicating that it can be changed. -
Page 21: General Controls
General Controls BMS Output The glassware drying oven can be fitted with an optional 3-pin socket to allow for connection to a building monitoring system or phone dialler. A plug is also supplied separately to connect the socket to your system. The alarm contacts have no voltage present but we recommend that the wiring is connected by a suitably qualified technician. -
Page 22: Mrst
General Controls Manual Reset Safety Thermostat The over-temperature safety thermostat is not operator adjustable. It will electrically isolate the heating elements in the event of an over-temperature situation. The main aim of this safety is to protect from overheating in the event that there is no air ow through the cabinet. -
Page 23: Troubleshooting
Troubleshooting Glassware Drying Oven User Manual By Thermoline Problem Part Number Oven Temperature does Sensor Issue There could be a few reasons why the oven 40716- PT100 Sensor not match the controller temperature is not matching the controller readout. One read out. - Page 24 There is a grooved surface that enables the screw to remain in position once tightened. Thermoline suggests making only very small changes to the strike location (one groove at a time) while making adjustments.
-
Page 25: Warranty
Thermoline Scientific Equipment Pty Ltd ABN 80 000 859 129 (‘Thermoline’) Thermoline warrants to the original purchaser that this product will perform to its product specification for a period of 2 years from date of purchase, provided that the installation of the product has been carried out in accordance with the latest version of the manufacturer’s instructions and further provided that the use of the product complies with that specified in the relevant specification. - Page 26 Doc ID: TM-018-V2...
Need help?
Do you have a question about the TGD-80F and is the answer not in the manual?
Questions and answers