Table of Contents
Advertisement
Quick Links
Advertisement
Table of Contents

Subscribe to Our Youtube Channel
Summary of Contents for Night Owl DBW2 Series
- Page 1 Video Doorbell User’s Manual Support.NightOwlSP.com...
- Page 2 Night Owl’s Video Doorbell Compatibility: Night Owl’s 1080p Video Doorbell can be used as a standalone device with a Wi-Fi connection or added to a compatible recorder. The doorbell is compatible with various Night Owl recorders. For an accurate, up- to-date, list you can view your series support page.
-
Page 3: Table Of Contents
Preparing the Doorbell for Setup ........10 7.2.4 Ringing the Doorbell ..........35 1.1 Testing ..............10 1.2 Power the Doorbell ..........10 Chapter 8: Using the Night Owl Protect App ........36 Chapter 2: 8.1 Live View ..............36 Downloading Night Owl App ...........12 8.2 Notifications ............37 8.3 Settings Menu ............38... -
Page 4: Fcc Warnings
FCC Warnings This device complies with Part 15 of the FCC Rules. Operation is subject to the following two conditions: (1) this device may not cause harmful interference and (2) this device must accept any interference received, including interference that may cause undesired operation. FCC Compliance Statement These limits are designed to provide reasonable protection against frequency interference in residential installation. -
Page 5: Safety Instructions
Safety Instructions 1. The Doorbell’s operating temperature range is 22° F to 158° F. 2. The Doorbell works using 12V AC ~ 24V AC supply and requires a 10VA transformer. Do not connect the device directly to AC mains while wiring the device, otherwise this may cause electric shock and permanent damage to the device. -
Page 6: Specifications
Specifications Doorbell Requirements Please be sure that your mobile device complies with the following specifications: • Android™: 8.0 and above • iOS : 12.4 and above ® THIS MANUAL WAS ACCURATE AT THE TIME IT WAS COMPLETED. DUE TO OUR ONGOING EFFORT TO CONSTANTLY IMPROVE OUR PRODUCTS, FUNCTIONS MAY HAVE BEEN ADDED OR CHANGED. -
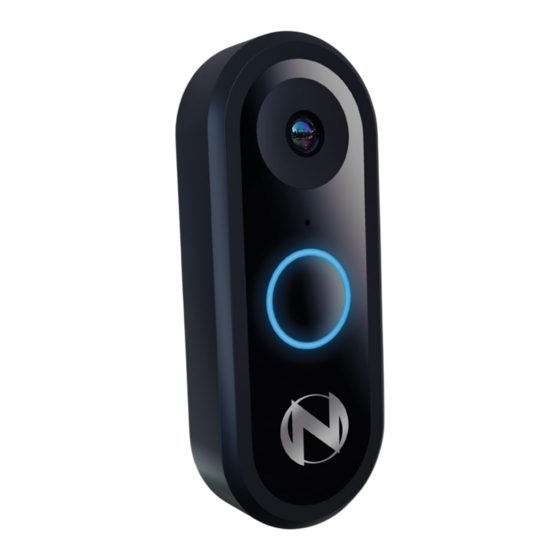
Page 7: Video Doorbell Diagram
FRONT VIEW Doorbell Lens Microphone Ring Button: Press to ring the Night Owl Doorbell. The LED status light turns blue and spins clockwise for approximately 30 seconds. A notification is sent to the mobile device running the Night Owl Protect App. Tapping on the... -
Page 8: Left Side View
LEFT SIDE VIEW NOTE: The faceplate must be removed in order to access the sides of the Doorbell. Micro-USB Input: Requires 5V of voltage and at least 1A of current intensity. microSD Card: The microSD card can be Reset Button: formatted from the Night Press and hold the “Reset”... -
Page 9: Rear View
REAR VIEW Check out my rear! Wiring Connectors: Connect the wires from your existing Doorbell to the Night Owl Doorbell. Make sure the wires are properly fastened. The recommended voltage range is 12-24 Volts. -
Page 10: Preparing The Doorbell For Setup
Chapter 1: Preparing the Doorbell for Setup YOU MUST HAVE AN EXISTING WIRED DOORBELL TO USE THIS PRODUCT. 1.1 Testing Test 1: Does your current Doorbell work? If the current Doorbell chime doesn’t work, please consult an electrician prior to installation. Test 2: Using a mobile device, verify you have at least 50% Wi-Fi signal strength at the Doorbell’s location. - Page 11 Carefully remove the faceplate from the Night Owl Doorbell. Insert the small end of the provided USB cable into the micro USB port on the Doorbell. Connect the other end of the cable to a USB power adapter and plug it into an outlet. If you do not have a USB power adapter, you may use a USB charging port.
-
Page 12: Downloading Night Owl App
Chapter 2: Downloading Night Owl App If you are a first-time user, go ahead and download the Night Owl app. Quickly create an account and log in. Already have an account? Simply log in. Create and verify your Night Owl account. Log into the App. -
Page 13: Connecting The Doorbell To A Wi-Fi Router
Chapter 3: Connecting the Doorbell to a Wi-Fi Router NOTE: The Router’s security protocol MUST be set to WPA/WPA2 (strong security). 3.1 Adding the Doorbell “Add New.” “Doorbell” Select from the device list. 3.2 Setup using the QR Code NOTE: The QR Code Setup is the recommended method to add your Doorbell to the App. -
Page 14: Initial Firmware Update
3.3 Initial Firmware Update If the pairing process is successful, your device looks for a firmware update. Once the firmware is up to date, you can name the Doorbell. Tap “Live View” to see the Doorbell’s video stream. -
Page 15: Adding The Doorbell To A Recorder
There are two methods you can choose to successfully add your new doorbell to a Wi-Fi recorder. Select either Option A: From a TV or Monitor (via HDMI) or Option B: From the Night Owl App. Option A: From a TV or Monitor (via HDMI) Step 1: Power on the doorbell and wait for it to enter pairing mode. - Page 16 Step 4: Click the “+” icon in the navigation bar at the bottom of the screen. Optionally, you can also click the “tool” icon in the navigation bar then click “Camera” followed by the “+” in the lower right corner. IMPORTANT: You must have an available Channel on your recorder to add the doorbell.
- Page 17 Step 5: Ensure the doorbell is powered on and near your recorder. Then click “Continue.” Step 6: Your Wi-Fi recorder will now search for the doorbell. Once you see it appear in the list, tap “Continue.”...
- Page 18 Option B: From the Night Owl App IMPORTANT: You MUST have a Wi-Fi recorder already added to your Night Owl Protect account prior to adding the doorbell to your Wi-Fi recorder via the app. Step 1: Power on the doorbell and wait for it to enter pairing mode. The doorbell’s voice prompt says, “Doorbell is in Pairing Mode”...
- Page 19 Step 2: If the doorbell is not in pairing mode: Press and hold the reset button until you hear “Please be patient, as Doorbell restores its factory settings” The Doorbell’s voice prompt then says, “Doorbell is ready for use” and “Doorbell is in Pairing Mode”...
- Page 20 Step 5: Ensure your doorbell is powered on near your Wi-Fi recorder and then tap “Continue.” Step 6: The app will now search for your cameras.
- Page 21 Step 7: Verify you can see your doorbell and then tap “Continue.” IMPORTANT: If you don’t see your doorbell appear, press the reset button on the doorbell for 3 seconds. The doorbell will audibly tell you when it returns to pairing mode.
-
Page 22: Adding A Doorbell To A Wired Recorder
The doorbell can be added to a compatible wired recorder. Simply follow the steps below: IMPORTANT: You MUST have a wired recorder already added to your Night Owl Protect account prior to adding the doorbell to your wired recorder via the app. - Page 23 Step 4: Tap “Doorbell.” Step 5: From this point, there are a few different methods you can choose to pair the doorbell. The preferred method is a QR code setup. Simply hover your smart device’s camera over the QR Code on the rear of your doorbell.
- Page 24 Step 6: During the pairing process, your doorbell will search for a firmware update. Once the firmware has been updated, you can name the doorbell. Tap “Live View” to see the doorbell’s video stream. Step 7: When you arrive at the Storage screen, tap “Add Camera to My Recorder.”...
- Page 25 Step 8: Choose the recorder you wish to add the doorbell to and then tap “Continue.” Step 9: Configure your doorbell’s settings and then you are finished with the initial setup process and can proceed with installation.
-
Page 26: Doorbell Installation
Chapter 5: Doorbell Installation with Wired Mechanical Chime TURN OFF THE POWER AT THE BREAKER BEFORE TOUCHING ANY WIRES! Remove the old Doorbell. Place the Doorbell on the wall or use the provided mounting template to mark the positioning for the new holes. For stucco, brick, or concrete, make the new holes using a 15/64 drill bit and insert the provided plastic anchors into the holes. - Page 27 Doorbell. Securely fasten the faceplate with the security screw. Turn the power back on at the breaker. Return to the Night Owl app and select “Ring Enable” to activate the ringer. Test the Doorbell. If it rings normally, you are done and can relax.
-
Page 28: Power The Doorbell Via Power Amp
Chapter 6: Power the Doorbell via Power Amp DEPENDING ON YOUR MODEL NUMBER, THE DIGITAL CHIME POWER AMP MAY BE SOLD SEPARATELY. YOU CAN PURCHASE IT AT NIGHTOWLSP.COM. TURN OFF THE POWER AT THE BREAKER BEFORE TOUCHING ANY WIRES! Remove the cover from your internal doorbell. Loosen the “Front”... - Page 29 Make sure the Power Amp doesn’t interfere with any moving parts. Replace the cover on the internal doorbell. Turn on the power at the breaker.
-
Page 30: Know Your Doorbell
Chapter 7: Know Your Doorbell 7.1 Booting Process Doorbell plays the voice prompt “Doorbell is ready for use.” Doorbell is ready for use. Use the Doorbell’s LED status light turns white and spins clockwise and the voice prompt says, “Doorbell is in Pairing Mode.” The Doorbell remains in Pairing Mode until it is connected to a Wi-Fi network. -
Page 31: Video Doorbell Functionality
The Doorbell checks for available firmware upgrades to download once it is connected to a Wi-Fi network (this does not occur during the initial boot). NOTE: Doorbell MUST be connected to a Wi-Fi network to receive firmware upgrades. If new firmware is available, it is automatically downloaded. If no new firmware is available, the voice prompt says, “Thanks for checking, but my firmware is up to date.”... -
Page 32: Status Check Process
The Doorbell restarts and initiates the booting process. Once reset to factory settings, the Doorbell loses the connection with the Night Owl Protect App (the Doorbell will be in DISCONNECTED/OFFLINE status). To restore the Doorbell to “Online” status, delete it from the App and repeat the setup process. -
Page 33: Firmware Upgrade Process
7.2.3 Firmware Upgrade Process After the Doorbell boots up and connects to a Wi-Fi network, it checks for a firmware upgrade. NOTE: The Doorbell does not check for a firmware upgrade during the initial boot. If a new firmware upgrade is available for download, the Firmware Upgrade Process begins. If there isn’t a new firmware upgrade available, the Doorbell says, “Thanks for checking, but my firmware is up to date.”... - Page 34 If the upgrade is successful, the Doorbell says, “Woohoo! Firmware Upgrade is complete,” and it will reboot. Woohoo! Firmware Upgrade is complete. If the download is unsuccessful, the status light alternates between a pulsing blue and white and the Doorbell says, “Oops, Doorbell firmware upgrade failed. Try again later.” The Doorbell returns to ON/Standby status, and the status light turns to solid white (as long as no other status issues are found during “Status Check Process”).
-
Page 35: Ringing The Doorbell
7.2.4 Ringing the Doorbell After the Doorbell is pressed, the status light turns blue and spins clockwise. The Doorbell rings and sends a push notification that when tapped, allows the user to communicate with the person who rang the Doorbell. NOTE: Answering the Doorbell changes the status light to solid blue. -
Page 36: Using The Night Owl Protect App
Chapter 8: Using the Night Owl Protect App 8.1 Live View NOTE: If the Doorbell is paired to a recorder, the Live View is seen when you select the recorder on the Devices screen Doorbell’s Name: Name given to the Doorbell during the setup process... -
Page 37: Notifications
If the Night Owl Protect App is running in the background, tapping the notification after a minute has passed opens the recording related to the push notification. If Night Owl Protect App is NOT running in the background, when you tap on a notification, the App opens on the device list screen. -
Page 38: Settings Menu
8.3 Settings Menu Back: Tap to return to the previous screen Camera Name: View and edit the Doorbell’s name Camera Information: Technical information about the Doorbell Recording Settings: Record by Event Type and Advanced Settings Notifications: Enable or Disable push notifications to your Smart Device Video Quality: Adjust the quality of the Doorbell’s video Color and Orientation: Configure the brightness or contrast Doorbell Options: By default, the option is ON and set to work with a mechanical chime... -
Page 39: Doorbell Information
8.4 Doorbell Information Back: Tap to return to the previous screen Model: The Doorbell’s model number MAC Address: The unique identifier assigned to network interfaces Serial Number: The current hardware version Firmware: Doorbell’s current software microSD: Shows how much space is used and allows you to format a microSD card Network: Name of the network connected to the Doorbell Camera Wi-Fi Strength: Shows status of the network connectivity... -
Page 40: Recording Settings
8.5 Recording Settings Tap Recording Settings to select the events that trigger a recording. 8.5.1 Advanced Screen By default, Motion is disabled. In order to enable any option on this menu, tap on the circle next to the option. To disable, tap on the circle again and it will be grayed out. Motion: Detected motion starts a recording (this option is not recommended if the recording space is limited) - Page 41 Object Detection: Enabled by default. Tap to record by Human Detection, Face Detection or both. If a check mark is displayed, the option is enabled. See Menu below. Event: It is enabled by default. Triggers a recording when the Doorbell’s ring button is pressed.
-
Page 42: Notifications
8.6 Notifications Channel Notifications: Tap to Disable or Enable push notifications for the Doorbell. Notify By: Allows you to receive push notifications for Motion or Object Detection (Human and Face) or ringing bell notifications. 8.7 Video Quality Adjusting the video resolution affects the quality, speed and performance of live streaming. -
Page 43: Color And Orientation
8.8 Color and Orientation Brightness: Allows you to adjust the Doorbell’s brightness. This feature does not extend or enhance Night Vision mode. Contrast: Increases the difference between the blackest black and the whitest white in the image NOTE: Adjust this setting if sections of the image are “grayed out.” However, setting the contrast too high degrades the image quality. -
Page 44: Doorbell
8.9 Doorbell - Advanced Allows you to enable or disable the Ring feature. Ring is enabled by default. Tap to toggle on or off. 8.10 Bell Type For Bell Type list Mechanical. This doorbell only supports ring functionality with Mechanical chimes. -
Page 45: Shared Users
Tap “Get Started” Enter a name, confirm the product you want to share, and tap “Next” Enter the email associated with the guest user’s Night Owl Protect account (Guest’s must download Night Owl Protect and create an account) Create a custom message if desired and tap “Send” when done... -
Page 46: Adding A Compatible Wireless Chime
Chapter 9: Adding a Compatible Wireless Chime If needed, you can easily add a plug-n-play Night Owl wireless chime to your doorbell. This chime is included with some models. If not included with yours, it can be purchased at NightOwlSP.com. To set up, please follow the simple steps below:... - Page 47 Step 2: Open the Night Owl app on your smart device and proceed to the settings for the doorbell. Tap “Doorbell” under Feature Controls Step 3: Tap “Add a Chime.”...
- Page 48 Step 4: Plug the wireless chime into an outlet and tap “Continue.” Step 5: Press and hold the sync button on the chime for 2 seconds. You should hear the chime beep twice indicating it is in pairing mode. Tap “Continue.”...
- Page 49 Step 6: The app will now search for the chime. Step 7: If the doorbell is not able to connect with the chime, you will receive an error message. Please ensure the chime is within range of the doorbell and then tap “Try Again.” IMPORTANT: You can also try resyncing by pressing the sync button on the chime until you hear 3 beeps,...
- Page 50 Step 8: Once you see the chime is connected, tap “Continue.” Step 9: Lastly, adjust your settings for the chime, including choosing the melody and chime volume.
-
Page 51: Troubleshooting
Troubleshooting Firmware Upgrade When the Doorbell is turned on for the first time, it will be in Pairing Mode. Once the Wi-Fi connection has been made (Home Wi-Fi or a recorder), the Doorbell does NOT run a firmware upgrade check. Doorbell is in Pairing Mode. -
Page 52: Status Light Key
Status Light Key Normal Light Notifications Solid Spinning Blue Spinning White/Blue Blue (Clockwise) (Counter Clockwise) The Doorbell The Doorbell Updating has been Answered is Ringing Firmware Solid Spinning White White (Clockwise) On / Pairing Stand-By Mode Error Light Notifications Top Half Top Flashing Blue / Alternating Pulse Flashing White... -
Page 53: Warranty
Night Owl is not responsible for any personal damage, loss or theft related to the Product or to its use for any harm, whether physical or mental related thereto. Any and all claims or statements, whether written or verbal, by salespeople, retailers, dealers or distributors to the contrary are not authorized by Night Owl and do not affect this provision of this warranty. - Page 54 Disclaimer: Certain uses, publication and/or distribution of video/audio recordings from security cameras and/or audio devices are prohibited or restricted by federal, state and local laws. When enabling and/or using audio recording features with your hidden security camera, be sure to comply with the laws in your country, state and locality.
-
Page 55: Need Help
Need Help? Why call? Our 24/7 online support site has it all! For system manuals, troubleshooting guides, FAQs, video tutorials and more: Please visit Support.NightOwlSP.com Enter the Series listed on the Product Support Sticker into the Search bar. Product support information can be Access the support material needed.
Need help?
Do you have a question about the DBW2 Series and is the answer not in the manual?
Questions and answers