Advertisement
Quick Links
ASTRAZENECA USER GUIDES
Sentry as gateway installation
The purpose of this user guide is to provide you with an overview of the device Sentry600 and
instructions on how to complete the installation of Sentry600 as a gateway
The Sentry600 gateway is
supplied with a mounting
bracket, USB power cable
and adaptor to plug into
power outlet.
A power socket in the
dispatch/receive area will
be required.
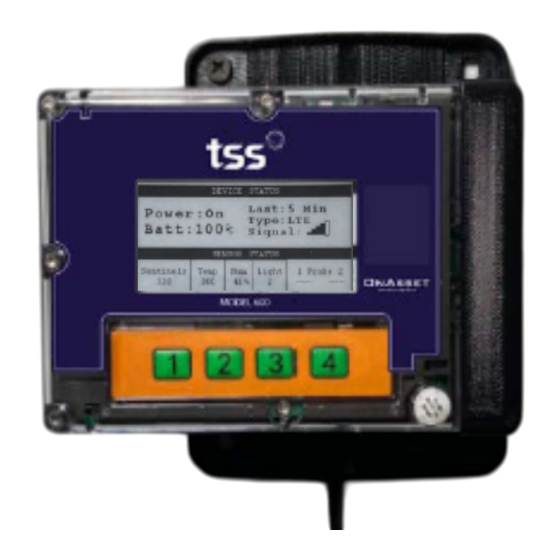
Connect the Sentry600 gateway to USB
charger + power outlet for 8 hours
and verify Batt: 100%
on the display. There is a
LED above the QR code
that will be Red when
charging and Green when
fully charged. It will change
to Red when transmitting.
Once installed, e-mail customer.service@tss.se
with your site name, SENTRY ID number and if
possible, a photograph of the installation
including surrounding area.
Add 'SENTRY Gateway installed' as email title.
For additional support please visit our support site
1
3
5
www.help.tss.se/az
© TSS AB 2021. All rights reserved
Place the gateway close where the sentinels will be
launched or uploaded (within 30-50m),
If the Sentry 600 gateway display shows the last
report was within 10 minutes (screen shows Last:
10 min or less) and the display shows a connection
with good signal strength (signal bars) it can be
mounted at this location.
Note: Always keep the Sentry plugged into the
power. It has a battery backup to continue
operations in the event of power outages. The Red
LED above the QR code will indicate it is back on
charge after these types of events.
2
4
UMN_DEV_AZ_SentryGateway600_1.4
Advertisement

Summary of Contents for TSS Sentry600
- Page 1 ASTRAZENECA USER GUIDES Sentry as gateway installation The purpose of this user guide is to provide you with an overview of the device Sentry600 and instructions on how to complete the installation of Sentry600 as a gateway The Sentry600 gateway is...
- Page 2 1,2,3,4 (not in use) IN-TRANSIT GATEWAY (green label) (blue label) Mounted at sending and receiving site Shipment location tracker for uploading Sentinel data to cloud For additional support please visit our support site www.help.tss.se/az UMN_DEV_AZ_SentryGateway600_1.4 © TSS AB 2021. All rights reserved...
Need help?
Do you have a question about the Sentry600 and is the answer not in the manual?
Questions and answers