Table of Contents
Advertisement
Quick Links
Advertisement
Table of Contents

Subscribe to Our Youtube Channel
Summary of Contents for Hikity T86DVR
- Page 1 10.26-Inch DVR Player User Manual...
-
Page 2: Table Of Contents
............................... 2 ..........................3 ............................4 ............................. 6 ............................6 ............................7 .............................8 A. Apple CarPlay ..............................10 B. Android Auto ..............................12 C. Apple Airplay ..............................14 D. Android Cast ..............................15 E. Bluetooth Music ............................16 F. WiFi video ................................ 17 G. - Page 3 The T86DVR 10.26 uses two wide-angle cameras installed inside and outside the vehicle to capture images of the surrounding area and transmit them to the integrated device in real time. With the help of this system, the driver can see the obstacles and pedestrians around the vehicle intuitively, and effectively reduce the occurrence of scraping, collision, collapse and other accidents.
- Page 4 Name Graphic Instructions Number 10.26 -inch FHD display (1600*600) / 2 -channel camera interface / touch control / Bluetooth / The host Wi-Fi / A udio output / SD card recording / Type C interface power supply The power Type C power cord/ 7V~32V / 3A current / cord integrated cable / cigar lighter to take power Pull back...
- Page 5 Function Project Performance indicators introduction Simplified Chinese / Traditional Chinese / English / Russian / Language Spanish / French / German / Japanese / Korean / Italian / Portuguese etc. System Interface Graphical menu operation Mode of operation Touch Video input 2 channels FHD video input Video input Video mode...
- Page 6 Supports Apple CarPlay / Android Auto / Apple Airplay / Wi-Fi Android Cast / WiFi Video Smart + connected Bluetooth Support Bluetooth music playback The video store SD card CLASS10 U1 : 32GB minimum and 256GB maximum The microphone Support microphone recording, menu can be set to turn off Audio part Voice control Support voice control, menu can be set to turn off...
- Page 7 On some models, the SD card can be used to store movies and music, which can be played after being plugged into the machine. On other models, however, it can only be used to store driving video. To record video safely, use SD cards from major brands such as SanDisk, Kingston, Toshiba, and Samsung.
- Page 8 Locate the drilling hole, find the appropriate installation position in the license plate attachment, mark it with a pen and then drill the appropriate size of the screw hole. Fix the camera to the rear of the car with screws, the reversing trigger wire (red thin wire) needs to be connected to the positive pole of the reversing light, and finally use the camera extension cable to connect to the monitor.
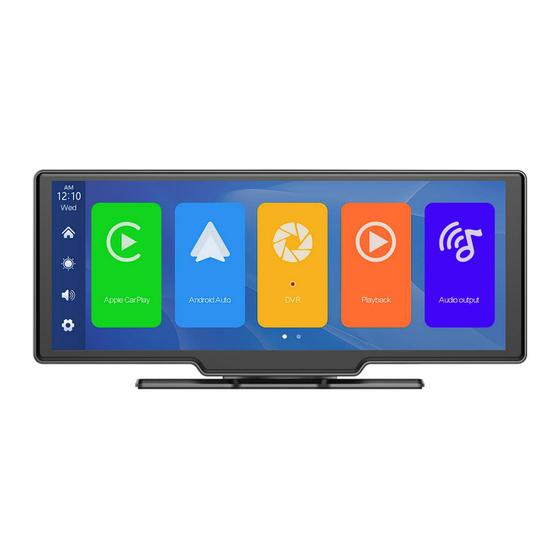
- Page 9 1. Time and date: display the current time and date. 2. Home button: click to return to home page. 3. Brightness key: click to adjust the screen brightness.
- Page 10 4. Volume key: click to adjust the volume. 5. Setting button: click to jump to the setting interface. (DVR) (Mobile Internet) (Return) 6. Apple CarPlay: Special connector for iPhone. 7. Android Auto: Special connector for Android mobile phone. 8. Dvr: Click to enter the video recording interface. 9.
-
Page 11: Apple Carplay
A. Apple CarPlay As shown in the above figure, click the 'Apple CarPlay' button, then select the 'Apple CarPlay' option, and first turn on the phone's Wi Fi and Bluetooth, as shown in the above figure. Bluetooth will automatically turn on, named T86-XXXXXX. Once Bluetooth is successfully connected, you can connect to Apple CarPlay. - Page 12 (Half screen mode) (Hull screen mode) (Apple CarPlay option is only supported for Apple mobile phones. Please turn off the Bluetooth button and then the WiFi button in your phone's settings to disconnect.)
-
Page 13: Android Auto
B. Android Auto As shown in the picture, click the [Android Auto] button, and then select the [Android Auto] option, first turn on the phone's Wi-Fi and Bluetooth, as shown in the picture above. Bluetooth will be turned on automatically and the name will be T86-XXXXXX. - Page 14 (Hull screen mode) (Wireless Android Auto option is only supported for Android phones. Please forget Bluetooth in your phone's settings and turn off the WiFi button to disconnect).
-
Page 15: Apple Airplay
C. Apple Airplay Apple AirPlay can transmit videos, audio and pictures from iPhone to car device to play to watch. It is fundamentally different from the Bluetooth wireless. The transmission carrier is WIFI. Need iPhone connection to machine WiFi Select the smart screen in the screen mirror in the iPhone control center Note: Only support iPhone mobile phones... -
Page 16: Android Cast
D. Android Cast It can realize the mirror projection of the mobile phone and the car machine. You need to scan the code with your mobile phone to download, install and run the "TcLink" application. Note: Only supports Android phones... -
Page 17: Bluetooth Music
E. Bluetooth Music Turn on the Wi-Fi and Bluetooth of the mobile phone first, and select [Bluetooth Music] option. Click the [BT Manage] option on the interface to connect Bluetooth to the mobile phone and start playing music. The buttons correspond to "previous song", "play/pause" and "next song" respectively. -
Page 18: Wifi Video
F. WiFi video As shown in the above figure, first scan the QR code to download the corresponding app. After downloading, open the app and follow the prompts to connect to the machine's WiFi. WiFi name: RTSP-XXXXXX, password as shown on the machine. After connecting, the machine will enter the recording interface and cannot perform any operations. -
Page 19: Dvr
G. DVR As shown in the picture, the main page will not display the camera image, you need to click the Dvr button to view the camera image. When a card is inserted, the system automatically enters the video mode, and when recorded, the small red dots in the [Driving Monitoring] button will flash. -
Page 20: Playback
H. Playback As shown above, click the [Playback] button to enter the video playback interface. You can click any to play back the video and play the video on the right. [Video] Click to view the recorded loop video. [Photo] Click to view the pictures taken by the one-click photo function. [Locked video] Click the video saved after locking. -
Page 21: Audio Output
Audio Output Click the [Audio Output] button to enter the audio output selection interface. ① 【Speaker】: The sound will be played from the speaker of the smart screen. ② 【Carplay/Auto】 : Select this mode, and then connect to 【Apple CarPlay】 or 【Android Auto】to cast the screen, you can use the phone's Bluetooth to directly connect to the original car's Bluetooth. - Page 22 After selecting this mode, the volume icon will change to the Bluetooth transmission icon【 】, and the volume cannot be adjusted on this device, so the volume must be adjusted on the original car. ③【FM】: After selecting this mode, the FM transmission mode will be turned on by default.
- Page 23 ④ 【 AUX 】 : After selecting this mode, the AUX output mode will be turned on by default. Use the AUX sound source cable to connect the smart screen to the original car. After the connection is successful, all the sounds of the device will be transmitted to the original car speakers through the AUX sound source cable for playback.
-
Page 24: Bluetooth
J. Bluetooth As shown in the figure above, click the Bluetooth button [ ] to switch on the device after entering the Bluetooth interface. The page will display the device name, such as: T86-140D07, and click the Modify button [ ] to modify the Bluetooth name of the device. -
Page 25: Setting
K. Setting As shown in the figure, click the [ ] button in the lower left corner to enter the setting interface. Click on [Auto-dimming] to freely set: automatically adjust the brightness time and brightness value. Click [Screen saver] to enter the settings: Screen saver can be set to: off / 10 seconds / 30 seconds / 1 minute The system will run without corresponding time, and the screen... - Page 26 After entering the screen saver, the screen can be lit at any position on the screen again. Click [Driving Position] to enter the setting: You can select left rudder or right rudder. In the shortcut menu bar of Apple CarPlay, select left rudder on the left, and select right rudder on the right.
- Page 27 Click [Microphone] to enter the settings: You can choose to close or open. You can choose to close or open. This option makes it easier for customers to install the camera flexibly.(just for rear camera) See the instructions below. (not required) See the instructions below.
- Page 28 Click [Voice Control] to enter the settings: Voice control commands are: show front camera / Show rear camera / Turn on display / Turn off display / Show all cameras 5 control commands, after opening the option, in the video interface, say the corresponding command entry, the system will perform the corresponding operation.
- Page 29 There is no need to touch the screen by hand, and the corresponding operation can be realized only by voice command. Opening method: setting - voice control - clicking anywhere - opening voice control - speaking command can realize corresponding operations. The following commands are supported: Show front camera / Show rear camera / Turn on display / Turn off display / Show all cameras...
- Page 30 Click on [Reverse line calibration] to enter the settings: Park the car in the middle of the parking space. You can choose whether to turn the reverse line feature off or on. Manually drag the left, adjust the position of the reversing assist line up, left and right, so that the reverse assist line is horizontal to the parking line on the left of the ground.
-
Page 31: Time Lapse Video
Time lapse video In the settings, click the "time lapse video" option, you can choose "off", "12 hours", "24 hours" (default off). After selecting the monitoring time for 12 hours or 24 hours, when the car is turned off (ACC is disconnected), the system will turn off the screen after a five-second countdown to reduce power consumption and enter monitoring. - Page 32 Item Problem Solution ① Check whether the head of the Unable to start cigarette lighter power cord is (Player supports damaged or aging. 7V-32V car use, ② Check whether the fuse of the high voltage power plug is disconnected or cannot be used) burned.
- Page 33 ① Avoid direct sunlight or exposure to sunlight during use. The normal The system is operating temperature of player is stuck or Player -4 ~ 149 ℉. ② overheating After disconnecting the power supply, the temperature of player will be lower than 149 ℉ and work normally.
- Page 34 ① Only Android phones are supported. ② Update Auto and related applications on mobile phones to Android Auto the latest version. ③ connection Do not enable VPN on the mobile failed phone. ④ Check that the WiFi and Bluetooth functions of the mobile phone are normal.
- Page 35 Name Smart player Chip High-performance SOC Wireless system Apple CarPlay/Android Auto/ Apple Airplay/Mirror Cast/BT Screen 10.26-inch IPS material,1600*600 resolution Storage expansion Class10 TF Card ≤ 256G Wireless module Wi-Fi, BT, FM Launch module Built-in speaker 2 W speaker FM launch Adjustable frequency 76MHz-108MHz Operating Voltage 7V-32V Adaptive...
- Page 36 FCC Statement This device complies with part 15 of the FCC Rules. Operation is subject to the following two conditions: (1) This device may not cause harmful interference, and (2) this device must accept any interference received, including interference that may cause undesired operation. Note: This equipment has been tested and found to comply with the limits for a Class B digital device, pursuant to part 15 of the FCC Rules.
Need help?
Do you have a question about the T86DVR and is the answer not in the manual?
Questions and answers
TF card failed mesage, How to fix it?
To fix the TF card failed message on the Hikity T86DVR:
1. Manually format the SD card before first use to ensure sufficient capacity.
2. Regularly format the SD card to maintain performance.
3. Ensure the SD card is properly inserted and not damaged.
4. Use a compatible SD card with enough storage capacity.
If issues continue, try using a different SD card.
This answer is automatically generated