Table of Contents
Advertisement
Quick Links
Advertisement
Table of Contents

Summary of Contents for kincrome K8412
- Page 1 Diagnostic Scan Tool OBDII/EOBD K8412 June 2024...
-
Page 2: General Notice
Diagnostic Scan Tool OBDII/EOBD General Notice For your own safety and the safety of others, and to prevent damage to the equipment and vehicles, read this manual thoroughly before operating your code reader. The safety messages presented below and throughout this user’s manual are reminders to the operator to exercise extreme care when using this device. -
Page 3: Warranty And Service
Diagnostic Scan Tool OBDII/EOBD Warranty and Service Limited One Year Warranty We warrants to its customers that this product will be free from all defects in materials and workmanship for a period of one (1) year from the date of the original purchase, subject to the following terms and conditions: 1) The sole responsibility of our company under the Warranty is limited to either the repair or, at the option of our company, replacement of the scan tool at no charge... -
Page 4: Table Of Contents
Diagnostic Scan Tool OBDII/EOBD Table of Contents 1 GENERAL INFORMATION ..................1 1.1 On-Board Diagnostics (OBD) II ..................1 1.2 Location of the Data Link Connector (DLC) ............... 1 2 USE THE SCAN TOOL ....................2 2.1 Tool Descriptions ......................2 2.2 Accessory Descriptions .................... -
Page 5: General Information
Diagnostic Scan Tool OBDII/EOBD 1 General Information 1.1 On-Board Diagnostics (OBD) II The first generation of On-Board Diagnostics (called OBD I) was developed by the California Air Resources Board (ARB) and implemented in 1988 to monitor some of the emission control components on vehicles. As technology evolved and the desire to improve the On-Board Diagnostic system increased, a new generation of On-Board Diagnostic system was developed. -
Page 6: Use The Scan Tool
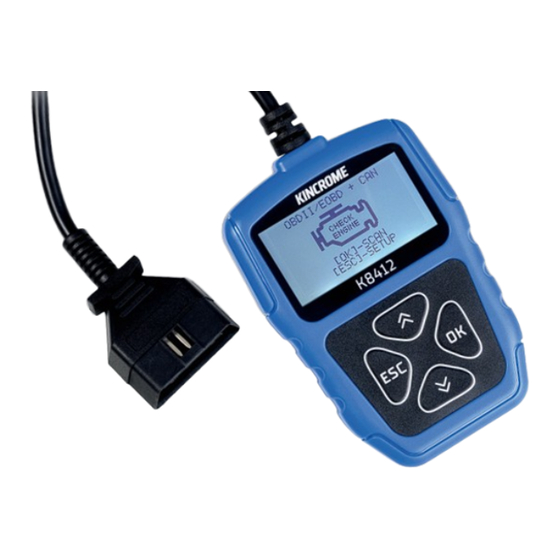
Diagnostic Scan Tool OBDII/EOBD 2 Use the scan tool 2.1 Tool Descriptions This section illustrates external features, ports and connectors of the code reader. A OK Key - Enters diagnostic operation or confirms an action. B ESC Key - Enters SETUP for system, such as language, measurement unit and contrast of the LCD display. -
Page 7: Technical Specifications
Diagnostic Scan Tool OBDII/EOBD 2.3 Technical Specifications Display: 128 x 64 pixels, backlit display screen Working Temperature: 0 to 60 °C (32 to 140°F) Storage Temperature: -20 to 70°C (-4 to 158°F) Power Supply: 8-18V vehicle power J1850-PWM, J1850-VPW, ISO9141, KWP2000 (ISO Supported Protocols: 14230), and CAN (Control Area Network ISO 11898) Measurement (L x W x H): 112 x 76 x 20mm... -
Page 8: Connecting To Vehicle Power
Diagnostic Scan Tool OBDII/EOBD 3.2.1 Connecting to Vehicle Power The code reader normally powers on whenever it is connected to the data link connector (DLC). To connect to vehicle power: 1. Turn the ignition off. 2. Locate the data link connector (DLC). The DLC port is typically located under the dashboard, near the steering column. -
Page 9: Obdii/Eobd Diagnostics
Diagnostic Scan Tool OBDII/EOBD 4 OBDII/EOBD Diagnostics When OK/SCAN application is selected from Home screen, the code reader starts to detect the communication protocol automatically. Once the connection has been established, a menu that lists all of the tests available on the identified vehicle displays. -
Page 10: Clear Codes
Diagnostic Scan Tool OBDII/EOBD 4.2 Codes 1. Press UP/DOWN key to highlight Clear Codes from Diagnostic Menu and press the OK key. 2. Follow the on-screen instructions and answer questions about the vehicle being tested to complete the procedure. 3. Check the codes again. If any codes remain, repeat the Codes steps. 4.3 Datastream Datastream menu lets you view real time PID data from the electronic control module. - Page 11 Diagnostic Scan Tool OBDII/EOBD When the monitor’s status is: • OK - vehicle was driven enough to complete the monitor. • INC (Incomplete) - vehicle was not driven enough to complete the monitor. • N/A (Not Applicable) - vehicle does not support that monitor. There are two types of I/M Readiness tests: •...
- Page 12 Diagnostic Scan Tool OBDII/EOBD Below is a list of abbreviations and names of OBD II monitors supported by the code reader. Abbreviation Name Misfire Monitor Fuel System Monitor Comprehensive Components Monitor Catalyst Monitor HCAT Heated Catalyst Monitor EVAP Evaporative System Monitor Air Conditioning Refrigerant Monitor Oxygen Sensor Monitor Oxygen Sensor Heater Monitor...
- Page 13 Diagnostic Scan Tool OBDII/EOBD To retrieve I/M Readiness Status data by typical way: 1. Scroll with UP/DOWN key to highlight I/M Readiness from Diagnostic Menu and press the OK key. If vehicle supports both types of monitors, a screen for monitor type selection displays.
-
Page 14: Request Vehicle Information
Diagnostic Scan Tool OBDII/EOBD Since DTCs Cleared FUEL HCAT EVAP 4.6 Request Vehicle Information Vehicle Information allows to request the vehicle’s VIN number, calibration ID(s) which identifies software version in vehicle control module(s), calibration verification numbers (CVN(s)) and in-use performance tracking on model year 2000 and newer OBD II compliant vehicles. -
Page 15: System Setup
Diagnostic Scan Tool OBDII/EOBD To request vehicle information: 1. Use the UP/DOWN key to highlight Vehicle ID Number. from Diagnostic Menu and press the OK key. Follow on-screen instruction and send the command to read vehicle information. 2. Use the UP/DOWN key to highlight an available option and press the OK key. A screen with details of the selected option displays. - Page 16 Kincrome Express Warranty, you can, at your cost, send the product to the above address for repair or replacement. Your rights under a Kincrome Express Warranty are in addition to any other rights you have under the Australian Consumer Law or other applicable laws.
Need help?
Do you have a question about the K8412 and is the answer not in the manual?
Questions and answers