Advertisement
Quick Links
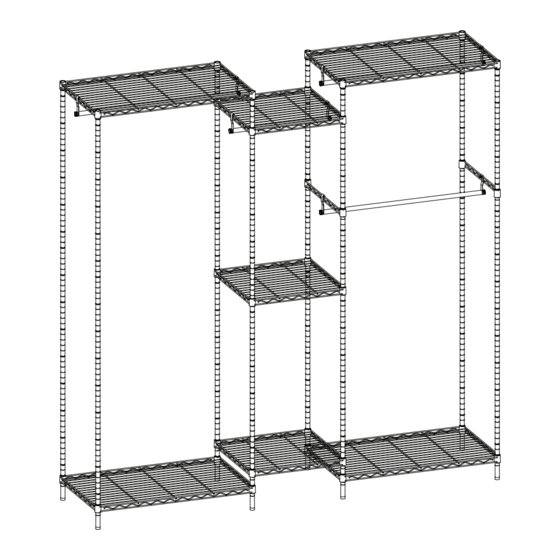
Garment Rack
PACKAGE CONTENTS
A
B
C
x4 Large Shelf
x3 Small Shelf
x 2 Hanging Rail
F
G
x8 Bottom Pole
x 64 +2 extra
(with feet leveler preassembled)
Tapered Lock
K
AA
x3 Long Hanging rod
x2 Laveuse
XF-GR597
http://www.paylesshere.com
Warning:
Maximum weight capacity per large shelf
is 180lbs(120lbs per small shelf,90lbs per
short hanging rod and 70lbs per long
hanging rod) when equally distributed on
feet levelers.
Maximum entire unit weight capacity is
830lbs when equally distributed on feet
levelers.
Do not stand on or climb on the shelving unit.
Place heavier items on lower shelves
and lighter ones on top shelves.
Failure to follow these guidelines may
result in property damage or personal
injury.
Caution:
Do not stand on or climb on the shelving unit.
Place heavier items on lower shelves
and lighter ones on top shelves.
D
X 8 Top Pole
(with pole cap and pole
connector preassembled)
(with pole connector preassembled)
H
I
x8 Screw
x8 Bracket
x1 Short Hanging rod
O
BB
CC
x 22 Black plastic spacer
(NOTE: Discard the black plastic spacers O.
These between each shelf are only for packing
x2 Ancre
x2 Vis
purpose , not for assembling.)
ASSEMBLY INSTRUCTIONS OPTION 1
1. With the tapered end facing up, snap the two halves of a
tapered lock (G) at the desired height on bottom pole (F).
Repeat for the remaining bottom poles (F), making sure
the tapered locks (G) are installed at the same grooved
line on each bottom pole (F).
Attention:The tapered must be fixed
to the groove on the pole, and make
sure the tapered does not slip before
installing the shelf
2. Rest shelf (A) on its side, then insert the bottom poles (F)
through the corner holes of the shelf (A).
F
3. Turn assembly upright and push the shelf (A) firmly onto
the tapered locks (G). Note: Make sure the lip of shelf (A)
is facing down and the levelers on bottom poles (F)
are on the floor.
4. Repeat steps 1-3 for the shelf (B).
E
x8Middle Pole
5.Screw middle pole (E) onto bottom pole (F), hand tighten.
J
6.Repeat steps 1-3 for the shelf (B).
7.Screw top pole (D) onto middle pole(E), hand tighten.
F
G
8.Repeat 1-3 position hanging rail (C),make sure one
support faces outward, the other support faces inward
to make them face same direction.
A
9. Repeat steps 1-3 for the remaining shelf (A).
A
B
10.
Place hanging rod bracket (I) with notch on end straddling
one of the bars on the top shelf (A), top shelf (B) and
rail
(C).Attach hanging rod (J) and (K) onto bracket with screw (H).
Repeat for other side.
E
I
J
H
F
I
H
11. OPTIONAL: Move unit to desired
location and mark spot through top
shelf wire on each side of unit. Drill
B
1/4 in. holes at each marked spot,
then insert plastic anchors (BB) into
holes. Insert screws (CC) through
the washers (AA) then through the
back of the top shelf wire and into
the plastic anchors (BB).
D
E
C
A
A
B
hanging
K
BB
AA
CC
Advertisement

Related Manuals for PayLessHere XF-GR597


Summary of Contents for PayLessHere XF-GR597
- Page 1 ASSEMBLY INSTRUCTIONS OPTION 1 Garment Rack XF-GR597 7.Screw top pole (D) onto middle pole(E), hand tighten. 1. With the tapered end facing up, snap the two halves of a tapered lock (G) at the desired height on bottom pole (F).
- Page 2 ASSEMBLY INSTRUCTIONS OPTION 2 1. With the tapered end facing up, snap the two halves of a 6.Screw middle pole (E) onto bottom pole (F), hand tighten. 10. Repeat steps 1-3 for the remaining shelf (A) (B). tapered lock (G) at the desired height on bottom pole (F). Repeat for the remaining bottom poles (F), making sure the tapered locks (G) are installed at the same grooved line on each bottom pole (F).
Need help?
Do you have a question about the XF-GR597 and is the answer not in the manual?
Questions and answers