
Summary of Contents for MBC CFPG08
- Page 1 MBC VARIABLE CHILLER USER MANUAL VARIABLE CHILLER AIR CONDITIONER SYSTEM I INSTALLATION MANUAL...
-
Page 2: About This Manual
ABOUT THIS MANUAL This manual provides comprehensive instructions for the correct installation of MBC Marine Variable Chilled Water Systems. It is crucial to follow these guidelines carefully, as improper installation can result in reduced system performance, premature equipment failure, and even serious injury or death. -
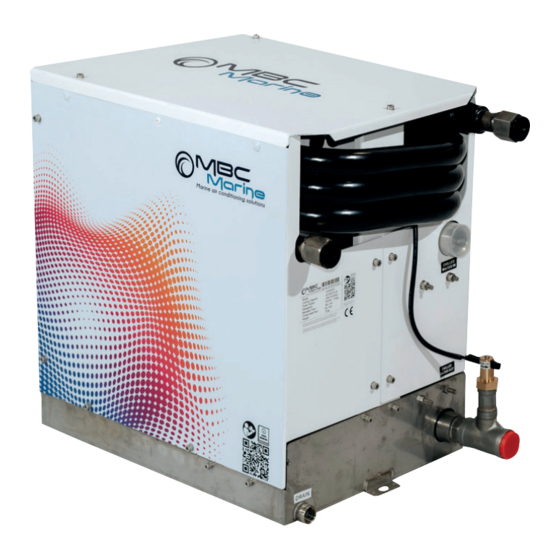
Page 3: Product Introduction
Whether you’re cool- ing or heating, the MBC Marine system offers superior climate con- SYSTEM OPERATION trol, tailored to meet the demanding needs of marine environments. - Page 4 GENERAL INSTALLATION GUIDELINES FOR CHILLER UNIT Before starting the installation, carefully review these instructions and Working with this system involves potential hazards due to high-pres- plan all necessary connections for the unit, including ducting, conden- sure components and electrical equipment. Always adhere to the sate drain line, seawater inlet and outlet hoses, electrical power sup- safety guidelines outlined in the documentation, as well as the tags ply, control panel placement, and seawater pump location.
- Page 5 After installation, it is important to perform a pressure test on the sys- The pressure gauge on the MBC Variable Chiller unit is an essential tool tem to ensure there are no leaks and that the system is operating with- for monitoring the system’s operation.
-
Page 6: Chilled Water System
Failure to maintain proper glycol levels can cause system damage and densation can go unnoticed until it causes water damage. Be sure to will void the warranty on your MBC units. cover all exposed pipe ends, use tape when necessary, and ensure that the insulation is not damaged or pinched by supporting hardware. - Page 7 For further questions or concerns regarding the installation or oper- ation of your MBC Marine Variable Chiller System, please consult our Technical Service team. VARIABLE CHILLER AIR CONDITIONER SYSTEM I INSTALLATION MANUAL...
-
Page 8: Important Warning
AIR BLEEDERS It is essential to have a way to release trapped air from the system. All MBC air handlers and chillers are equipped with bleeder valves. In IMPORTANT WARNING: addition to these, a main bleeder should be installed at the highest... - Page 9 STRAINER REQUIREMENTS CLEANLINESS Strainers are essential in both the condenser/seawater circuit and the Strainers are not designed to catch fine particles, so it is crucial that circulated water circuit. Failing to adhere to these guidelines will void the system is assembled using clean pipes and components. Failure the warranty.
- Page 10 PIPE SIZE The recommended pipe size should be based on the total water flow To determine the appropriate pipe size, add the total BTU rating of the requirements to maintain stable pressure. Overly large pipes can be air handlers served by the pipe. Chillers are typically sized to about harmful and may lead to drastic changes in water velocity.
- Page 11 DROP WATER DRAIN The unit produces condensate that collects in the drain pan. Choose sue in chilled water systems and can go unnoticed until water dam- the location of the air handler so that condensate drainage is always age occurs. Cover all exposed ends, use tape for split-insulating, and possible.
- Page 12 Air Trap Prevention: Two-Pump System: The pump discharge should be positioned vertically upward to prevent The two-pump system ensures efficient water circulation throughout air from being trapped in the pump head, with a straight vertical pipe the cooling system, significantly improving both performance and re- run leaving the pump.
- Page 13 Flow Control Valve: Each MBC Air Handler is equipped with its own flow control valve. If the air handler’s capacity exceeds 10% of the chiller’s capacity, a bypass around the flow control valve may be necessary if the pump cannot force enough liquid through the chiller.
- Page 14 FILLING THE FRESHWATER CIRCUIT OF THE CHILLER SYSTEM B. Pressure Build-Up: Proper filling of the freshwater circuit in the chiller system is essential for the system’s efficient operation and long-term reliability. The fol- Allow the static pressure to build up until it reaches approximately 1.4 lowing steps ensure that the system is properly filled, vented, and free bar.
- Page 15 6. Temperature Setting and Testing: 8. Final Inspection: Turn on the chiller system and adjust the cabin temperature controls. After the system is operational, monitor the condition of the cooling water. Ensure the circulation pump starts immediately, and the system reaches The water should be clear and free of air bubbles, and there should be no air the desired temperature.
- Page 16 INSTALLATION GUIDELINES FOR AIR HANDLER UNIT MBC fan coil units feature an integrated electric heating element, pro- WARNING! viding a dual heating and cooling solution that is highly efficient in areas with fluctuating temperature demands. These units include a Systems are sensitive to air reductions, (e.g. from 150mm fan-powered heat exchanger along with a built-in electric heater, of- to 100mm) which result reduction of air flow efficiency.
- Page 17 MOUNTING THE AIR HANDLER AND THE ELECTRICAL BOX Air Handler Placement: Blower Adjustment: The Air Handler Unit should be installed as low as possible (e.g., under If needed, loosen the lock screw on the blower to adjust its position a V-berth or at the bottom of a locker), while the supply air duct should for the most direct airflow.
- Page 18 UNIT PARAMETERS CFPG08 CFPG10 CFPG12 CFPG16 CFPG24 Cooling capacity BTU/hr 8000 10000 12000 16000 24000 Power source 230V/50Hz Operating Current 0,4 A 0,5 A 0,8 A 0,9 A 1,1 A Input power 100 W 120 W 150 W 200 W...
- Page 19 SEAWATER SYSTEM INSTALLATION INSTRUCTIONS Water Intake Placement: Water Strainer Positioning: Install the water intake fitting as deep and as close to the keel as Place the water strainer in a location that allows easy access for possible to ensure proper water flow. Ensure the water intake fitting cleaning.
- Page 20 Thread Sealing: condenser, from corrosion. MBC Marine assumes no liability for any Use thread sealing cord (e.g., Loctite 55) or an approved pipe thread damage caused by electrolysis or corrosion if no sacrificial anode is sealant for all metal-threaded connections to ensure a watertight seal installed in the system.
- Page 21 Grounding Reminder: Extreme seawater temperatures can impact Marine A/C perfor- Note: All metal components that come into contact with seawater mance. must be connected to the boat’s grounding system. These compo- nents include: In cooling mode, optimal efficiency is achieved when seawater tem- •...
- Page 22 BEFORE THE FIRST START As a condition of the warranty, the installer is required to provide clean tire internal chiller system with clean water before the first glycol fill. circulating water in the system. If this is not done, dirt can accumulate Observe the water during the draining process by collecting a small in the evaporators, causing them to freeze and rupture.
-
Page 23: Maintenance
MAINTENANCE To ensure optimal performance and longevity of the cooling system, it is recommended to create an air conditioning system maintenance log. This log will help you track all activities starting from the system’s initial start-up. Make sure that all maintenance operations are recorded in detail. -
Page 24: Seawater Connections
The MBC Marine variable chiller unit is pre-charged with refrigerant gas at the factory and is adequate for the life of the system. Routine Dosage of Antifreeze: •... - Page 25 Protection of the Seawater Side: PUMPS • Application of Antifreeze: If the chiller system operates in an area where seawater may freeze, consider introducing antifreeze into Remove oil, dust, dirt, water, and chemicals from the exterior of the the seawater side as well, especially if there is a risk of freezing. motor and pump.
- Page 26 SENSORS CLEAN SEA WATER CIRCULATION All control probes and sensors should be checked to ensure they are Condenser coils and seawater lines located below the waterline can in the correct position and properly secured. Improperly positioned or become fouled over time due to marine growth and deposits within loose probes can lead to inaccurate readings and system failures.
-
Page 27: Troubleshooting
TROUBLESHOOTING The PCB controller will display if there is any error during the system Code Meaning Description Solution operation. Please follow the troubleshooting guidelines below. The troubleshooting and error codes are grouped into four categories: E1:06 Compressor Return Air The compressor return Check the sensor and Temperature Sensor air temperature sensor is... - Page 28 Code Meaning Description Solution Code Meaning Description Solution E1:14 Protection Against Low The freshwater outlet Check the temperature E1:18 Compressor Controller Communication between the Damaged or loose Freshwater Outlet Temperature temperature is too low, which sensor. Communication Failure compressor controller and the communication cables.
- Page 29 Code Meaning Description Solution Code Meaning Description Solution E1:34 Compressor Drive Failure The compressor drive has Faulty compressor motor. E1:39 EE Fault (EEPROM Memory EEPROM memory fault where Corrupted or malfunctioning failed, likely due to a motor Fault) system parameters are EEPROM.
- Page 30 Code Meaning Description Solution E1:48 Input Current Sampling Fault Faulty input current sampling. Defective current sensors or wiring. Solution: Replace faulty sensors or control components. E1:49 Compressor Overcurrent Alarm Overcurrent detected in the Compressor motor overload or compressor. mechanical issues. Solution: Inspect and reduce the load on the compressor.
- Page 31 WIRING DIAGRAM AND INSTALLATION SCHEME VARIABLE CHILLER AIR CONDITIONER SYSTEM I INSTALLATION MANUAL...
Need help?
Do you have a question about the CFPG08 and is the answer not in the manual?
Questions and answers