Advertisement
Quick Links
Advertisement

Subscribe to Our Youtube Channel
Related Manuals for Outsunny 84J-013V80


Summary of Contents for Outsunny 84J-013V80
- Page 1 IN240600272V01_GL_84J- IN240600272V01_GL_84J-013V80 US_CA...
-
Page 2: Planning Assembly
Before You Start Please read all instructions carefully. Retain instructions for future reference. Separate and count all parts and hard wares. Read through each step carefully and follow the proper order. We recommend that, where possible, all items are assembled near to the area in which they will be placed in use, to avoid moving the product unnecessarily once assembled. -
Page 3: Planification De L'assemblage
Avant de Commencer Veuillez lire attentivement toutes les instructions. Conservez les instructions pour vous y référer ultérieurement. Vérifiez toutes les pièces et les accessoires. Lisez attentivement chaque étape et suivez l'ordre correct. Nous recommandons que, dans la mesure du possible, tous les produits soient assemblés à... - Page 4 Antes de Empezar Lea atentamente todas las instrucciones. Conserve las instrucciones para futuras consultas. Separe y cuente todas las piezas y los accesorios. Lea detenidamente cada paso y siga el orden correcto. Recomendamos que, siempre que sea posible, todos los elementos se monten cerca de la zona en la que se van a utilizar, para evitar mover el producto innecesariamente una vez montado.
- Page 5 Antes de começar Leia atentamente todas as instruções. Guarde as instruções para referência futura. Separe e conte todas as peças e materiais duros. Leia cada passo cuidadosamente e siga a ordem correcta. Recomendamos que, sempre que possível, todos os itens sejam montados perto da área em que serão utilizados, para evitar deslocar desnecessariamente o produto depois de montado.
- Page 6 Vor dem Beginnen Bitte lesen Sie alle Anweisungen sorgfältig durch. Bewahren Sie die Anweisungen zum zukünftigen Verwendung auf. Überprüfen Sie, ob alle Teile und Zubehörteile vorhanden sind. Lesen Sie jeden Schritt sorgfältig durch und befolgen Sie die richtige Reihenfolge. Wir empfehlen, alle Teile möglichst in der Nähe des Aufstellungsortes zu montieren, um unnötige Bewegungen nach der Montage zu vermeiden.
- Page 7 Prima di Iniziare Si prega di leggere attentamente tutte le istruzioni. Conservare le istruzioni per riferimento futuro. Separare e contare tutte le parti e gli accessori. Leggere attentamente ogni passo e seguire l'ordine corretto. Si consiglia, ove possibile, di assemblare tutti gli articoli vicino alla zona in cui verranno posti in uso, per evitare di spostare inutilmente il prodotto una volta assemblato.
- Page 8 PART...
- Page 9 EN_1. Assembling the Left & Right Hind Legs Insert the movable connecting rod of the Right Hind Leg (C) into the connecting hole at the middle of the Left Hind Leg (D). FR_1. Assemblage des pattes arrière gauche et droite Insérer la tige de connexion mobile de la patte arrière droite (C) dans le trou de connexion situé...
- Page 10 EN_2. Assembling the Hind Legs to the Body of Deer Insert the connecting rods of the Left & Right Hind Legs (C & D) into the connecting holes of the Body of Deer (B) and fasten at two pairs of connecting loops with the Zip Ties (I).
- Page 11 EN_3. Assembling the Left Front Leg to the Body of Deer Insert the connecting rods of the Left Front Leg (E) into the connecting hole of the Body of Deer (B) and fasten together at the connecting loops with the Zip Tie (I). FR_3.
- Page 12 EN_4. Assembling the Right Front Leg to the Body of Deer Insert the connecting rods of the Right Front Leg (F) into the connecting holes of the Body of Deer (B) and fasten together at the connecting loops with the Zip Tie (I). FR_4.
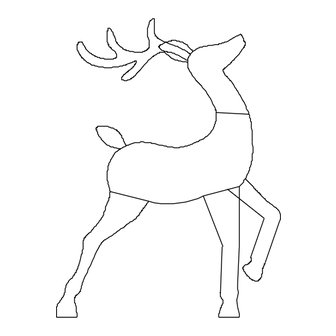
- Page 13 EN_5. Assembling the Head of Deer Hang the 7-shaped hooks at the bottom of the Head of Deer (A) onto the top metal frame of the Body of Deer (B) and fasten at the connecting loops with the Zip Tie (I). FR_5.
- Page 14 EN_6. Assembling the Antlers Insert the connecting rods of the two Antlers (H) into the connecting holes at the top of the Head of Deer (A). FR_6. Assemblage des bois Insérer les tiges de connexion des deux bois (H) dans les trous de connexion situés au sommet de la tête de cerf (A).
- Page 15 EN_7. Assembling the Tail Insert the connecting rod of the Tail (G) into the connecting hole at the rear of the Body of Deer (B). FR_7. Assemblage de la queue Insérer la tige de connexion de la queue (G) dans le trou de connexion situé à l'arrière du corps du cerf (B).
- Page 16 EN_8. Assembling the Ground Stakes Insert four Ground Stakes (J) over the bottom metal frames of the four Legs ©, D, E, F) then into the ground firmly . 9. Connecting the wires Insert all the plugs connected to the Wire Controller (L) into all the sockets then tighten the plastic nuts.
- Page 17 Input voltage Input voltage Input AC frequency Input AC frequency Output voltage Output voltage Output current Output current Output power Output power Average active efficiency Average active efficiency 78.7 Efficiency at low load (10 % ) Efficiency at low load (10 % ) No- load power consumption No- load power consumption Input voltage...
Need help?
Do you have a question about the 84J-013V80 and is the answer not in the manual?
Questions and answers