Table of Contents
Advertisement
Advertisement
Table of Contents

Summary of Contents for Spa Industries Global Cyclone Monsoon Advantage 13-PS
- Page 1 Portable and In-Ground Spas Operating Manual...
-
Page 2: Table Of Contents
Congratulations... Congratulations…on becoming the owner of a Spa Industries Global Spa. You’ll find the control systems in our spas have been designed for simplicity and can be programmed to suit your individual preferences. With the proper care and service of your new spa, and the correct chemical maintenance of the water, your spa will provide years of enjoyment. -
Page 3: Spa Hardware Orientation
operatingmanual Spa Hardware Orientation Touchpad Control Centre – located on the topside of your spa. This touchpad operates pump/s, blower, temperature adjustment and other ancillary functions that you may have, such as filter cycles, lights and diagnostic codes. Control Box – where power supply, blower, ozone (if used) and circulation pump are connected. - Page 4 Ozone (if fitted) – used for water purification. For additional chemical requirements when using ozone, contact your Authorised Dealer. There are two types of ozone units used in Spa Industries Global spas. Heater – Housed with the control box. Blower (if fitted) is located in the engine bay of the spa. Its purpose is to blow air through the air injector to create bubbles.
-
Page 5: General Information
Identification / Compliance Label (Portable Spas and Swim Spas) Spa Industries Global Portable Spas and Swim Spas come complete with their own Identification / Compliance Label which can be found in the engine bay area of the spa. It is an aluminium plate containing a host of information (pictured below in Image A. -
Page 6: Important Safety Instructions
operatingmanual General Information Important Safety Instructions Do not power up your spa until you have read this entire Operating Manual. Improper installation may result in equipment damage and void the Spa Warranty. Please take note: • You must contact local Authorities in relation to pool fencing and other manditory regulations that MUST be adhered to when installing a spa. -
Page 7: Installation
If you are installing your spa indoors, pay close attention to the flooring beneath it. Always remember that the spa is filled with water. Choose flooring that will not be spoiled or ruined from water damage. Spa Industries Global will not accept responsibility for water damage caused through spa being placed in unacceptable surroundings. -
Page 8: Electrical Connections
operatingmanual Electrical Connections As stated in the Spa Industries Pre-Delivery Manual, a qualified Registered Electrical Contractor must undertake all electrical connections. You must also have a Certificate of Electrical Safety issued by the Electrical Contractor at completion of the installation. This certificate may need to be presented to your Authorised Spa Dealer or Spa Industries Global in the event of a warranty claim. -
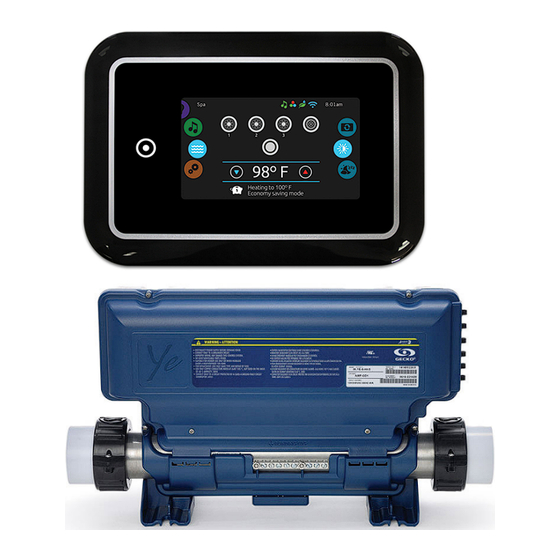
Page 9: Touchpad Control Centre
Power Consumption Electrical Terminations With all Spa Industries Global Spas, you will usually find the Control Box at the same end of the spa as the controller Touchpad Control Centre. There are a number of electric controllers that you may find on your Spa Industries Global Spa. The Balboa System is the unit most widely used by Spa Industries Global. -
Page 10: Checklist Prior To Filling Your Spa
operatingmanual Checklist Checklist Prior To Filling Your Spa Never operate equipment without correct water in your spa. Serious damage to the pump and/or heater may occur. Damage caused to the pumps or heater through poor water chemistry will not be covered by the Spa Warranty. Remove all access service panels around the exterior of the spa, inspect for any item that may have come adrift or loosened during transport. - Page 11 operatingmanual Checklist Checklist Prior To Filling Your Spa ...continued Check shut-off valve. Valve (if installed) are located either side of the pump/s. The handles should be in the up position. This allows the water to travel through the pipes to your pump. Note: The only time these are closed (down position) is during servicing.
-
Page 12: Start-Up
operatingmanual Start Up • If spa is a plug-in model, plug the power cord into the power point and switch the power on. If the spa is hard wired, turn power on at the main isolator. When the unit is powered up, it is normal operation that the spa pumps may turn on and run for up to 4 minutes depending on the type of controller. -
Page 13: Spa Filters
operatingmanual Spa Filters Cleaning Your Spa Filter Cartridges Filter cartridges are made from fine polyester paper like material, specifically designed to filter out body oil and grime. Your spa is equipped with easy access skimmer cartridge filters. The average life expectancy of a filter cartridge is approximately 12-18 months, (with proper care and correct water maintenance). -
Page 14: Replacing / Inserting Filters
operatingmanual Spa Filters Fig B. To Remove Cartridge Filter Elements (Swim Spa) Some Portable Swim Spas have 4 x 50sq/ft filter cartridges, place two on top of one another (Fig B). The cleaning process is conducted in exactly the same way as the Portable Spa, except for the insertion of the filters (refer to replace / re-install filters). -
Page 15: Draining The Spa
operatingmanual Draining the Spa Approximately every 8-12 weeks, or more frequently depending upon usage, you should completely drain your spa. About 1/3 of the water capacity should be drained off every month in addition to the above procedure to keep the water manageable. -
Page 16: Acrylic Shell Maintenance
operatingmanual Acrylic Shell Maintenance Ensure spa is not continually exposed to the elements, the acrylic shell can reach very high temperatures if spa is located without shading or cover. Damage due to sunlight or extreme temperatures is not covered by the Spa Warranty. -
Page 17: Maintenance
operatingmanual Maintenance Headrests Removing Your Headrests Most spa models have 2-7 moulded comfort pillows / headrests. These headrests are designed for comfort to the spa user. We recommend removing these headrests periodically to clean behind them. We also recommend removing the headrests if your spa is not going to be used for a long period of time, as consistent exposure to chemicals, ozone and moisture may damage the product over time. -
Page 18: Jet Information
If fitted to your spa, the purpose of an Ozonator is to break down bacteria, yeast moulds and viruses leaving your spa water clear. There are 2 types of ozone units which Spa Industries Global use: 1. 24hr Ozone, which as it states ozonates 24hrs a day. -
Page 19: Air Control, Aromatherapy Dispenser, Air Injectors
operatingmanual Jet Information Air Control These controls allow you to regulate the amount of air that is mixed with water entering through the jets. This significantly increases the jets performance and massage effect. Air Control’s should be in the closed position when spa is not in use, to aid in heat retention. -
Page 20: Jets
operatingmanual Jet Information Your new Spa has several different types of jets, with different massage actions. Follow the diagrams for correct operation of your jets. Note: Turning off too many jets may cause water to syphon out of the Air Venturi’s. Hurricane Jets The Large Hurricane Jets are interchangeable with each other. -
Page 21: Massage Selector / Diverter Valve
operatingmanual Jet Information To keep your jets performing at their best, you should regularly remove adjustable jets and clean them (approximately once every 3 months). Clean the jet face in hot soapy water. Make sure all fittings are moving freely before re-inserting. (Sand and grit in jet will not be covered by Warranty) Ensure all soap residue is removed prior to re-installation of jet face. -
Page 22: Blower & Pumps
operatingmanual Blower & Pumps The pump and/or blower will turn on automatically at various times of the day. This function is to eliminate the water becoming stagnant and allowing build up of bacteria. The pumps and blowers will automatically turn off after approximately 20 minutes of operation. This is normal operation, designed to protect the pumps and blower. -
Page 23: Trouble Shooting
operatingmanual Trouble Shooting Problem Cause Procedure Spa does not operate 1. Power not connected Check power is connected 2. Power supply fault Check fuse or safety switch at meter box/switchboard Power available, but pump 1. Air lock in plumbing work Loosen barrel union situated Does not run above pump to release build up... - Page 24 SPA INDUSTRIES DEALER CONTACT...
Need help?
Do you have a question about the Cyclone Monsoon Advantage 13-PS and is the answer not in the manual?
Questions and answers