Table of Contents
Advertisement
Quick Links
Advertisement
Table of Contents

Summary of Contents for rollibot ST01
- Page 1 STEAMER ST01 USER MANUAL Rollibot.com In order to continue serving our customers and providing the best products, our product information including our user manuals may receive updates from time to time. Please check our website for the latest user manuals and product materials.
-
Page 3: Table Of Contents
Table Of Contents Section 1. Information & Safety Warnings ............4 1.1 – Introduction ..................4 1.2 – Safety Warnings ................... 4 1.3 – Important Note ..................5 Section 2. Steamer Parts ..................6 2.1 – Box Contents ..................6 2.2 –... -
Page 4: Section 1. Information & Safety Warnings
Section 1. Information & Safety Warnings 1.1 – Introduction This user manual will guide you through the functions and usage of your Rollibot Steamer. It is important that you follow all instructions and pay attention to all notes that appear throughout this manual. Consult this manual before you attempt to use your steamer. -
Page 5: Important Note
1.3 – Important Note CLEANING FABRICS • A number of materials and fabrics are NOT suitable to be cleaned by steam. DO NOT use on leather, wax polished furniture or floors, synthetic fabrics, velvet, Dralon or other delicate, steam sensitive materials. •... -
Page 6: Section 2. Steamer Parts
Section 2. Steamer Parts 2.1 – Box Contents • 1 x Steamer ST01 • 1 x Wallpaper Steam Plate • 1 x Floor Brush • 1 x Floor Brush Angled Adapter Steamer ST01 • 1 x Floor Brush Mop Pad •... -
Page 7: Product Overview
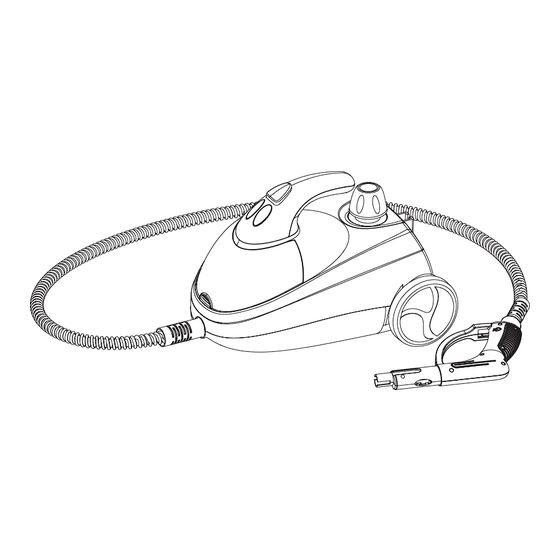
2.2 – Product Overview Steam Gun Continuous OFF/Lock Steam Accessories Storage Fixed Steam Hose Steam Indicator Switch (Orange Light) Water Tank Operating Indicator (Red Light) Wheel ON/OFF Power Button Steam Gun Carrying Handle Steam Trigger Pressure Cap Safety ON/OFF Switch... -
Page 8: Section 3. Getting Ready To Use Steamer
Section 3. Getting Ready to Use Steamer 3.1 - Accessories for Cleaning Squeegee To use the squeegee, attach it onto fabric steam head first. It is a versatile tool for cleaning bathroom shower door, windows and walls. Do not use on glass when temperature is below 32°F (0°C). -
Page 9: Assembling And Attaching Accessories
3.2 - Assembling and Attaching Accessories The straight adapter is used to attach accessories to the steam gun. ALWAYS attach accessories before turning the unit on. Step 1. Take the accessories out from the package and accessories storage compartment of steamer. Step 2. -
Page 10: Using The Fabric Steam Head
3.5 - Using the Fabric Steam Head Step 1. Stretch open the opening of the microfiber cloth (cap-shaped, white). Step 2. Place the cloth over the fabric steam head, and make sure that it completely covers the fabric steam head. 3.6 - Filling the Water Tank NEVER fill the tank while the steamer is plugged in. -
Page 11: Steam Gun Operation
Failure to follow these precautions may result in burns from escaping steam when the water tank safety cap is removed. Safety Cap will rotate but will not unscrew until steamer is cool and pressure is released. For household use only. Do not overfill reservoir as it may cause damage to the unit. Allow a 30-minute cool down period before refilling the reservoir. -
Page 12: Rebuilding Steam Pressure While In Use
3.8 - Rebuilding Steam Pressure While In Use Step 1. If the orange steam indicator light comes on during use, it indicates the steamer needs to rebuild pressure in the tank. The steamer may still be used while pressure rebuilds. Step 2. -
Page 13: Section 5. Cleaning And Maintenance
There are no customer service parts to the boiler unit, all repairs must be carried out by a qualified person. Section 6. Specifications Item Detail Model Name Steamer ST01 Main Material ABS/Nylon Water Tank Capacity 50.7 fl-oz (1500 ml) Water Tank Material... -
Page 14: Section 7. Troubleshooting
Section 8. Warranty 8.1 – Violation The Rollibot Steamer ST01 cannot be repaired or serviced within its warranty period if any of the following has occurred: The warranty has expired. Damage occurred during or in relation to non-routine and/or unauthorized disassembly. -
Page 15: Information
8.2 – Information Ninety Days (90 Days) Limited Hardware Warranty Your Rollibot Steamer ST01 (“Product”) includes a Ninety Days (90 Days) Limited Hardware Warranty (“Warranty”). The Warranty covers product defects in materials and workmanship under normal use. This Warranty is limited to residents of the United States and Canada only and is available only to original purchasers. - Page 16 Copyright © 2023. Rollibot, LLC. All Rights Reserved...
Need help?
Do you have a question about the ST01 and is the answer not in the manual?
Questions and answers