Table of Contents
Advertisement
Quick Links
Advertisement
Table of Contents

Related Manuals for Miele KFN 4776 ED


Summary of Contents for Miele KFN 4776 ED
- Page 1 Operating instructions Bottom-mount units It is essential to read the operating and installation instructions before setup, installation, and commissioning. This prevents both personal injury and damage to the appliance. en-US, CA M.-Nr. 12 090 320...
-
Page 2: Table Of Contents
Contents IMPORTANT SAFETY INSTRUCTIONS..............Caring for the environment ..................16 Installation........................17 Installation site ....................... 17 Climate range ......................17 Ventilation requirements ....................18 Installing several refrigeration appliances..............19 Changing the door hinges ..................... 19 Installing the supplied wall spacers................19 Installing the supplied insect protection panels ............ - Page 3 Switching the safety-lock function / on............48 Sabbath mode ....................... 49 Changing the time before the door alarm is triggered ........49 Miele@home......................50 Changing the volume of the alarms and audible signals /......52 Adjusting the display brightness ............... 52 Switching off Demo mode ................... 53 Resetting the settings to their factory default settings ...
- Page 4 Contents Cleaning and care ......................67 Cleaning agents ......................67 Preparing the refrigeration appliance for cleaning ............. 68 Cleaning the interior of the appliance ................. 69 Cleaning accessories by hand or in the dishwasher ..........69 Removing, dismantling, and cleaning accessories ............ 70 Inserting the glass shelves and drawers into the freezer zone ......
-
Page 5: Important Safety Instructions
“IMPORTANT SAFETY INSTRUCTIONS”. Miele cannot be held liable for injury or damage caused by non- compliance with these instructions. Keep these instructions in a safe place and pass them on to any fu-... -
Page 6: Appropriate Use
Miele cannot be held liable for damage resulting from incorrect or im- proper use or operation. This refrigeration appliance may only be used by people (including ... -
Page 7: Safety With Children
IMPORTANT SAFETY INSTRUCTIONS Safety with children Children should be supervised in the vicinity of the appliance. Children may only use the appliance even without supervision if they have been shown how to use it in a safe manner, and if they are able to recognize and understand the potential risks of improper use. -
Page 8: Technical Safety
- Disconnect the refrigeration appliance from the power supply. - Ventilate the room where the refrigeration appliance is located for several minutes. - Contact Miele Service. The more refrigerant there is in a refrigeration appliance, the larger the room it should be installed in. In the event of a leakage, if the ap- pliance is in a small room, there is the danger of a combustible gas/ air mixture building up. - Page 9 If the power cord supplied is damaged, it must only be replaced by an original part to prevent a hazard for the user. Miele can only guar- antee the safety of the appliance when original Miele parts are used.
- Page 10 Any manufacturer's warranty may be void if the appliance is not re- paired by a Miele approved service technician. Faulty components must only be replaced by genuine Miele re- placement parts. Miele can only guarantee the safety standards of the appliance when Miele replacement parts are used.
-
Page 11: Proper Installation
IMPORTANT SAFETY INSTRUCTIONS Proper installation Change the door hinging (if necessary) as described in these in- stallation instructions. Always wear protective gloves when transporting and installing the refrigeration appliance. Two people are required to install the appliance. Correct use ... -
Page 12: Accessories And Parts
The surface is easily scratched. Even magnets can cause scratch- ing. Accessories and parts Use only genuine original Miele parts. If parts or accessories from other manufacturers are used, the warranty may become invalid. -
Page 13: Cleaning And Maintenance
IMPORTANT SAFETY INSTRUCTIONS Cleaning and maintenance Do not use any oil or grease on the door seals. They can cause the seals to deteriorate over time. Never use a steam cleaner to clean the appliance. The steam can reach the electrical components and cause a short circuit. -
Page 14: Disposal Of Your Old Appliance
IMPORTANT SAFETY INSTRUCTIONS Disposal of your old appliance DANGER! Risk of child entrapment! Children could become trapped in the refrigeration appliance and could suffocate. - Remove the appliance door(s). - Remove the drawers. - Leave the adjustable shelves in the refrigeration appliance so chil- dren cannot climb inside. - Page 15 IMPORTANT SAFETY INSTRUCTIONS The oil in the compressor can be fatal if swallowed or if it pene- trates the airways. Symbol on the rear of the appliance (depending on model) This label or a similar one is only relevant for recycling. Do not remove the lable. This information refers to the foamed-in panels in the door and/or ...
-
Page 16: Caring For The Environment
Miele, free of charge. By law, you are solely responsible for deleting any per- sonal data from the appliance prior to... -
Page 17: Installation
*INSTALLATION* Installation This appliance should be installed in a Installation site dry, well-ventilated room. Risk of damage due to high hu- When deciding where to install your midity. refrigeration appliance, please bear in In environments with high humidity, mind that it will use more energy if in- condensation can build up on exter- stalled near to a heater, a range, or an- nal refrigeration appliance panels. -
Page 18: Ventilation Requirements
*INSTALLATION* Installation designed. The climate range is stated on Ventilation requirements the data plate in the interior cabinet of the refrigeration appliance. WARNING! Fire hazard and risk of damage due to insufficient ventila- Climate range Ambient temper- tion. ature If the refrigeration appliance is not ventilated sufficiently, the compres- 50 to 90°F... -
Page 19: Installing Several Refrigeration Appliances
*INSTALLATION* Installation Installing several refrigeration Installing the supplied wall appliances spacers The wall spacers supplied must be Risk of damage due to condensa- used in order to achieve declared en- tion on external appliance panels. ergy consumption values and to pre- In environments with high humidity, vent the build-up of condensation at condensation can build up between... -
Page 20: Installing The Supplied Insect Protection Panels
*INSTALLATION* Installation Work with another person to tilt the Installing the supplied insect refrigeration appliance backward a lit- protection panels tle. The insect protection panels protect the refrigeration appliance from small in- sects getting inside and ensure that the appliance works correctly. -
Page 21: Installing The Refrigeration Appliance
*INSTALLATION* Installation Connect the refrigeration appliance to Installing the refrigeration appli- the power supply as described in the ance section on “Electrical connection”. Risk of injury and damage due to Move the refrigeration appliance care- the refrigeration appliance tipping fully to its intended installation site. -
Page 22: Aligning The Refrigeration Appliance
*INSTALLATION* Installation inch (mm) Aligning the refrigeration appliance Risk of damage and injury caused by the appliance door falling out or the refrigeration appliance tipping over. If the additional adjustable foot on the hinge plate at the bottom is not resting firmly on the floor, the appli- ance door can fall out or the refrigera- tion appliance can tip over. - Page 23 *INSTALLATION* Installation Install the refrigeration appliance next WARNING! Fire hazard and risk to the kitchen cabinet. of damage due to insufficient ventila- tion. - The appliance front must protrude in front of door fronts by at least the If the refrigeration appliance is not door depth.
-
Page 24: Appliance Dimensions
*INSTALLATION* Installation Appliance dimensions Installation dimensions/View from above KFN 4776 ... All dimensions are given in inches (mm). The refrigeration appliance will function correctly if the specified ventilation gaps are kept clear. 26 19/32"* (675*) 14 1/4" 7/16" (362) (12) 72 27/32"... - Page 25 *INSTALLATION* Installation Connections KFN 4776 ... All dimensions are given in inches (mm). 9 5/8 (245) a Front view b Power cord, length = 78" (2,000 mm) A longer power cord is available to order from Miele Customer Service.
-
Page 26: Electrical Connection
*INSTALLATION* Installation Wait for 1 hour after installation before Electrical connection plugging the appliance into the power Risk of electric shock! supply. This allows coolant and refriger- ator oil to settle in accordance with reg- The appliance must only be switched ulations. - Page 27 The function and operation of the pro- tective measures provided in the do- mestic electrical installation and in this Miele product must also be maintained in isolated operation or in operation that is not synchronized with the grid power supply, or these measures must be re- placed by equivalent measures in the in- stallation.
-
Page 28: Saving Energy
Saving energy How to save energy: Installation lo- The refrigeration appliance has to cool more often at higher am- cation bient temperatures and consumes more energy in the process. Therefore, you should: - Install the refrigeration appliance in a well-ventilated room. - Do not install the refrigeration appliance near to a heat source (heater element, range). - Page 29 Saving energy - Use the wall spacers. The wall spacers on the back of your re- frigeration appliance are designed to ensure that the declared energy consumption is achieved.
-
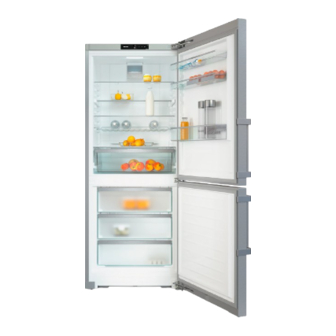
Page 30: Guide To The Appliance
Guide to the appliance Appliance overview ... - Page 31 Guide to the appliance a Display b Interior lighting c Fan d Shelf with egg tray in the appliance door e Split shelf (FlexiBoard) f Dry back wall to prevent condensate g Adjustable shelf h Flexible bottle rack i Bottle shelf with bottle holder j Space for a baking tray (XL interior) k Compartment lid for setting the humidity level in the DailyFresh drawer l DailyFresh drawer for fruit and vegetables (humidity-controlled)
-
Page 32: Control Panel With Status Display
Sensor controls for selecting a setting d OK sensor control for confirming a selection e Display for Miele@home connection status (only visible when the Miele@home function has been set up) Settings mode In Settings mode, you can select the following appliance functions and alter their... - Page 33 (see “Selecting additional settings”) Changing over the cooling circuit (metrological function, not relevant for the customer) Setting up the Miele@home function for the first time, activating and deactivating WiFi, or resetting the network configuration (see “Selecting additional settings”) / ...
-
Page 34: Selecting The Desired Function In Settings Mode
Guide to the appliance Selecting the desired function in Settings mode Touch the OK sensor control on the control panel. will appear in the display (refrigerator section is selected). Use the or sensor control to scroll to the symbol. ... -
Page 35: Adjusting The Interior Fittings
Guide to the appliance Moving the adjustable shelves Adjusting the interior fittings The shelves can be adjusted according Moving the door shelf/bottle shelf to the height of the food. Only move the door/bottle shelves in the appliance door when they are empty. -
Page 36: Sliding Back The Split Shelf
Guide to the appliance Sliding back the split shelf Space for a baking tray To accommodate tall items such as bot- A baking tray can be placed above the tles or large containers, the front section drawers. of the split shelf slides underneath the ... -
Page 37: Moving The Carbon Filter
Guide to the appliance Moving the carbon filter Accessories supplied KKF-FS carbon filters with holder (Ac- Egg tray tive AirClean) are available as optional accessories (see “Optional acces- Bottle holder sories”). Ice cube tray When you are storing very strong- Insect protection panel (depending on smelling food (e.g., cheese): the model) -
Page 38: Optional Accessories
Guide to the appliance Bottle rack Optional accessories A range of useful Miele accessories and care products are available for your ap- pliance. MicroCloth Kit The MicroCloth Kit contains an all-pur- pose cloth, a glass cloth, and a polishing cloth. -
Page 39: Switching On And Off
“Electrical connection”. tion lights up constantly and the alarm will then appear on the appliance stops. Miele display, followed by . To turn the alarm off, tap OK. The alarm will stop. The refrigeration appliance will gradually reach the preset temperatures. -
Page 40: Switching Off The Appliance
Switching on and off Turning off the refrigerator section Switching off the appliance separately You can only switch the entire refrigera- The refrigerator section can be switched tion appliance off in Settings mode . off without having to switch off the ... -
Page 41: Switching Off For Longer Periods Of Time
Switching on and off Switching off for longer periods of time If, during a long absence, the refriger- ation appliance is switched off but not cleaned and the door is left shut, there is a danger of bacteria building up inside the appliance. It is essential to clean the refrigera- tion appliance before a long period of absence. -
Page 42: The Correct Temperature
The correct temperature It is very important to set the correct ... in the refrigerator section temperature to ensure the shelf life of A temperature of 39°F (4°C) is recom- food. Reducing the temperature reduces mended in the refrigerator section. the growth rate of microorganisms. Food does not spoil as quickly. -
Page 43: Temperature Display
The correct temperature If you change the temperature setting: Temperature display Check the temperature display after a In normal operation, the refrigeration few hours. It will take this long for an appliance temperature display shows accurate reading to be given. the current average fridge zone tem- perature and the maximum freezer - Wait for approx. 6 hours if the refriger-... -
Page 44: Using Automatic Supercool, Superfrost, And Dynacool
Using Automatic SuperCool, SuperFrost, and DynaCool Switching Automatic SuperCool on Automatic SuperCool and off When switched on, the Automatic Su- Touch the OK sensor control on the perCool function can be used to control panel. rapidly reduce the temperature in the ... - Page 45 Using Automatic SuperCool, SuperFrost, and DynaCool Switching SuperFrost on and off SuperFreeze Touch the OK sensor control on the When switched on, the SuperFreeze control panel. function can be used to rapidly re- will appear in the display (refrigerator duce the temperature in the freezer section is selected).
- Page 46 Using Automatic SuperCool, SuperFrost, and DynaCool will appear in the display (refrigerator DynaCool section is selected). When the DynaCool function is not Touch OK. switched on, the natural circulation of Use the sensor control to scroll to air in the appliance will cause different the symbol.
-
Page 47: Selecting Additional Settings
Selecting additional settings Vacation mode Explanation of the different set- tings The Vacation-mode function is use- ful when you go on vacation, for exam- Only the settings that require further ex- ple, if you do not wish to switch off the planation are described below. -
Page 48: Switching The Safety-Lock Function / On
Selecting additional settings Switching the safety-lock function / Switching the safety-lock function / on off completely When the safety-lock function is Touch OK. switched on, it protects the refrigeration will appear in the display. appliance from being switched off unin- ... -
Page 49: Sabbath Mode
Selecting additional settings Sabbath mode Switching Sabbath mode on The refrigeration appliance features a In Settings mode , use the or Sabbath mode for the purposes of reli- sensor control to scroll to the gious observance. symbol. If Sabbath mode is switched on, this ... -
Page 50: Miele@Home
- the Miele app The ability to use the Miele app de- pends on the availability of the - a Miele user account You can create a Miele@home service in your country. user account via the Miele app. The Miele@home service is not avail- The Miele app will guide you as you able in every country. - Page 51 Selecting additional settings Setting up Miele@home for the first Resetting the network configuration time In Settings mode , use the or In Settings mode , use the or sensor control to scroll to the sensor control to scroll to the symbol.
-
Page 52: Changing The Volume Of The Alarms And Audible Signals
Selecting additional settings Changing the volume of the alarms Adjusting the display brightness and audible signals / You can adjust the display brightness to You can change the volume of the the lighting conditions in the room. alarms and audible signals (e.g., in the ... -
Page 53: Switching Off Demo Mode
- When integrating the refrigeration ap- pliance into your WiFi network (see “Selecting additional settings – Miele@home”). - When reporting an appliance fault to Miele Customer Service (see “Ser- vice”). - When retrieving information from the EPREL database (see “Service”). -
Page 54: Carbon-Filter Change Indicator
Selecting additional settings Carbon-filter change indicator After inserting the carbon filter (optional accessory), you must activate the car- bon-filter change indicator in Set- tings mode . The carbon-filter change indicator on the status display will remind you to replace the carbon filter approx. every 6 months (see “Cleaning and care –... -
Page 55: Temperature And Door Alarm
Temperature and door alarm A temperature alarm has priority over a Health risk caused by contami- door alarm and is displayed first. nated food. The audible and visual signals may be If the temperature in the freezer re- activated in the following situations: mains above 0°F (-18°C) for a long time, the frozen food may start to de- - You switch on the refrigeration ap-... -
Page 56: Door Alarm
Temperature and door alarm Door alarm The refrigeration appliance is supplied with a door alarm to avoid increased energy consumption and food becom- ing warm if the door is left open. If an appliance door is left open for a longer period of time, ... -
Page 57: Storing Food In The Fridge Zone
Storing food in the fridge zone Do not load more than a maximum of If there is insufficient air circulation, 35 lb (16 kg) of food in the appliance the cooling performance will de- door. crease and energy consumption will increase. To allow air to circulate efficiently, do Risk of fire from electrical appli- not pack food too closely together in... -
Page 58: Different Storage Zones
Storing food in the fridge zone Coldest area Different storage zones The coldest area in the fridge zone is di- Due to natural air circulation, there are rectly above the DailyFresh drawer and different temperature zones in the re- at the back of the appliance. frigerator section. -
Page 59: Food Which Is Not Suitable For Storage In The Fridge Zone
Storing food in the fridge zone Food which is not suitable for Storing food correctly storage in the fridge zone Ensure that food stored in the fridge zone is in packaging or covered properly Not all food is suitable for refrigeration (some exceptions apply in the Dai- at temperatures below 40°F (5°C) be- lyFresh drawer). -
Page 60: Storing Food In The Dailyfresh Drawer
Storing food in the DailyFresh drawer The DailyFresh drawer provides good Selecting low humidity storage conditions for fruit and vegeta- By factory default, the humidity is in- bles. creased and the compartment cover The humidity level in the DailyFresh pushed backward . drawer can also be regulated to suit the Only change this factory default set- food being stored. - Page 61 Storing food in the DailyFresh drawer Observe the following tips if you find that food you have stored does not keep well (e.g., food becomes limp or wilts after only being stored for a short time): Only place fresh food in the appliance as the initial condition of the food is crucial to maintaining freshness.
-
Page 62: Freezing And Storing Food
Freezing and storing food What happens when you freeze Storing frozen food fresh food? When buying frozen food to store in your freezer, make sure to check: Health risk caused by contami- - that the packaging is not damaged nated food. -
Page 63: Home Freezing
Freezing and storing food Packaging food for freezing Home freezing Freeze food in portions. Before placing food in the freezer Tip: Use suitable packaging to avoid When freezing more than 4.4 lb (2 kg) freezer burn (such as freezer contain- of fresh food, switch on the Super- ers). -
Page 64: Storage Time For Frozen Food
Freezing and storing food Place the food flat in the bottom of Storage time for frozen food the upper freezer drawers so that it freezes through to the core as quickly Food group Storage time as possible. (Months) Ice cream 2 to 6 – VarioRoom: freezing the maximum amount of food (see data plate) -
Page 65: Cooling Drinks Quickly
Freezing and storing food Cooling drinks quickly To cool drinks quickly in the refrigerator section, switch on the Automatic Super- Cool function . If you want to cool a large amount of drinks, or if you want to cool drinks in the freezer section, select Party mode ... -
Page 66: Defrosting
Defrosting Freezer section WARNING! DANGER of injury and damage! The appliance is equipped with a “NoFrost” system. The freezer defrosts Do not use any mechanical or other automatically. types of aids which are not recom- mended by the manufacturer to ac- The moisture generated in the appliance celerate the defrosting process. -
Page 67: Cleaning And Care
Cleaning and care Cleaning agents The data plate located inside the inte- rior cabinet of the refrigeration appli- Cleaning and care products used in ance must not be removed. It contains the interior cabinet of the refrigera- information which is required in the tion appliance must be food safe. -
Page 68: Preparing The Refrigeration Appliance For Cleaning
Cleaning and care Cleaning the freezer section/the entire Preparing the refrigeration ap- refrigeration appliance: pliance for cleaning Turn the appliance off. Cleaning the refrigerator section only: appears in the display and the cooling Switch Cleaning mode on. The cool- system is switched off. -
Page 69: Cleaning The Interior Of The Appliance
Cleaning and care Cleaning the interior of the ap- Cleaning accessories by hand pliance or in the dishwasher The following components must be Clean the appliance regularly, or at cleaned by hand only: least once a month. - the stainless-steel trim If soiling is left on for any length of - adjustable shelf with printing time, it may become impossible to... -
Page 70: Removing, Dismantling, And Cleaning Accessories
Cleaning and care - the holder for the carbon filter (avail- Dismantling an adjustable shelf able as an optional accessory) Remove the trim before cleaning the ad- justable shelf. Proceed as follows: Removing, dismantling, and Place the shelf on a countertop cov- cleaning accessories ered with a soft material (e.g., a dish towel). -
Page 71: Inserting The Glass Shelves And Drawers Into The Freezer Zone
Cleaning and care Removing the compartment lid Removing the drawers and glass shelves from the freezer zone Lift the drawer up slightly at the front and pull it out. Pull the glass shelf forward a little and out. Inserting the glass shelves and draw- ers into the freezer zone ... -
Page 72: Dismantling And Cleaning The Insect Protection Panels
(e.g., use the dusting brush for Miele Replacement KKF-RF carbon filters vacuum cleaners). can be obtained from Miele Customer Service, or from the Miele webshop. -
Page 73: Cleaning The Machine Front And The Side Panels
(you could agent can also be used for cleaning. use a Miele Vacuum Cleaner dust brush, for example). After cleaning, wipe with clean water and dry with a soft cloth. -
Page 74: After Cleaning
Cleaning and care After cleaning Replace all shelves and accessories in the appliance. Switch the refrigeration appliance back on, if necessary. If you have activated the refrigerator section’s Cleaning mode : Touch the OK sensor control on the control panel. will appear in the display. -
Page 75: Frequently Asked Questions
You can save time and money in many cases, as you do not need to contact Miele Customer Service. Information to help you rectify faults yourself can be found at www.miele.com/ser- vice. The following tables are designed to help you to find the cause of a malfunction or a fault and to resolve it. - Page 76 Frequently asked questions Problem Possible cause and solution After a while, the temperature will return to normal by itself. The appliance doors are not closed properly. A thick layer of ice may have already formed in the freezer section. Close the appliance doors. After a while, the temperature will return to normal by itself.
- Page 77 Frequently asked questions Problem Possible cause and solution The compressor comes This is not a fault. The temperature setting is too high. on less and less often Correct the temperature setting. and for shorter periods Check the temperature again after 24 hours. of time.
- Page 78 lights up on the Touch OK. display, the refrig- eration appliance will appear initially in the display, followed by the Miele does not get cold start screen. even though the Touch OK. controls and the In Settings mode , use the or sensor control interior lighting to scroll to the symbol.
- Page 79 Frequently asked questions Message Possible cause and solution Cleaning mode is still switched on. is lit up on the Touch the OK sensor control on the control panel to display and the switch off Cleaning mode. refrigeration ap- pliance cannot be will appear in the display.
- Page 80 Frequently asked questions Message Possible cause and solution lights up in the The temperature alarm has been activated; the tem- freezer-section tempera- perature in the freezer section has risen higher or fallen lower than the temperature set. ture display and an Possible reasons for this include: alarm also sounds.
- Page 81 Frequently asked questions Message Possible cause and solution lights up in the dis- Indication of a power failure: the temperature in the play and an alarm also freezer section over the last few days or hours has risen too high because of a power failure. sounds.
- Page 82 Switch the alarm off by touching OK. display and a fault code F with num- Contact Miele Customer Service. bers may appear. To report the fault, you need the fault code and also An alarm will also the model identifier and serial number of your refriger- sound.
-
Page 83: Interior Lighting
15 minutes if the appliance door is left open. If this is not the cause, there is a fault. Contact Miele Customer Service. The interior lighting is This is not a fault. The door alarm has been activated. -
Page 84: Causes Of Noises
Causes of noises The refrigeration appliance is producing various noises during operation. If the cooling performance is low, the refrigeration appliance will conserve energy but operate for longer. The volume will be lower. Food will be chilled faster if the cooling performance is high. The volume will be higher. -
Page 85: Customer Service
In the event of a fault which you cannot remedy yourself, please contact your Miele dealer or Miele Customer Service. You can book a Miele Customer Ser- vice call online at www.miele.com/ser- vice. Contact information for Miele Cus- tomer Service can be found at the end of this document. -
Page 86: Copyrights And Licenses
Copyrights and licenses For the purpose of operating and controlling the communication module, Miele uses proprietary or third-party software that is not covered by open source licens- ing terms. This software/these software components are protected by copyright. The copyrights held by Miele and third parties must be respected. - Page 87 Customer Service. U.S.A. Canada Miele, Inc. Importer Miele Limited National Headquarters Headquarters and Miele Centre 9 Independence Way 161 Four Valley Drive Princeton, NJ 08540 www.mieleusa.com Vaughan, ON L4K 4V8 www.miele.ca Customer Support Phone: 888-99-MIELE (64353) Customer Care Centre info@mieleusa.com...
- Page 88 KFN 4776 ... en-US, CA M.-Nr. 12 090 320 / 01...
Need help?
Do you have a question about the KFN 4776 ED and is the answer not in the manual?
Questions and answers