Table of Contents
Advertisement
Quick Links
Advertisement
Table of Contents

Summary of Contents for CZone ACMI
- Page 1 ACMI & ACOI User & Installation Manual V1.1...
- Page 2 EN / CZone® ACMI & ACOI User & Installation Manual Copyright This document is copyright 2018 under the Creative Commons agreement. Rights are granted to research and reproduce elements of this document for non-commercial purposes on the condition that BEP Marine is credited as the source.
-
Page 3: Table Of Contents
EN / CZone® ACMI & ACOI User & Installation Manual TABLE OF CONTENTS GENERAL INFORMATION Use Of This Manual Guarantee Specifications Quality Validity Of This Manual Liability Changes To The ACMI and ACOI SAFETY AND INSTALLATION PRECAUTIONS Warnings And Symbols... - Page 4 EN / CZone® ACMI & ACOI User & Installation Manual Dimensions Technical Specifications NMEA 2000 PGN’s ORDERING INFORMATION COMPLIANCE...
-
Page 5: General Information
The following manual is valid all CZone ACMI and ACOI models. It is obligatory that every person who works on or with the ACMI or ACOI is completely familiar with the contents of this manual, and that he/she carefully follows the instructions contained herein. ... -
Page 6: Safety And Installation Precautions
• Connection and protection must be done in accordance with local standards Do not work on the ACMI or ACOI system if it is still connected to a power source. Only allow changes in • your electrical system to be carried out by qualified electricians ... -
Page 7: Acmi
3 ACMI DESCRIPTION A smart source selector or transfer switch, the ACMI (AC Mains Interface) enables the user to specify which AC power source is actively supplying power to the vessel (generator, inverter, shorepower). It was developed for use with the CZone digital switching system but may also be used as a stand-alone device. -
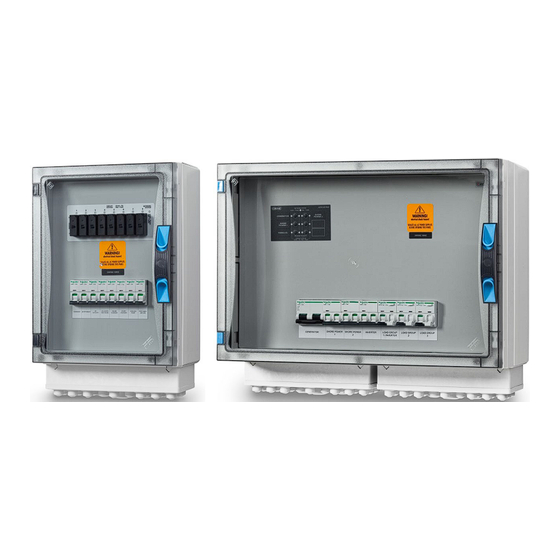
Page 8: External Component Overview
EN / CZone® ACMI & ACOI User & Installation Manual EXTERNAL COMPONENT OVERVIEW ACMI KEYPAD NETWORK STATUS Green - Power Red - Traffic Red - Traffic SHORE GENERATOR POWER 2 ELECTRICAL FIRE READ OWNERS WARNING SHOCK HAZARD HAZARD MANUAL SHORE POWER 1 AVOID INJURY OR DEATH FROM ELECTRICAL SHOCK. -
Page 9: Internal Component Overview
ACMI External DC Input Connectors NMEA2000 Earth Busbar Mechanical Interlock AC Source Selector Contactors WARNING – There are no user serviceable components inside an ACMI. Only authorised trained technicians should remove front cover for service. If an issue occurs, contact your local CZone... -
Page 10: Led Indicators
EN / CZone® ACMI & ACOI User & Installation Manual LED INDICATORS 1. Input Status LED’s Colour Description AC Input Disconnected Green Solid On AC Input Activated By CZone Control Red Solid On AC Input Activated By Manual Override At ACMI Keypad... -
Page 11: Ac Input Manual Override
When an input is manually overridden, the inputs status LED will illuminate RED to indicate that the input is in the manual position. A ‘Manual Override’ alarm will be displayed on all CZone displays. Control of the input from CZone is not available when the input is manually selected. To resume CZone control of the source, the user will need to deselect the input at the ACMI’s keypad. -
Page 12: Reverse Polarity Fault
Do Not attempt to rectify polarity issue. Contact a local service technician. Once the polarity of AC source is corrected, the error will need to be cleared on the ACMI Keypad by re-selecting the AC source before normal CZone operation is resumed. -
Page 13: Example System Schematic
EN / CZone® ACMI & ACOI User & Installation Manual EXAMPLE SYSTEM SCHEMATIC WARNING – Each ACMI/ACOI are custom designed and built to suit a specific installation. The above schematic should not be used as a wiring diagram. For drawings of a specific ACMI/ACOI, contact your local CZone dealer. -
Page 14: Acoi
Circuits are configurable via the CZone Configuration tool allowing control of AC circuits in CZone Modes, as well as control at multiple locations throughout the vessel. -
Page 15: External Component Overview
EN / CZone® ACMI & ACOI User & Installation Manual EXTERNAL COMPONENT OVERVIEW Circuit Status: ACOI 1 Green = On Red = Fault ELECTRICAL FIRE READ OWNERS WARNING SHOCK HAZARD HAZARD MANUAL AVOID INJURY OR DEATH FROM ELECTRICAL SHOCK. ISOLATE AC POWER SUPPLIES AND DC TO AC INVERTERS BEFORE OPENING PANEL. -
Page 16: Internal Component Overview
Load Output Din Connector Main AC Input Earth Busbar DIP Switch WARNING – There are no user serviceable components inside an ACOI. Only authorised trained technicians should remove front cover for service. If an issue occurs, contact your local CZone dealer/technician. -
Page 17: Acoi Pcba Overview
EN / CZone® ACMI & ACOI User & Installation Manual ACOI PCBA OVERVIEW Component Circuit Control Relays Individual Circuit Current Transformers Din Rail Mounting Feet (Din-rail not supplied with ACOI PCBs) DIP Switch NMEA 2000 Connection (NMEA2000 connector may be attached with pigtail lead) -
Page 18: Led Indicators
EN / CZone® ACMI & ACOI User & Installation Manual LED INDICATORS 1. Circuit Status LED’s Colour Description Channel Off Green Solid On Channel On 1 Red Flash Module Not Configured 2 Red Flash Configuration Conflict 3 Red Flash DIP Switch Conflict... -
Page 19: Circuit Manual Override
LOAD 7 LOAD 8 WARNING – Each ACMI/ACOI are custom designed and built to suit a specific installation. The above schematic should not be used as a wiring diagram. For drawings of a specific ACMI/ACOI, contact your local CZone dealer. -
Page 20: Installation
5 Installation GENERAL Each ACMI/ACOI is designed and built to a specific set of requirements. The following installation instructions are a general guide for installation of the modules, however certain aspects may vary depending on a particular system design. Always ensure you have the latest set of electrical schematics for your installation before undertaking any work. -
Page 21: Acmi Connections
EN / CZone® ACMI & ACOI User & Installation Manual ACMI CONNECTIONS Connections made to the ACMI are made easy due to the pre-wired assembly of the ACMI. Always ensure all AC sources are isolated before starting any work. DO NOT undertake any electrical works unless you are a registered/qualified electrician, failure to do so may result in electric shock. - Page 22 Insert the NMEA 2000 drop cable into ACMI. 2. Connect the drop cable to the connector in the ACMI, then the other end to the CZone NMEA 2000 backbone. Ensure the CZone network is correctly terminated.
-
Page 23: Acoi Connections
EN / CZone® ACMI & ACOI User & Installation Manual ACOI CONNECTIONS Always ensure all AC sources are isolated before starting any work. DO NOT undertake any electrical works unless you are a registered/qualified electrician, failure to do so may result in electric shock. - Page 24 EN / CZone® ACMI & ACOI User & Installation Manual Only 3 of the 8 load outputs are show for illustrative purposes. 2. AC Load Outputs 1. Using a sharp knife, carefully cut a hole into the cable entry gland of the enclosure. Hole size should be slightly smaller than the cable outer diameter to allow for a snug fit around the cable.
-
Page 25: Nmea 2000 Connection
Insert the NMEA 2000 drop cable into ACOI. 2. Connect the drop cable to the connector in the ACOI, then the other end to the CZone NMEA 2000 backbone. Ensure the CZone network is correctly terminated. -
Page 26: Dip Switch Setting
5. Check the software version on the modules with the CZone Configuration Tool and update if necessary. 6. Write configuration file to the ACMI/ACOI and the rest of the CZone modules on the system. 7. Test all inputs and outputs for configured functionality. -
Page 27: Specifications
EN / CZone® ACMI & ACOI User & Installation Manual 6 Specifications DIMENSIONS 186.0mm [7.32"] 276.0mm [10.87"] ACOI1 540.0mm [21.26"] 236.0mm [9.29"] CZONE ACMI Note – Enclosure dimensions may vary depending on customer requirements. Each ACMI/ACOI are custom designed and built to suit a specific installation. -
Page 28: Technical Specifications
EN / CZone® ACMI & ACOI User & Installation Manual TECHNICAL SPECIFICATIONS ACMI Specifications Circuit protection Type C MCBs (amperage as specified) Reverse polarity detection on all 6 metered input channels with Reverse Polarity Detection contactor lockout and visual reverse polarity fault indicator on integrated keypad and CZone displays. -
Page 29: Ordering Information
7 Ordering Information Each of the ACMI and ACOI modules are custom built to meet the requirements of a particular installation. The part numbers mentioned in this manual are for quotation purposes only. To order an ACMI/ACOI, get in touch with your local... - Page 30 EN / CZone® ACMI & ACOI User & Installation Manual 8 COMPLIANCE...
Need help?
Do you have a question about the ACMI and is the answer not in the manual?
Questions and answers