Table of Contents
Advertisement
Quick Links
20L WET/DRY VACUUM CLEANER
Thank you for buying a WORKPRO Wet/Dry Vacuum Cleaner. It has been engineered and manufactured to
WORKPRO'S high standard for dependability, ease of operation, and operator safety. When properly cared for, it
will give you years of rugged, trouble-free performance.
WARNING: To reduce the risk of injury, the user must read and understand the operator's manual before
using this product.
SAVE THIS MANUAL FOR FUTURE REFERENCE
Original Safety and Operating Manual
Item#: W125112A
Model#: K-615/1200
Made in China
Advertisement
Table of Contents

Summary of Contents for WorkPro K-615/1200
- Page 1 20L WET/DRY VACUUM CLEANER Original Safety and Operating Manual Thank you for buying a WORKPRO Wet/Dry Vacuum Cleaner. It has been engineered and manufactured to WORKPRO’S high standard for dependability, ease of operation, and operator safety. When properly cared for, it will give you years of rugged, trouble-free performance.
-
Page 2: Table Of Contents
TABLE OF CONTENTS Important Safety Instructions & Warnings-------------------------------------------------------------------------------------- Double Insulation Instructions ---------------------------------------------------------------------------------------------------- Know Your Product------------------------------------------------------------------------------------------------------------------- Unpacking & Checking Carton Contents---------------------------------------------------------------------------------------- General Assembly Instructions---------------------------------------------------------------------------------------------------- Dry Vacuum Operation-------------------------------------------------------------------------------------------------------------- Liquid Vacuum Operation----------------------------------------------------------------------------------------------------------- Blower Operation---------------------------------------------------------------------------------------------------------------------- Maintenance---------------------------------------------------------------------------------------------------------------------------- Installing & Cleaning Cartridge Filter--------------------------------------------------------------------------------------------- Installing & Cleaning Foam Wet Filter-------------------------------------------------------------------------------------------- Troubleshooting----------------------------------------------------------------------------------------------------------------------- Disposal --------------------------------------------------------------------------------------------------------------------------------- FOR YOUR SAFETY: CAREFULLY READ AND UNDERSTAND ALL INSTRUCTIONS BEFORE USE. -
Page 3: Important Safety Instructions & Warnings
Use this Wet/Dry Vac only as described in this manual. To reduce the risk of personal injury or damage to your Wet/Dry Vac, use only WORKPRO recommended accessories. SAVE THIS MANUAL FOR FUTURE REFERENCE. When using an electrical appliance, basic precautions should... - Page 4 gases, or explosive vapors like gasoline or other fuels, lighter fluids, cleaners, oil-based paints, natural gas, hydrogen, or explosive dusts like coal dust, magnesium dust, grain dust, or gun powder. Sparks inside the motor can ignite flammable vapors or dust. •...
-
Page 5: Double Insulation Instructions
INSTRUCTIONS”. • This appliance has a polarized plug (one blade is wider than the other). To reduce the risk of electric shock, this plug is intended to fit in a polarized outlet only one way. If the plug does not fit fully in the outlet, reverse the plug. -
Page 6: Know Your Product
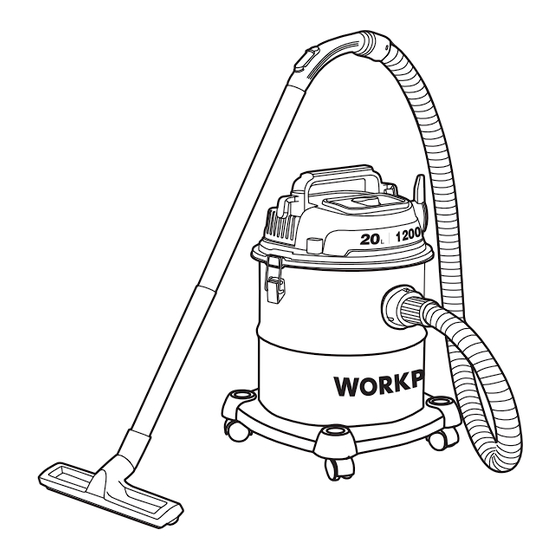
KNOW YOUR PRODUCT Elbow Air Control Switch Hose Handle Power Switch Blower Port Power Head Latch Vacuum Port Collection Tank Tool Storage Vacuum Base Wheels Nozzle 220-240V~ 50/60Hz 1200W 16Kpa... -
Page 7: Unpacking & Checking Carton Contents
UNPACKING & CHECKING CARTON CONTENTS Remove all contents from the box. Remove the power head and take out any contents inside the collection tank. Check each item against the carton contents list. Description Vac Assembled Hose Crevice Tool Half-round dust brush Multi-surface floor nozzle Foam Wet Filter Cartridge filter... -
Page 8: Dry Vacuum Operation
WARNING: To reduce the risk of electric shock, do not expose to rain. Make sure plug is disconnect- ed before assembling the wet/dry vac. UNPACKING YOUR WET/DRY VACUUM & GENERAL ASSEMBLY 1. Verify that the power cord is disconnected from the outlet. (fig. 1) 2. -
Page 9: Liquid Vacuum Operation
OPERATING INSTRUCTIONS: DRY VACUUMING 6. Insert the locking end of the hose into the vacuum port on the front side of tank and screw in place. Push the desired extension wands or attachments onto the elbow end of the hose. (fig. 6) 7. -
Page 10: Blower Operation
BLOWER OPERATION This vacuum can be used as a powerful blower. To use your unit as a blower, clear hose of any obstructions. 1. Verify that the power cord is disconnected from the outlet. Verify that the collection tank is clean and free of dust and dirt. -
Page 11: Installing & Cleaning Cartridge Filter
INSTALLING & CLEANING CARTRIDGE FILTER Installing Cartridge Filter 1. Verify that the power cord is disconnected from the outlet. (fig. 1) 2. Remove power head and place in upside down position. 3. Install the cartridge filter over the filter cage and carefully push filter in until it stops against the power head. (fig. 2 &... -
Page 12: Troubleshooting
TROUBLESHOOTING WARNING: To reduce the risk of electric shock, unplug before troubleshooting Symptom Possible Causes Corrective Action 1) Check power supply–cord,breakers, 1) No power supply. fuses. Vacuum will not operate. 2) Unplug and check the power cord. 2) Faulty power cord. If damaged, have it repaired by a professional.
Need help?
Do you have a question about the K-615/1200 and is the answer not in the manual?
Questions and answers