Table of Contents
Advertisement
Quick Links
Advertisement
Table of Contents

Subscribe to Our Youtube Channel
Related Manuals for Axon Body 3 AX1023


Summary of Contents for Axon Body 3 AX1023
- Page 1 Body 3 Camera User Guide Models: AX1023, AX1024, AX1025 Rev: 13 Sep 2024...
- Page 2 Body 3 Camera User Guide Axon Enterprise, Inc. 17800 N 85th St Scottsdale AZ 85255 , , Axon Body, Axon Dock, Axon Evidence, and Axon Fleet are trademarks of Axon Enterprise, Inc., some of which are registered in the US and other countries. For more information, visit www.axon.com/legal. All other trademarks are property of their respective owners. All rights reserved. ©2024 Axon Enterprise, Inc.. Axon Enterprise, Inc.
-
Page 3: Table Of Contents
Accessories and mounts Configure your camera Adjust volume Light setting Camera vibration Stealth mode Axon Signal Other settings (admin) Operate your camera Operating modes Turn on the camera and Ready mode (buffering) Start Recording mode (event) Mute audio recording Add markers while recording Illuminate the camera display Battery status Sleep mode Priority upload Start a Priority upload Cancel an upload Error states and edge cases False Signal cancellation Cancel a false Signal activation Automatic Wi-Fi upload Advantages In Axon Evidence Set up a network Enable Automatic Wi-Fi Upload Axon Enterprise, Inc. - Page 4 Icons, LEDs, and sounds Visual notifications Icons and Triad LEDs while docked Audible and haptic notifications Axon View Pair your camera with a smart device Axon View XL Standalone mode (Windows) Admin settings Video Pre-Event Buffer and Video Recall Watermark Audio Lights Location Axon Respond Evidence upload Axon Signal Gunshot detection (beta) Remote activation App support Battery Firmware download User permissions and mute configuration Device management Button confirmation Care and maintenance Clean the camera Charge the battery Charge without a dock Internal clock Moisture Axon Enterprise, Inc.
- Page 5 Body 3 Camera User Guide Camera storage Troubleshooting General FAQs Axon Dock FAQs Wireless microphone FAQs Camera registration ADM error codes Viewing camera information on the display Technical information Technical support Warranty Warnings Radio waves FCC compliance statement ISED Canada compliance statement Declaration of conformity and EU compliance statement Compliance marks Axon Enterprise, Inc.
-
Page 6: Introduction And Registration
Axon Body 3 does not support offline mode and is not compatible with Evidence Sync. Important safety and health information Read, understand, and follow all warnings and instructions before using this product. The most up-to-date warnings and instructions are available at www.axon.com. Additional reading This manual discusses how to operate the camera. Other manuals cover additional aspects of the camera system. These documents are available at help.axon.com. For details on working with uploaded videos and managing cameras, including inventory management and agency-wide settings, see the Axon Evidence User and Administrator Reference Guide. For details on installing and setting up the dock to transfer information and recharge your camera, see the Axon Dock section (or PDF) on your camera's product page at my.Axon. For instructions on using Axon cameras with a smart device, see the Axon View for Devices User Manual for Android or iOS. Axon Academy provides video training on some of the topics in this guide, such as how to register for and use the Axon Evidence website, configure settings, install Evidence Sync software, assign personnel to cameras, recharge your camera, and transfer video from an Axon device to a computer. Register camera Cameras must be registered by your agency before they can be assigned to users. Additionally, you should adjust the agency-wide camera settings in Axon Evidence before assigning cameras to users. Cameras with firmware v1.10 or greater can be registered using View XL in Standalone mode. The camera’s display will show DOCK DEVICE OR CONNECT VIEWXL if you can use View XL Standalone mode to register the camera. Cameras using older firmware will show DOCK DEVICE and must be registered with Axon Device Manager. See the V iew XL Standalone Mode User Guide on the Body 3 product page at my.Axon (or start with this online Introduction topic) for more information on using View XL to register cameras. Axon Enterprise, Inc. -
Page 7: Registration With Axon Device Manager
Body 3 Camera User Guide In addition to the camera, registration requires: Axon Device Manager (ADM) installed on an appropriate device. If you already have ADM installed, ensure you have v3.0.3 (Android) or v2.0.3 (iOS) or higher installed. Note You must have device management permissions to use ADM. If you aren’t sure if you have permissions to use ADM, contact an Axon Evidence administrator. A Body 3 Dock connected to power and the internet (green LED visible on the WAN port). Registration with Axon Device Manager This section describes the out-of-the-box registration process for cameras using Axon Device Manager (ADM) and the body camera dock. Adjust the agency-wide camera settings in Axon Evidence in the Admin section prior to assigning. This requires device management permissions. You can register up to 100 cameras at once if you have an Axon Dock for each camera. You must keep your mobile device with ADM within 30 feet of all the cameras. 1. Power on the camera by pressing the Power button until you feel a short vibration. 2. Place the camera in a networked dock. 3. Log in to ADM and tap Settings . Axon Enterprise, Inc. - Page 8 Body 3 Camera User Guide 4. Go to Registration, select Devices, then Axon Body Camera. 5. Review the device registration setup and tap Next to move to the next screen. Tap Start Scan to start the registration process. Axon Enterprise, Inc.
-
Page 9: Registration With View Xl Standalone Mode
If successful, the display shows NOT ASSIGNED to indicate the camera is ready to be assigned to a user. 7. When you have registered all the detected cameras, select Finish. ADM shows a list of camera serial numbers that have been registered during this session. Successfully registered cameras can be charged and assigned to users. Registration with View XL Standalone mode This is the out-of-the-box registration process for cameras using View XL Standalone mode. Registration requires: View XL Version v1.17 or later installed on a Windows computer A camera with USB-C cable 1. Launch View XL and enter your agency Axon Evidence URL. 2. Sign in using your Axon Evidence credentials. 3. Select Launch Standalone Mode. 4. Connect your camera to View XL using a USB-C cable. 5. Follow the on-screen instructions to complete the registration process and assign the camera to an officer. FAQs For camera registration FAQs, including error codes when registering through ADM, see Camera registration in Troubleshooting on page 46. Axon Enterprise, Inc. -
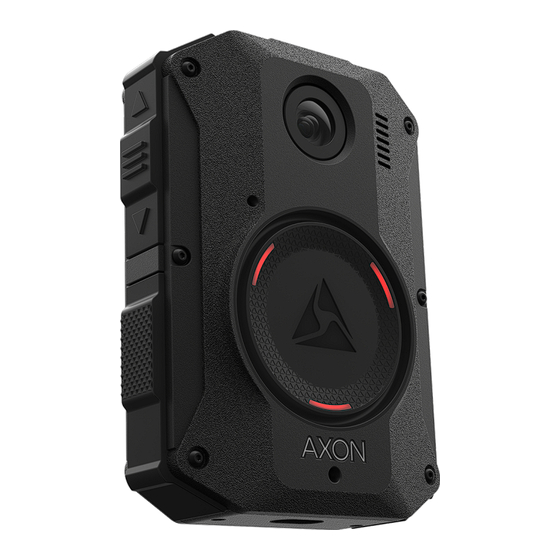
Page 10: Get To Know Your Camera
6. Lens 7. Speaker 8. Microphone (4) 9. Triad LED (3) 10. Event 11. Operation LED (top) Action Button Presses Lights Press Volume Up p for three second, then tap to toggle modes Marker, add Press Select while recording Menus Press Program and Power simultaneously Mute on/off Press Select for three seconds while recording Pairing Press Event + Program simultaneously Power on Press Power until short vibration Power off Press Power for three seconds Recording start Double-press Event Recording stop Press Event for three seconds Sleep mode on Press Power then Select to confirm Axon Enterprise, Inc. -
Page 11: Top View
Press Volume Up p or Volume Down q for three seconds* Volume, speaker Press Volume Up p or Volume Down q * The camera remembers the previous volume and light settings when exiting Stealth mode. For details on screen icons and meanings of both the top Operation and front Triad LEDs, see Icons, LEDs, and sounds on page 31. Top view 1. Operation LED 2. Display 3. Power Camera Display – Shows information on camera status and activity. Different information is shown when the camera is in the field and in an Axon Dock. Some icons may not be active or displayed at your agency. The display is divided into a Status Bar and Activity Area. 1. Status Bar 2. Activity Area For details on all the icons that may display both in the field and during dock charging, see Icons, LEDs, and sounds on page 31. Bottom view 1. Microphone 2. USB-C connector 3. Microphone (model AX1023) Axon Enterprise, Inc. -
Page 12: Accessories And Mounts
Body 3 Camera User Guide USB-C connector – Used for data transfer and charging when placed in an Axon Dock. Microphone – Used to record audio. Accessories and mounts The Body 3 Camera works with a variety of Axon mounting systems. Note As with any radio frequency or electronic device, Axon recommends to avoid placing the camera directly next to your radio to prevent inadvertent radio activation. The various mounts that use this system can be used with a wide variety of uniforms to fasten the camera to your shirt, patrol vest, or jacket. In general, Axon mounting systems consist of the attachment piece (called the key) on the camera and the attachment receiver (called the lock) on the mount. To lock a camera in place, insert the key of the camera into the lock of the mount (the camera will typically be sideways) and turn it 90 degrees counterclockwise (when you are looking straight at the mount). To release the camera from the mount, turn the camera 90 degrees clockwise. When wearing the camera, you can use the livestreaming feature of the Axon View app (see page 34) to show the camera's view. You can find further information on mounting options, including demonstration videos, on my.Axon at Body-Worn Camera Mounting Options. Axon Enterprise, Inc. -
Page 13: Configure Your Camera
Axon View XL – Download from Axon Evidence under Help. For details, see the View XL Standalone mode section on your camera's product page. Axon View – Install on your smart device from your app store, select Settings (see Axon View on page 34). Go to the Axon View product page or see the Axon View for Devices User Manual for Android or iOS for details about using Axon View. Your camera must be turned on and paired with your mobile device. Axon Evidence – Select Admin > Devices and Applications > Axon Body 2 & Flex 2) if your role allows access to the Admin menu. Settings will update the next time you dock your camera or connect to approved Wi-Fi (if enabled). Adjust volume During normal operation, the camera emits beeping sounds, called audio prompts, to notify you of the camera status. To adjust camera audio prompt volume: Use camera controls Use Volume Up p and Volume Down q to adjust the volume. The camera provides audio feedback and indicates the volume setting on the camera display as the volume changes. Use Axon View or View XL In Settings, tap Volume and select the volume level. The camera beeps once at the volume ... -
Page 14: Light Setting
Lights off Lights dim Lights auto (automatically adjusts lights based on ambient lighting) To change the brightness of the LEDs: Use camera controls To change the brightness of the LEDs, press Volume Up p for three seconds to turn lights off; the Lights out icon appears on the display. To turn lights back on, press Volume Up p for three seconds, then press again for other lighting options. Use Axon View or View XL Tap the switch to the right of Indicator Lights to change the setting. Camera vibration During normal operation, the camera uses vibrations (haptic feedback) to notify you of the camera status. Use Axon View or View XL Tap the switch to the right of Vibration to change the setting. Stealth mode Use Stealth mode to turn off the LEDs, sounds (audio prompts), and vibrations (haptic feedback) on your camera. This is useful for both tactical situations and when dealing with members of the public with light/sound sensitivity. -
Page 15: Axon Signal
Body 3 Camera User Guide To exit Stealth mode – Press Volume Up p or Volume Down q for three seconds. The icon disappears from the display. Use Axon View or View XL Tap the switch to the right of Stealth mode to change the setting. Axon Signal This camera is compatible with Axon Signal technology. Your administrator must activate Axon Signal capability prior to use. When it is active, Axon Signal technology can broadcast a signal that allows your camera to transition from Ready to Recording mode automatically. When your camera starts recording, you will see, hear, and feel all the normal start recording notifications. Axon Signal technology transmissions only allow cameras to start recording. Axon Signal technology does not transmit a signal to end recording. The camera must be stopped manually. Axon Signal technology cannot turn an Axon system on. If the c amera is turned off, it will not record, even if Axon Signal instructs it to. Devices equipped with Axon Signal technology have a signal range of approximately 30 feet (9.1 meters) and can be purchased separately from the Axon Body camera. Other settings (admin) Your organization’s Axon administrator can configure additional settings and functionality (such as video quality and pre-event buffer time) for your camera. The list of options is in Admin settings on page 36. Check with your Axon administrator for information about which ... -
Page 16: Operate Your Camera
Operate your camera Before operating an Axon Body Camera, ensure it is fully charged and properly configured. For details, see Charge the battery on page 41. Operating modes This camera has two operating modes: Ready (Buffering) – Camera is on and is pre-event buffering Recording (Event) – Camera is recording Turn on the camera and Ready mode (buffering) Press Power until you feel a short vibration. The camera emits two short rising-pitch tones with a long vibration and then enters Ready (Buffering) mode. When the camera is in Ready mode: The camera display shows READY The Operation LED on top of the camera blinks green The camera is capturing video but not recording to permanent memory The pre-event buffer is configurable between 0 and 120 seconds, but set at 30 seconds by default. When Recording (Event) mode is activated, the buffered video captured directly before the event is saved and attached to the event in permanent memory. This feature is intended to capture the video of an incident just before a recording begins. The camera does not capture audio within the pre-event buffer by default (but can be set to do so by an admin). Ready mode starts when the camera is turned on. It does not buffer video when the camera is turned off, in Sleep mode (see page 13), or docked. Axon Enterprise, Inc. -
Page 17: Start Recording Mode (Event)
2. To stop recording and return to Ready mode, press Event for three seconds. The camera emits one long tone and vibrates. The camera display shows SAVING and then READY a nd the Operation LED blinks green Mute audio recording If your organization’s administrator has configured your camera to do so, you can mute audio while recording video. This feature may be useful in sensitive situations. 1. Press Select for three seconds to mute audio capture. The microphone off icon appears on the camera display and the Operation LED blinks blue while the camera is muted. 2. Press Select another three seconds to cancel mute. Add markers while recording Markers are useful for indicating an important event that you want to easily find when replaying the video. The marker is shown when the video is replayed in Axon Evidence and documented in the audit trail. To add a marker to a video while you are recording, press Select. The camera vibrates once. Illuminate the camera display In low-light situations, double-press Select to illuminate the camera display for five seconds. To change light settings, see Change light settings and Stealth mode starting on page 9. Battery status The battery capacity for your camera appears on the camera display as a percentage. The Operation and Triad LEDs also reflect battery level; see Icons, LEDs, and sounds on page Axon Enterprise, Inc. -
Page 18: Sleep Mode
Body 3 Camera User Guide Sleep mode Sleep mode puts the camera in an idle state that disables recording and buffering. While in this state, an automatic activation enabled at your agency will not initiate camera recording. Note The ability to use Sleep mode is enabled by your agency Axon Evidence administrator and may not be available at your agency. Requires camera operating system v1.10 or later. Sleep mode is useful for situations where camera users may need momentary privacy. You can enter Sleep mode from the buffering state in less than three seconds, as opposed to turning the camera completely off. Similarly, the camera will exit Sleep mode and enter a buffering or recording state in less than three seconds. The device audit trail reflects when Sleep mode is entered and exited. While Sleep mode can be used as an alternative to completely powering down the camera during private situations, it should not be considered a replacement for powering the camera off. Certain background processes are running while the camera is in Sleep mode and the battery still depletes while in this mode, but at a slower rate. Enter and exit sleep mode To enter Sleep mode: 1. Press Power. 2. With Sleep selected, press Select to enter sleep mode. To exit Sleep mode, either: Press Power to return the camera to buffering state, or Double-press Event to begin recording. Axon Enterprise, Inc. -
Page 19: Priority Upload
Body 3 Camera User Guide Priority upload Priority upload lets you wirelessly upload the most recent recording on your body camera to Axon Evidence using its LTE connectivity. Several factors can affect the performance, speed, and battery impact of uploading o ver LTE. With strong LTE coverage, a 15-minute recording at 720p High will take five minutes to upload and use about 2%, or 12 minutes, of battery capacity. With poor LTE coverage, this same recording may use about 4%, or 24 minutes, of battery capacity. The Body 3 Camera can continue to buffer or record normally while u ploading over LTE. This feature is only available for Axon Respond for Devices+ agencies. Agency Axon Evidence administrators can enable it by turning on the Priority Evidence Upload setting on the camera settings page: Start a Priority upload 1. Press Program and Power simultaneously to open the diagnostic menu. 2. Press Select (between the volume buttons) to select Upload. Axon Enterprise, Inc. -
Page 20: Cancel An Upload
Body 3 Camera User Guide 3. Select Priority Upload. If there is no recording on the device, the display shows NO EVIDENCE. 4. If there is a recording on the device, the top of the screen shows its start time followed by the duration in parenthesis. Use the volume buttons to select either BACK (upload nothing) or START (uploads the last saved recording), then press Select. Once an upload has started, the display returns to its normal view of showing if the camera is Ready or Recording, along with the upload icon at the bottom right. The diagnostic menu option changes from Upload to Uploading when an upload is in progress. Once the recording has uploaded, the camera vibrates and then deletes it from the camera. Cancel an upload 1. Open the diagnostic menu. 2. Select Uploading. Axon Enterprise, Inc. -
Page 21: Error States And Edge Cases
3. Select CANCEL. A message confirms the cancellation and the recording remains on the device. Error states and edge cases Upload over LTE may encounter the following errors. Evidence exceeds upload limit Recordings longer than 60 minutes cannot be completed using LTE due to the size of the file. Dock the camera or use View XL standalone mode. Upload paused: poor signal The camera pauses uploaded if it loses LTE coverage during an upload, displaying at the bottom right. If LTE coverage returns within 10 minutes, the upload will resume, otherwise it cancels and the recording remains on the camera. Upload paused: USB-C connected An LTE upload pauses when you connect a USB-C cable. The upload will resume when you disconnect the cable. Camera shut-down due to low battery If the camera shuts down due to a low battery during an LTE upload, the upload pauses and the recording remains on the camera. The upload will resume when the camera is turned back on with sufficient charge. Axon Enterprise, Inc. - Page 22 Body 3 Camera User Guide Docked camera If you dock your camera during an LTE upload, the upload will continue using the dock's ethernet connection, with the Priority upload taking priority. Upload timed out If the upload takes longer than two hours (which may occur if LTE coverage is poor and/or the file size is large), the upload pauses. Select to RESUME or CANCEL the upload. Upload paused: livestream An LTE upload pauses to allow a requested livestream. The upload resumes when the livestream ends. Axon Enterprise, Inc.
-
Page 23: False Signal Cancellation
Body 3 Camera User Guide False Signal cancellation False Signal cancellation lets you report a Signal event on your Axon Body 3 camera as false, which also marks the associated recording as a false detection. A false Signal recording can also be automatically categorized (see third setting in image below). Follow your department guidance, but generally, don't take it upon yourself to determine whether Signal activations are false when interacting with members of the community. Only use this feature when no interaction occur, such as during Signal testing or when knowing the activation is 100% false. You can't cancel a Signal event during a recording activated prior to the Signal event. The False Signal Cancellation setting is disabled in Axon Evidence by default. Cancel a false Signal activation If the camera is ready (buffering) and a Signal event occurs, it displays the Signal icon and activates recording. I t then offers a 10-second opportunity to cancel the recording. Axon Enterprise, Inc. - Page 24 Body 3 Camera User Guide Press Select (between the volume buttons) within this time frame to cancel the activation and return the camera to Ready state (buffering). If you don't press Select within 10 seconds, the camera continues recording normally, but still displaying the Signal icon. Axon Enterprise, Inc.
-
Page 25: Automatic Wi-Fi Upload
This article describes how to set up a body camera Wi-Fi network, what happens on the camera during a firmware update over Wi-Fi, how to confirm an upload, what takes priority over Wi-Fi, and frequently asked questions (FAQs). Your Axon Evidence administrator can enable this feature in the Admin section. This feature requires operating system v1.19/1.23 or later. Admins should also reference: Enterprise Wi-Fi Network Quick Start Guide Personal Network Management Advantages When connected to an approved Wi-Fi network, a body camera will: Sync the clock once per day Sync changes made in the Axon Evidence camera settings page, including the list of approved Wi-Fi networks Upload recordings Download and install firmware updates When connected to a dock, communication occurs over the wired connection (if available), even if Automatic Wi-Fi Upload is enabled. Wi-Fi communication halts whenever the camera is docked, whether it is networked or not, but will continue if charging through a USB-C cable. Registration is the only non-supported Wi-Fi operation (use ViewXL Standalone or a networked dock). In Axon Evidence Set up a network These section describes how to create an approved Wi-Fi access point that body cameras can use to upload recordings and download updates. Axon Enterprise, Inc. - Page 26 Body 3 Camera User Guide 1. In Axon Evidence, select Admin > Body Camera Wi-Fi Networks. 2. Select Add Network. 3. Enter the Network Name (SSID) and Password. Optionally, add Location information to differentiate networks with similar names. Note While WPA2-TKIP, WPA, and WEP are supported, Axon recommends using WPA2-PSK networks for increased security. 4. Select Save. Axon Enterprise, Inc.
-
Page 27: Enable Automatic Wi-Fi Upload
Body 3 Camera User Guide 5. Add more networks as needed. 6. Use Edit and Delete to manage existing networks. Enable Automatic Wi-Fi Upload 1. Select Admin > Axon Body 3. 2. If applicable, select the appropriate profile. 3. Under Evidence Upload, toggle Automatic Wi-Fi Upload on. 4. Scroll to the bottom and select Save Profile Settings. Axon Body Cameras download updates to the network list the next time they are docked or can access an approved Wi-Fi network. On the camera What triggers Wi-Fi These situations will cause the camera to communicate over Wi-Fi: 1. At the end of a recording. If multiple networks are available, it will use the one with the ... -
Page 28: Receive A Firmware Update Over Wi-Fi
Body 3 Camera User Guide Receive a firmware update over Wi-Fi To receive a firmware update, the camera goes through the following steps. 1. The camera downloads the new firmware. 2. The camera displays Wi-Fi when it is connected and Download when downloading. 3. Once the firmware has downloaded, press Select (between the volume keys) at the opt-in prompt to install. Note Because this will restart the camera, don't install if the camera is in active use. 4. During installation, the LEDs flash white and the screen displays Installing 5. After installation, the camera restarts with the latest firmware. 6. If you ignore the opt-in prompt, it will disappear after 60 seconds and the camera will return to the Ready state. 7. If the prerequisites for updating over Wi-Fi are still not met after four hours because the camera is in use, press Select to opt-out of (cancel) the installation. Axon Enterprise, Inc. -
Page 29: Disable Wi-Fi Upload On Camera
Body 3 Camera User Guide 8. If you don't cancel within 60 seconds of this message displaying, the firmware will install and the camera will restart as noted in step 4. Disable Wi-Fi Upload on camera If your network is overloaded or you have large recordings to upload, you may not want to upload wirelessly even though your admin has enabled it. You can disable wireless upload on your phone: 1. Press Program and Power simultaneously to open the diagnostic menu and use Select (between the volume keys) to choose Upload. 2. If your agency has Respond+ or the Priority Evidence Upload add-on, the first option listed will be Priority Upload. If not, it will be Auto Upload and whether it is ON or OFF. 3. To disable the Wi-Fi upload feature, select Auto Upload and then OFF using the volume buttons. To turn the feature back on later, return here and select ON. To cancel, select BACK. 4. Once a camera connects to approved Wi-Fi and begins uploading, the screen displays Wi-Fi and Upload 5. When the upload completes, the camera vibrates and then deletes the recording from the camera. Axon Enterprise, Inc. -
Page 30: Check Camera Storage
In general, Wi-Fi communication will occur if the feature is on and an approved network is available, but other app or camera connectivity functions take priority. If a Wi-Fi network connection is lost or interrupted during upload, the upload pauses and resumes when reconnected. Wi-Fi connectivity to Axon applications such as Axon View or Fleet 3 Dashboard take priority over Wi-Fi communication. If you use Respond or Respond+, LTE connectivity for Respond-related activities take precedence over Wi-Fi communication. For example, if you start recording during a Wi- Fi upload, the upload will pause for livestreaming connectivity. Wi-Fi upload will not occur while recording to Wi-Fi or if already processing a Priority upload. Frequently Asked Questions If your question isn't answered here, contact Axon support or your Axon representative for more information. How long must a camera be docked to receive an updated list of Wi-Fi networks? Dock your camera or connect to View XL for at least two minutes to receive changes to settings, including Wi-Fi networks. An icon on the screen shows if it is downloading Axon Enterprise, Inc. - Page 31 Will my camera download over Wi-Fi while in Sleep mode? Yes, it will still check for an approved network every 15 minutes while in Sleep mode. What happens if the opt-in or opt-out messages are interrupted by a different button press? The message will disappear and the other action will take precedence. The camera will retry four hours later. Will the camera upload and download over Wi-Fi at the same time? Yes. Axon Enterprise, Inc.
-
Page 32: Video Recall
Body 3 Camera User Guide Video Recall Video Recall adds a Video Recall tab to View XL Standalone Mode. The tab is only visible if your admin has assigned you to a role with the Access Video Recall Files permission enabled. Viewing videos through Video Recall is only available using View XL. The Video Recall tab shows 30-minute-increment files captured in the past 18 hours while the camera was buffering, listed by time-stamp of the recording start time and duration of the file. If a recording is less than 30 minutes, it was interrupted by a different camera state, such as being in placed in Sleep Mode, docked, powered off, plugged in to View XL Standalone, or actively recording. When the camera returns to buffering, Video Recall recording resumes with a new file. Files selected for upload in the Video Recall tab are placed in the Upload queue. You can't view Video Recall recordings or edit metadata prior to upload. View the status of the file uploads in the Upload tab. Once uploaded, the Video Recall recording functions as any normal recording in Axon Evidence. Video Recall must be enabled prior to the event you want to recall for it to have captured that video. Your camera will not store, and therefore you can't retrieve, any buffered video prior to Video Recall being turned on. Upload Video Recall recordings 1. Sign into View XL (download at Axon Evidence > Help), connect camera with a USB-C cable, and launch Standalone mode. Axon Enterprise, Inc. - Page 33 Body 3 Camera User Guide 2. Select Video Recall. Axon Enterprise, Inc.
- Page 34 Body 3 Camera User Guide 3. The time-stamp shows the start time of the recording. Select Upload t o place a recording in the Upload queue. The file remains listed here until upload completes. Axon Enterprise, Inc.
- Page 35 Body 3 Camera User Guide 4. Optionally, monitor the status of the upload in the Upload Status tab. Video Recall recordings in Axon Evidence receive a unique tag in the watermark. Axon Enterprise, Inc.
-
Page 36: Icons, Leds, And Sounds
1. Status Bar 2. Activity Area Icons during use Status Bar Icon Description Battery capacity Battery charging Battery low (≤10%) Camera paired Lights off Stealth mode on Activity Area Icon Description Operation LED Axon Respond Livestreaming* Blinking purple Memory is 85% full Blinking red (while LOW STORAGE recording) STORAGE FULL Memory is 95% full Blinking red (recording stops) Axon Enterprise, Inc. -
Page 37: Icons And Triad Leds While Docked
Battery charging – Triad LED colors show the Green: > 90% charge level. Yellow: 11-89% Red: <10% Battery optimized charging – Charge level is Same as normal reduced to protect battery health during extended charging above time in dock. DEVICE ERROR Device error #. Refer to the common codes in Blinking red Troubleshooting on page 44 or the device page in Axon Evidence. Network error – Check network connection, see NETWORK device page in Axon Evidence and troubleshooting Blinking red and ERROR instructions at help.axon.com. green Updating firmware or settings – Camera will Spinning white resume normal operation after update. Operation LED solid white. Display may also show UPDATING. Axon Enterprise, Inc. -
Page 38: Audible And Haptic Notifications
One – short duration Mute mode (microphone off), One short tone Two – long duration enter or exit Pairing mode, enter Three short rising-pitch tones None Power off Three short lowering-pitch One – long duration tones Power on Two short rising-pitch tones One – long duration Recording reminder Two short tones every two Two – short duration every two minutes minutes Recording start Two short tones Two – short duration Recording stop, return to Ready One long tone One – long duration mode Sleep mode, enter or exit One short tone One – long duration Stealth mode, exit None Two – short duration Volume up or down One short tone at new volume One – short duration level Axon Enterprise, Inc. -
Page 39: Axon View
Pair your camera with a smart device For additional information on using Axon cameras with a smart device, see Sign in and connect body camera at my.Axon. Note Internet access is required to pair the camera with Axon View. The security model for Axon View with the camera requires server login access when pairing and when the authorization on the camera expires (approximately every 10 days). Your admin must enable Pair with Axon Applications under App Support to pair with Axon View. 1. Turn on the camera. 2. Open Axon View, select your camera, and tap Initiate Pairing. 3. On the camera, press Event and Program simultaneously. You’ll hear three short rising-pitch tones, the Operation LED blinks blue, and PAIRING appears on the display. 4. Follow the Axon View on-screen instructions. Tap the serial number for your camera. When pairing is complete, the pairing icon appears in the camera display status bar. Axon View XL Standalone mode (Windows) This camera can be connected to a Windows laptop or computer with Axon View XL to allow priority upload of videos from the camera to Axon Evidence and to charge the camera. Using Axon View XL in standalone mode is separate from using it with Axon Fleet products. Connect the camera to the laptop or computer with a USB C cable and use Axon View XL standalone mode. Axon Enterprise, Inc. - Page 40 Body 3 Camera User Guide If your agency uses this feature, the administrator must set the appropriate Axon Evidence permissions to allow users to sign into View XL. In Axon View XL, select Launch Standalone mode and then connect the camera to the computer. Use the normal View XL procedures to review recordings, add metadata, and upload recordings. For details on installing View XL and using Standalone mode, see Body 3 and View XL Standalone Mode on the Axon Body 3 product page. Axon Enterprise, Inc.
-
Page 41: Admin Settings
Action Definition Quality Determines the camera’s recording quality. Pre-Event Buffer and Video Recall Action Definition Pre-Event Buffer Determines the buffer duration included in the final video. Video Recall Enables an 18-hour recording buffer. Users with the correct permissions can recall recordings f rom that buffer using the View XL Standalone app. Watermark Action Definition Watermark Adds a permanent watermark with date, time, and camera serial number to the upper-right corner of videos. Watermark Local Time Sets the time display in the watermark as local time (based on agency Zone configuration). When disabled, it is UTC. Audio Action Definition Record Audio Enables audio along with the video. Pre-Event Buffer Audio Enables audio in the pre-event buffer. Audio in Video Recall Enables audio in Video Recall recordings. Axon Enterprise, Inc. -
Page 42: Lights
If enabled, lights can still be configured at the user level through Axon View or on the device. Action Definition Front Light Illuminates the front-facing Triad camera lights to provide a visible indication of recording status. The lights blink green during pre-event buffering, red when recording. Automatic Brightness Enables this mode in the camera and Axon applications. This mode automatically adjusts the brightness of front and top lights based on ambient light. If front lights are disabled, it only applies to top light. Users must have permission to adjust indicator lights to enable Auto mode from the camera or Axon applications, and stealth must be disabled for this setting to be enabled. Location Action Definition Location in Video Enables gathering of location data from GNSS/GPS and embedding in video recordings. Wi-Fi Positioning Enables gathering of location information from Wi-Fi access points to improve location performance. This also improves battery performance. Axon Respond Configure permissions for using Respond features such as Livestreaming in Roles & Permissions. Action Definition Livestreaming Determines when cameras can livestream audio and video to authorized agency users in Respond. Camera Location on Configures when camera location information is made available to the Axon Respond Map Axon Respond map. Axon Enterprise, Inc. -
Page 43: Evidence Upload
Rate-limited Camera Sets the maximum upload speed in megabits per second for each Upload Speed individual camera. Axon Signal Configure assigned officer activation in Axon Evidence under Admin > Signal. Action Definition Signal Activation Lets camera recording be activated by Axon Signal. False Signal Lets Signal alerts be canceled on the camera by pressing Select. Cancellation False Signal The selected category is automatically applied to recordings canceled as Cancellation Default false activations. Category Gunshot detection (beta) This feature is in a beta stage and may not be available for deployment. Action Definition Gunshot Detection Determines if the camera starts recording if sensors detect the camera Recording wearer discharging their firearm. Gunshot Detection Determines if a notification is sent in near real-time to authorized agency Notification users. False Gunshot Determines if gunshot alerts can be canceled on the camera. Users can Detection Cancellation dismiss a false gunshot detection by pressing Select. Axon Enterprise, Inc. -
Page 44: Remote Activation
Determines if Remote Activation alerts can be canceled on the camera. Activation Cancellation Users can dismiss a Remote Activation alert by pressing Select. App support Action Definition Pair with Axon Allows cameras to be paired via Bluetooth with Axon View, View XL Applications (Fleet), and Fleet Dashboard. When disabled, cameras can still be connected via wired connection to View XL (Standalone). Video playback in Axon Lets users play video still on the camera from Axon View, View XL (Fleet Applications and Standalone), and Fleet Dashboard. Axon Application Lets a user upload video from View XL (Fleet and Standalone) or Fleet Upload Dashboard. Battery Action Definition Battery Optimized When enabled, the camera will slowly reduce its state of charge when left Charging in dock for greater than three consecutive days. While this will reduce runtime, it will improve long-term battery health and reduce degradation. Firmware download Action Definition Firmware Download Adjusts the timeframe in which cameras download a firmware update. A Timeframe shorter timeframe means cameras download firmware sooner but may result in congestion on your network. Axon Enterprise, Inc. -
Page 45: User Permissions And Mute Configuration
Recording requires a user to hold the mute button to remain muted. Static mode requires a user to manually enter and exit mute mode. Users Can Use Stealth Lets users enable Stealth mode on their camera, which disables all lights, Mode audio, and haptic feedback. Users Can Adjust Lets users adjust the indicator light settings of their camera. Indicator Light Settings Users Can Adjust Determines whether users can adjust the vibration settings of their Vibration Settings camera. Users Can Use Sleep Lets users put their camera in Sleep Mode. Users starting a recording Mode from sleep mode will lose the pre-event buffer. Signal products will not start a recording when a user is in sleep mode. A camera in sleep mode provides a haptic reminder every 15 minutes. Device management Action Definition Settings return to User settings return to default settings when the camera is docked. default in dock Button confirmation Action Definition End Recording Prevents unintentional ending of recordings. With Always, ending a Confirmation recording requires a secondary confirmation press of Select after every recording. Auto only requires a secondary confirmation after recordings where Event was pressed in the middle of the recording. Axon Enterprise, Inc. -
Page 46: Care And Maintenance
Care and maintenance This section describes cleaning, charging, and storage for the camera. Never disassemble the camera as this can compromise camera integrity and invalidate the warranty. The camera does not contain a memory card or any user-replaceable parts. Follow all cleaning agent manufacturer directions. Clean the camera Use a soft, damp cloth to clean the surface of the camera. Do not use harsh cleaners or solvents. Ideally, moisten the cloth with isopropyl alcohol. Do not immerse the camera in water or cleaning solutions. If the camera lens becomes dirty, use a lens blower brush to clean it and then wipe it with a soft cloth as needed. If the camera display becomes dirty, clean with a damp cloth and dry with a soft cloth. Do not use ammonia-based or similar type window cleaners on the camera lens or display as these normally contain abrasives that can scratch. Do not place the lens under running water or apply jets of water. Do not use compressed air to clean the camera. Compressed air may damage the camera’s microphones. Ensure the m icrophone openings are clear of debris. Charge the battery Charge the camera battery by placing the camera in the dock or connecting a USB-C cable. Note Ensure the USB port is dry and free of dirt and debris before placing the camera in a dock or connecting a USB-C cable. The dock functions as an ethernet adapter, an unmanaged network switch, and charger. It charges and uploads video to Axon Evidence simultaneously. When approximately 10% of the battery capacity remains, the camera display shows LOW BATTERY and the camera emits four quick tones and four short vibrations. These alerts repeat at 5% capacity. Recharge a depleted battery as soon as reasonably possible. Return cameras to Axon for battery replacement. Axon Enterprise, Inc. -
Page 47: Charge Without A Dock
If the camera was off, it enters low-power mode and the current charge level appears on the camera display. When you remove the cable, the camera turns off. During charging, power the camera on normally at any time and it enters Ready mode (buffering). If the camera was on, it remains on with the charging icon beside the battery. When you remove the cable, the icon disappears and the camera remains on. The color of the Operation LED on top provides a visual indication of the charge level. The LED is red when the charge level is 10% or less, yellow at 11–89%, and green at 90% or higher. Internal clock Place your camera in an Axon Dock or connect it to View XL Standalone mode to update the camera’s internal clock. Moisture Don’t charge your camera while the USB port on the camera or dock is wet. If the USB port is wet, use a paper towel or absorbent cloth to blot the connector and then allow it to fully dry before charging. If a camera is charging when it gets wet, remove it from the charging source (dock or cable), use a paper towel or absorbent cloth to blot the USB port, and then allow it to fully dry before charging again. The USB port must be fully dry before placing the camera in a dock or connecting a c able. Camera storage -04–95 °F Do not store Axon body-worn cameras in environments where the -20–35 °C temperature is likely to be outside the maximum (such as under direct sunlight, near heaters, or in a vehicle in extremely hot weather) or minimum values. Axon Enterprise, Inc. - Page 48 Body 3 Camera User Guide 70–75 °F For long-term storage, ensure room temperature is i n this range and 21–24 °C battery level is approximately 50% before powering down. Charge the stored camera back to around 50% once a year to prevent over-discharge of the battery. Do not store the camera fully charged or fully discharged. Axon Enterprise, Inc.
-
Page 49: Troubleshooting
What does the error code on my camera mean? Error Code 1001 – There is an issue with the digital video recorder. Restart the camera and check if the issue resolves. Error Code 1004 – There is an issue with the digital video recorder. Restart the camera a nd check if the issue resolves. Error Code 1006 – There is an issue connecting with Axon Evidence for video uploads. It can be resolved by un-docking and re-docking the camera. If you are still unable to resolve the errors, initiate an RMA (return merchandise authorization) to replace your device. I don't see all the camera display icons in your diagrams, or some I used to see are gone now. -
Page 50: Axon Dock Faqs
Axon Dock FAQs How do I ensure my dock is connected to the network? If your dock is connected to the network, LEDs in the ethernet port blink green or amber. The camera will also be able to upload videos to Axon Evidence immediately upon docking. My dock is registered, so why is "Device Profile" on Axon Evidence empty? This is a known issue and a fix is in progress. Why can't Axon Device Manager detect my dock? When using this option, look for the NFC tag and hold your mobile device near the NFC icon on the dock. For the 1-bay dock, the icon is on the side of the dock nearest to the ethernet ... -
Page 51: Wireless Microphone Faqs
Body 3 Camera User Guide Why can't I access my dock’s Device Profile page on Axon Evidence? Your dock must be registered to use the Device Profile page on Axon Evidence. See the Axon Dock PDF on your camera's product page or start with this online Introduction topic at my.Axon. What comes in the box with my dock? Each dock comes with an ethernet cable, 8-bay power cable and adapter (SKU 100142), and 1-bay power adapter (SKU 71104). See the Axon Dock PDF on your camera's p roduct page or start with this online Introduction topic at my.Axon. Wireless microphone FAQs When will the wireless microphone be available? The Fleet 3 wireless mic is now available for adding to any Fleet 3 system. -
Page 52: Adm Error Codes
Assign cameras to users with Axon Device Manager (ADM) or through Axon Evidence. To assign through Axon Evidence: 1. Ensure you have the correct permissions to assign users on Axon Evidence. 2. Select Inventory, then Body Worn Cameras. 3. Search for your device in the Body Camera search bar by the serial number. 4. Select the camera serial number in the list to go to the camera device profile page. In the Assignee section, select Reassign. 5. Enter the user's name and select Reassign. ADM error codes If there is a problem with preparing the camera, Axon Device Manager (ADM) displays an error. Tap Errors to review the error information on ADM and refer to the following instructions to resolve the issue. If you are unable to register any cameras, this may be due to a connectivity issue. Reference the Axon Network Whitelisting Guide to ensure the appropriate network ports are open. If some cameras are registering but others are not, this may be a transient error. A suggested general troubleshooting approach is to: 1. Start with only one camera docked at a time. 2. Attempt to register. If a registration error occurs, tap Dismiss All to allow ADM to retry registration. 3. If registration fails again, power the camera off and then on again and repeat the registration process. Axon Enterprise, Inc. - Page 53 Camera time is Sign out and back into ADM. 43, or 49 inaccurate Power the camera off and back on, then allow the camera to remain docked for two minutes to allow sufficient time to synchronize the camera time. Confirm your agency network settings allow network communication from dock to Axon Evidence through port 80 and port 443. For details, see Managing Network Whitelisting with Axon Cloud Services. 45 or 47 Camera unable to Power the camera off and back on, then allow the reach internet camera to remain docked for one minute prior to retrying. It takes about 30 seconds to establish an internet connection. Tap Dismiss All and allow ADM to retry the registration. If the error persists after retrying to register several ...
-
Page 54: Viewing Camera Information On The Display
Body 3 Camera User Guide Viewing camera information on the display View camera information such as serial number on the display using these steps: 1. Press Power and Program at the same time to enter the device menu. The camera display shows four options: Upload, About, Cellular, and Legal. 2. Use Volume Up p or Volume Down q to highlight About, then press Select. The camera display shows four options: Assignee, Firmware, Serial, and Storage. 3. Use Volume Up p or Volume Down q to highlight the information you want to view, then press Select. 4. Press Select to return to the prior options. 5. Press Event to return to the normal camera display. Axon Enterprise, Inc. -
Page 55: Technical Information
Technical support Visit www.axon.com for support options or call 800-978-2737. Warranty Axon Enterprise, Inc. warranty provisions are applicable on all Body system products. See our website, www.axon.com, for detailed warranty information. This warranty does not apply, and Axon shall not be liable for any loss, loss of data, damage, or other liability arising out of: a. Damage caused by failure to follow instructions regarding the use of the product; b. Damage caused by the use of non-Axon products or the use of cartridges, batteries or other parts, components or accessories not manufactured or recommended by Axon; c. Damage caused by abuse, misuse, intentional or deliberate damage to the product, or force majeure; d. Damage to a product or part that has been repaired or modified by persons not authorized by Axon or without Axon's written permission, or e. If any Axon serial number has been removed or tampered with. Thus, any handling of the camera that alters the condition of the equipment by unauthorized personnel without proper technical training may result in the immediate loss of the manufacturer's standard warranty coverage by impacting the integrity of the equipment and rendering the quality testing performed by specialized technical personnel impossible after handling the equipment. Warnings For a full list of the warning associated with this product, see www.axon.com. Radio waves The camera system transmission is in the frequency ranges of 2402–2480 MHz, 2412–2462 MHz, 5150–5350 MHz, 5470–5725 MHz, and 5725–5850 MHz. Additionally, depending on the model number and country, it may transmit in the frequencies listed below: AX1023: 699–716 Mhz, 704–716 Mhz, 777–787 MHz, 788–798 MHz, 824–849 MHz, 826.4–846.6 MHz, 1710–1755 MHz, 1710–1780 MHz, 1712.4–1752.6 MHz, 1850–1910 MHz, 1852.4–1907.6 MHz Axon Enterprise, Inc. -
Page 56: Fcc Compliance Statement
Your wireless device (model AX1023) is a radio transmitter and receiver. It is designed and manufactured not to exceed the emission limits for exposure to radio frequency (RF) energy set by the Federal Communications Commission (FCC) of the U.S. Government. These limits are part of comprehensive guidelines and establish permitted levels of RF energy for the general population. The guidelines are based on standards that were developed by independent scientific organizations through periodic and thorough evaluation of scientific studies. The standards include a substantial safety margin designed to assure the safety of all persons, regardless of age and health. Before a device model is available for sale to the public, it must be tested and certified to the FCC that it does not exceed the limit established by the government-adopted requirement for safe exposure. Axon equipment (models AX1023 and AX1027) has been tested and found to comply with the limits for Class B digital devices, pursuant to part 15 of the FCC Rules. These limits are designed to provide reasonable protection against harmful interference in a residential installation. This equipment generates, uses and can radiate radio frequency energy and, if not installed and used in accordance with the instructions, may cause harmful interference to radio communications. However, there is no guarantee that interference will not occur in a particular installation. If this equipment does cause harmful interference to radio or television reception, which can be determined by turning the equipment off and on, the user is encouraged to try to correct the interference by one or more of the following measures: Reorient or relocate the receiving antenna. Increase the separation between the equipment and receiver. Connect the equipment into an outlet on a circuit different from that to which the receiver is connected. Consult Axon technical support for help. Axon equipment (model AX1026) has been tested and found to comply with the limits for a Class A digital device, pursuant to part 15 of the FCC Rules. These limits are designed to provide reasonable protection against harmful interference when the equipment is operated in a commercial environment. This equipment generates, uses, and can radiate radio frequency energy and, if not installed and used in accordance with the instruction manual, may cause harmful interference to radio communications. Operation of this equipment in a residential area is likely to cause harmful interference in which case the user will be required to correct the interference at his own expense. Axon Enterprise, Inc. -
Page 57: Ised Canada Compliance Statement
Body 3 Camera User Guide Axon systems comply with part 15 of the FCC Rules. Operation is subject to the following two conditions: (1) This device may not cause harmful interference, and (2) this device must accept any interference received, including interference that may cause undesired operation. ISED Canada compliance statement This equipment (model AX1023) complies with the IC RSS-102 radiation exposure limits set forth for an uncontrolled environment. Énoncé d'exposition aux rayonnements: Cet équipement (modèle AX1023) est conforme aux limites d'exposition aux rayonnements ioniques RSS-102 pour un environnement incontrôlé. The device for operation in the band 5150–5250 MHz is only for indoor use to reduce the potential for harmful interference to co-channel mobile satellite systems. Les dispositifs fonctionnant dans la bande de 5150 à 5250 MHz sont réservés uniquement pour une utilisation à l’intérieur afin de réduire les risques de brouillage préjudiciable aux systèmes de satellites mobiles utilisant les mêmes canaux. Section 8.4 of RSS-GEN Axon systems (models AX1023, AX1026, and AX1027) comply with Industry Canada License-exempt RSS standard(s). Operation is subject to the following two conditions: 1) this device may not cause interference, and 2) this device must accept any interference, including interference that may cause undesired operation of the device. Systèmes Axon (modèles AX1023, AX1026, et AX1027) est conforme aux normes d’exemption de licence RSS d’Industrie Canada. Son utilisation est soumise aux conditions suivantes : 1) cet appareil ne doit pas causer de brouillage, et 2) doit accepter tout brouillage, y compris le brouillage pouvant entraîner un fonctionnement indésirable. These digital apparatus (models AX1023 and AX1027) comply with Canadian ICES-003 Class B. Digital apparatus model AX1026 complies with Canadian ICES-003 Class A. Ces appareils numériques (modèles AX1023 et AX1027) sont conformes à la norme canadienne NMB-003 Classe B. Appareil numérique modèle AX1026 conforme à la norme canadienne NMB-003 Classe A. THIS AXON SYSTEM MEETS THE GOVERNMENT’S REQUIREMENTS FOR EXPOSURE TO RADIO WAVES. CE SYSTÈME AXONE RÉPOND AUX EXIGENCES DU GOUVERNEMENT EN MATIÈRE D’EXPOSITION AUX ONDES RADIO. Axon Enterprise, Inc. -
Page 58: Declaration Of Conformity And Eu Compliance Statement
Body 3 Camera User Guide Declaration of conformity and EU compliance statement Axon declares that this Axon system is compliant with the requirements of the Radio Equipment Directive (RED) 2014/53/EU and the Electromagnetic Compatibility (EMC) Directive 2014/30/EU of the European Parliament and of the Council. A copy of the original Declaration of Conformity is at www.axon.com. Country of origin: Finished in the U.S. with U.S. and imported parts. Compliance marks RCPAXAX20-2577 Portuguese: ANATEL: 16084-20-10342 Incorpora produto homologado pela Anatel sob número 05289-18-01568 C-27220 R-NZ URCA_TA_2020_197 Axon Enterprise, Inc. -
Page 59: Labeling Information
Body 3 Camera User Guide Japan 5GHz帯 ( W52、 W53) : 屋 内専 用 ただし W52登 録 局 に接 続 さ れる場 合 は除 く Labeling information View camera information such as serial number on the display using these steps: 1. Press Power and Program at the same time to enter the device menu. The camera display shows four options: Upload, About, Cellular, and Legal. 2. Use Volume Up p or Volume Down q to highlight Legal, then press Select. Axon Enterprise, Inc. - Page 60 Body 3 Camera User Guide 3. The camera display will automatically scroll the following information. Optionally, use Volume Up p or Volume Down q to scroll manually. For model AX1023 For model AX1025 Model: AX1023 Model: AX1025 FCC ID: X4GS01200 ANATEL ID: 16084-20-10342 IC: 8803A-S01200 Módulo incorporado: ANATEL 05289-18-01568 Contains FCC ID: X4GAB7610 Contains IC: 8803A-AB7610 ICES-3(B)/NMB-3(B) 4. Press Event to return to the normal camera display. Axon Enterprise, Inc.
Need help?
Do you have a question about the Body 3 AX1023 and is the answer not in the manual?
Questions and answers