Advertisement
Quick Links
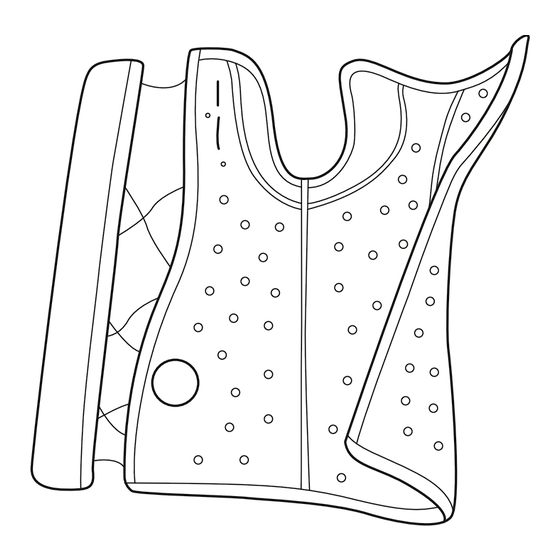
EXOS
Finger trap application system - for doctors and technicians
BEFORE USING THE BRACE, PLEASE READ THE INSTRUCTIONS FOR USE COMPLETELY AND CAREFULLY; CORRECT
APPLICATION IS VITAL TO THE PROPER FUNCTIONING OF THE BRACE.
The new Exos® Manu Advance wrist/forearm brace is used for conservative treatment of dislocated distal radius fractures.
These fractures are among the most commonly seen injuries in the emergency department. The application system in this
notice (also known commonly as a "finger trap") can be carried out as follows:
Step 1: Measure the patient's hand circumference around the palm to
determine the correct size and select the appropriate orthosis.
SIZE OVERVIEW
PART NUMBER
LEFT
329-31-1111
329-41-1111
329-51-1111
329-61-1111
HAND
329-71-1111
CIRCUMFERENCE
Step 2: Lift the BOA® knob and pull out the BOA tab to release the lacing.
Pull the hook-and-loop Full-Release Ribbon to open the brace. This will
help warm air to circulate better during heating. Warm the brace in the
Exos oven for approximately 8 minutes. If the oven has already been
preheated, it is sufficient to heat the brace for approximately 5 minutes.
5-8 min
Step 3: Meanwhile, the fracture can be appropriately positioned using the
finger trap, so-called "repositioned", prior to imaging. When the brace is
soft, remove it from the Exos oven and open it completely. The lacing of
the BOA system should be loose so that there is some play.
MANU ADVANCE
®
HAND
CIRCUMFERENCE
RIGHT
329-32-1111
18.5 - 20 cm
329-42-1111
20 - 23 cm
329-52-1111
23 - 25.5 cm
329-62-1111
25.5 - 28 cm
329-72-1111
28 - 30.5 cm
Step 4: Wrap the brace carefully around the forearm and close the
lengthwise hook-and-loop fastener. Hold the brace with one hand
and operate the BOA knob with the other. Press the BOA knob ("click
sound") and then turn it enough to remove the slack from the lacing.
SIZE
XS
S
M
L
XL
Step 5: Now apply gentle but firm pressure to mold the brace so that
the desired fit and posture is achieved and the brace rests comfortably
on the forearm. As the brace is radiolucent, you can check the result
on the imaging.
Step 6: Turn the BOA knob so that the brace fits snugly, but make
sure to leave a finger's width of space between the brace and the
limb. After a waiting time of approximately 5 minutes, the brace will
be completely hardened and a follow-up check is possible. If the
result and the X-ray control meet your expectations, the patient can
be discharged immediately. Corrections are also possible, for example
during the follow-up inspection, as the material can be reheated and
molded again.
5 min
"Click"
„klick"
Advertisement

Summary of Contents for Exos MANU ADVANCE
- Page 1 APPLICATION IS VITAL TO THE PROPER FUNCTIONING OF THE BRACE. The new Exos® Manu Advance wrist/forearm brace is used for conservative treatment of dislocated distal radius fractures. These fractures are among the most commonly seen injuries in the emergency department. The application system in this notice (also known commonly as a “finger trap”) can be carried out as follows:...
- Page 2 A clean and dry environment inside the brace will help maintain healthy skin and reduce odor and skin issues. • Retighten the brace. Exos® Braces are meant to be worn under light pressure and not tight to the skin. A little wiggle room inside an Exos® Brace promotes air circulation and helps maintain healthy dry skin.
Need help?
Do you have a question about the MANU ADVANCE and is the answer not in the manual?
Questions and answers