Table of Contents
Advertisement
Available languages
Available languages
Quick Links
Advertisement
Table of Contents

Summary of Contents for Powell K12V190060G
- Page 1 Robot vacuum cleaner NL – 1-21 EN – 22-36...
- Page 2 NL - NEDERLANDS Bedankt dat je voor de Powell robot stofzuiger hebt gekozen. BELANGRIJK: ● Lees de instructies in deze handleiding zorgvuldig door voordat je het apparaat gebruikt. Het niet naleven van de instructies in de handleiding of het gebruik van dit apparaat op een andere manier dan die vermeld in deze handleiding kan leiden tot persoonlijk letsel of schade aan het apparaat.
- Page 3 28. WAARSCHUWING: Niet-oplaadbare batterijen mogen niet worden opgeladen. 29. Dit apparaat bevat een batterij die alleen door gekwalificeerd personeel kan worden vervangen. 30. WAARSCHUWING: Gebruik alleen de adapter (model: K12V190060G) die bij deze robot is geleverd om de batterij op te laden.
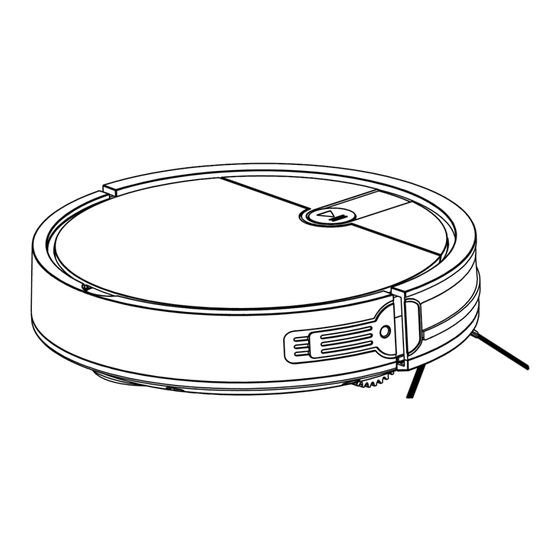
- Page 4 2. PRODUCT ONDERDELEN 2.1. Robot Bumper AUTO knop Oplaadpinnen Neuswiel Zijborstels Batterijdeksel Val Sensoren Zuigpoort Linker- en rechterwiel 2-in-1 stofcontainer en watertank Stofcontainer ontgrendel knop 2-in-1 Stofcontainer en watertank - 3 -...
- Page 5 2.2. 2-in-1 Stofcontainer en watertank Mop holder with mop 2-in-1 stofcontainer en watertank Note: Wanneer de watertank gevuld is met water, de robot zijn vaardigheden om obstakels te overkomen en het beklimmen van hogere stukken kan beïnvloeden. 2.3. Oplaadstation Indicatielampje Adapter Voedingsaansluiting Verbindingspinnen voor het opladen...
- Page 6 2.4. Afstandsbediening Home knop Richting knop Start knop Zuig knop Klassieke reinigingsknop Knop voor het reinigen van vlekken Knop voor het reinigen van randen 2.5. Robotknop en indicatielampje Robotstatus CLEAN knop status Opladen Oranje licht knippert Opladen voltooid Continu groen licht Stand-by modus Groen licht knippert Fout...
-
Page 7: Technische Specificaties
- Klassieke reinigingsmodus - Rand-modus - Vlek-modus Reinigingsfuncties - Max-modus - Schema-modus Laadtijd <300min Gebruikstijd 90-120min Oplader Modelidentificatie van de AC-adapter K12V190060G Ingangsspanning 100–240 V AC Ingangsfrequentie 50/60 Hz Uitgangsspanning 19 V DC Uitgangsstroom 0.6 A Uitgangsvermogen 11,4 W Gemiddeld actief rendement ≥83,80 %... - Page 8 4. HET PAKKET Nummer Omschrijving Aantal ① Robot ② Oplaadstation ③ Afstandsbediening (geen batterijen meegeleverd) ④ Oplaadadapter ⑤ Borstel ⑥ Handleiding Dweilhouder met dweil ① ② ③ ④ ⑤ ⑥ - 7 -...
-
Page 9: De Afstandsbediening Gebruiken
5. DE AFSTANDSBEDIENING GEBRUIKEN 1. " " Home knop Druk op deze knop om de robot terug te laten keren naar het oplaadstation. Druk twee keer snel op deze knop om een schema in te stellen wanneer de robot op het oplaadstation staat. - Page 10 6. PRODUCTWERKING 6.1. Opmerkingen vóór het reinigen Neem vóór gebruik even de tijd om het te reinigen gebied te inspecteren en eventuele obstakels te verwijderen. Verwijder netsnoeren en kleine voor-werpen Het product is niet geschikt voor gebruik op van de vloer waarin het product verstrikt zou hoogpolige tapijten.
- Page 11 Zet meubels, zoals tafels en stoelen, netjes Ga niet in nauwe ruimtes zoals gangen staan, neer, zodat de robot tijdens het reinigen niet om te voorkomen dat de robot gebieden mist vast komt te zitten en soepel kan werken. die moeten worden gereinigd. Als er na 10 minuten geen commando wordt ontvangen, gaat de robot naar de slaapmodus.
- Page 12 6.2. Oplaadmodus 1. Plaats het oplaadstation ● Verbind de adapter met het oplaadstation. ● Plaats het oplaadstation tegen de muur en verwijder obstakels ongeveer 1 meter aan beide zijden en ongeveer 2 meter aan de voorkant. Plaats geen reflecterende voor-werpen zoals spiegels rond het oplaad-station.
-
Page 13: Auto Modus
6.3. Opstarten / pauzeren / slaapmodus Slaapmodus: De robot werkt niet en de lichten eromheen zijn uit. Stand-bymodus: De robot werkt niet en de lampjes rondom knipperen groen. Reinigingsmodus: De robot werkt en de lampjes eromheen branden groen. 1. Opstarten A. - Page 14 2. Klassieke reiniging De robot maakt een rechte reinigingsbeurt en draait alleen van richting totdat hij obstakels detecteert of tegenkomt. 3. Vlek modus De robot volgt een spiraalvormig pad om een specifiek gebied met geconcentreerd stof en vuil te reinigen. 4.
- Page 15 5. Zuig knop De zuigkracht kan worden versterkt of verzwakt om aan verschillende reinigings-behoeften te voldoen. Druk op de knop op de afstandsbediening om te schakelen tussen verschillende zuigniveaus: Eco-Auto-Max. 6. Automatisch opladen Wanneer de batterij leeg raakt tijdens een reinigingscyclus, activeert de robot automatisch de functie "Auto Charge"...
- Page 16 Verwijder de watertank onderdelen 2. Voeg water toe Schuif naar achter en verwijder Open de waterinjectiedop en vul deze met de watertank onderdelen. water. Sluit de dop goed zodra de waterinjectie Is voltooid. Bevestig de dweilsteun met dweil 4. Installeer de onderdelen van de watertank Bevestig de dweilsteun met dweil aan Schuif hem naar voren, lijn hem uit met de clip De watertank.
-
Page 17: Zijborstels Reinigen
7. PRODUCTONDERHOUD 1. Zijborstels reinigen Reinig de zijborstels als ze vuil worden en vervang ze als ze beschadigd zijn. Opmerking: Voordat je de zijborstels vervangt, moet je de markeringen "L" en "R" op beide zijborstels en de onderkant van de robot controleren en met elkaar laten overeenkomen. 2. - Page 18 3. Onderdelen van de watertank reinigen Reinig het dweildoek Verwijderen: verwijder na het reinigen de dweilsteun en dweil. Onderhoud: spoel het dweildoek af en laat het drogen door de lucht. Maak de watertank schoon Verwijderen: Na het schoonmaken, verwijder je Onderhoud: Droog het waterreservoir met de hand Het dweildoek en de onderdelen en leeg het en laat het vervolgens aan de lucht drogen.
- Page 19 4. De anti-valsensoren en oplaadpinnen reinigen Gebruik reinigingsgereedschap of een zachte doek om de sensoren en oplaadpinnen te reinigen. Opmerking: Verwijder regelmatig stof of vreemde voorwerpen op de sensoren en oplaad-pinnen op zowel het oplaadstation als de robot. Anti-valsensor Oplaadpin 5.
-
Page 20: Problemen Oplossen
Opmerking: volg de onderstaande acties als alle bovenstaande oplossingen niet werken: 1) Start de robot opnieuw op. 2) Als het opnieuw opstarten niet werkt, neem dan contact op met Powell en vraag om hulp. Vervang de accessoires regelmatig: Accessoires... -
Page 21: Garantie
9. WEGGOOIEN ● Het verpakkingsmateriaal kan gerecycleerd worden. Gooi het op een milieuvrien-delijke manier weg en breng het naar een recyclingcentrum. ● Verwijder het apparaat op een milieuvriendelijke manier. Lever het in bij een recyclingcentrum voor gebruikte elektrische en elektronische apparaten. Je kunt meer informatie verkrijgen bij je lokale autoriteiten. -
Page 22: Safety Instructions
17. Stop using the robot and charging base immediately if they are damaged. 18. To avoid personal injury, do not replace spare parts yourself. Contact a professional technician or Powell. 19. Do not use spare parts from non-designated suppliers. Contact the manufacturer or Powell. - Page 23 28. WARNING: Non-rechargeable batteries should not be charged. 29. This device contains a battery that can only be replaced by qualified personnel. 30. WARNING: Only use the adapter (model: K12V190060G) provided with this robot to charge the battery. - 22 -...
-
Page 24: Product Parts
2. PRODUCT PARTS 2.1. Robot Bumper Auto button Charging pins Nose wheel Side brushes Battery lid Cliff sensors Suction port Side wheels 2-in-1 dustbin and water tank Dustbin release button 2-in-1 dustbin and water tank - 23 -... -
Page 25: Dust Container
2.2. Dust container 2-in-1 dustbin and water tank Mop holder with mop Note: When the water tank is filled with water, the robot’s ability to overcome obstacles and climb hills may be affected. 2.3. Charging Base Indicator light Adapter Power supply socket Connecting pins for the charging - 24 -... -
Page 26: Remote Control
2.4. Remote Control Home button Direction button Start button Suction button Classic cleaning button Spot cleaning button Edge cleaning button 2.5. Robot Button and Indicator Light Robot Status CLEAN Button Status Charging Orange light flashes Charging finished Solid green light Standby mode Green light flashes Error... -
Page 27: Technical Specifications
- Spot mode Cleaning features - Max mode - Scheduling mode Charging time <300min Usage time 90-120min Power adapter AC adapter model identifier K12V190060G Input voltage 100–240V AC Input frequency 50/60Hz Output voltage 19V DC Output current 0.6A Output power 11.4W... - Page 28 4. THE PACKAGE Number Description Quantity ① Robot ② Charging base ③ Remote control (no batteries included) ④ Charging adapter ⑤ Cleaning brush ⑥ User manual Mop holder with mop ① ② ③ ④ ⑤ ⑥ - 27 -...
-
Page 29: Using The Remote Control
5. USING THE REMOTE CONTROL 1. " " Home button Press this button to let the robot return to the charging base. Press this button twice to set a schedule when the robot is on the charging base. Indicator light on robot binks in green once, indicating the Schedule is set succesfully. Press this button 3 times to cancel the schedule when the robot is on the charging base. -
Page 30: Product Operation
6. PRODUCT OPERATION 6.1. Notes before cleaning Before use, take a moment to inspect the area to be cleaned and remove any obstructions. Remove power cords and small objects from The product is not suitable for use on long-pile the floor that could entangle the product. carpets. - Page 31 Arrange furniture, such as tables and chairs, Do not stand in narrow spaces such as neatly to prevent the robot from being stuck corridors to prevent the robot from missing during cleaning and to allow it to work out on areas to be cleaned. smoothly.
-
Page 32: Charging Mode
6.2. Charging mode 1. Place the charging base ● Connect the adapter with the charging base. ● Put the charging base against the wall and remove obstacles about 1 meter at both sides and about 2 meters in front. Do not place reflective objects such as mirrors around the charging base. - Page 33 6.3. Start up / Pause / Sleep Mode Sleep mode: The robot is not working and the lights around are off. Standby mode: The robot is not working and the lights around flash green. Cleaning mode: The robot is working and the lights around are solid green. 1.
-
Page 34: Cleaning Modes
6.4. Cleaning modes Multiple cleaning modes allow the robot to perform deep cleaning in different environments and on different floorings. Use the remote control to select a suitable cleaning mode. Note: Before selecting a cleaning mode, make sure the robot is on standby (the AUTO button is lighting green). - Page 35 4. Edge mode Press this button to let the robot move forward to detect a wall, and clean around the edges of the wall. 5. Suction button Suction and water Flow can be strengthened or weakened to meet different cleaning needs. Press the button on the remote control to switch between different suction levels: Eco-...
- Page 36 6.5. Operation of Water tank The water tank with a mop is installed in the device. Please add water to the tank before cleaning. It is recommended to vacuum the floor before mopping. For daily maintenance, please refer to the tips in the corresponding chapter of this manual. Note: 1.
-
Page 37: Product Maintenance
7. PRODUCT MAINTENANCE 1. Cleaning the side brushes Clean the side brushes when they get dirty and replace them if they are damaged. Note: Before replacing the side brushes, check and match the "L" and "R" marks on both side brushes and the bottom of the robot. - Page 38 3. Cleaning Water Tank Components Clean the mop cloth Removal: after cleaning, please remove the mop support and mop. Maintencance: rinse and air dry the mop cloth. Clean the water tank Removal: after cleaning, remove the mop Maintencance: cloth and components and empty the Hand dry the water tank and then let it Remaining water in the water tank.
- Page 39 4. Cleaning the anti-drop sensors and charging pins Use cleaning tools or a soft cloth to clean the sensors and charging pins. Note: Remove dust or foreign objects on the sensors and charging pins on both the charging base and robot regularly.
-
Page 40: Troubleshooting
●●●● Gyroscope failure restart Note: Follow the below actions if all the above solutions don’t work: 1) Restart the robot. 2) If restarting does not work, contact Powell and ask for help. Replace the accessories regularly: Accessories Maintenance Replacement Dust container... -
Page 41: Warranty
9. DISPOSAL ● The packaging material is recyclable. Dispose of it in an environmentally friendly manner and take it to a recycling center. ● Dispose of the device in an environmentally friendly manner. Dispose of it at a recycling center for used electrical and electronic devices. - Page 42 Dennepark B.V. Laan van ypenburg 122, 2497 GC Den Haag Nederland : klantenservice@dennepark.nl www.dennepark.nl © 2024 VONIA 2024-06-13 - 41 -...
Need help?
Do you have a question about the K12V190060G and is the answer not in the manual?
Questions and answers