Advertisement
Available languages
Available languages
Advertisement
Table of Contents

Related Manuals for Owl Labs Meeting Owl 4+

Summary of Contents for Owl Labs Meeting Owl 4+
- Page 1 SETUP GUIDE Guide d’installation...
-
Page 2: What's In The Box
WHAT’S IN THE BOX Meeting Owl 4+... - Page 3 Power Adapter Power Cord USB–C Cable Reference Card + Holder...
-
Page 4: Setup Step
SETUP STEP 1 Connect the Power Cord to the Power Adapter. Then, plug it into the Meeting Owl and an outlet. The Power Indicator will illuminate when the Meeting Owl is on. - Page 5 SETUP STEP 2 Connect the Meeting Owl to your computer using the USB-C Cable.
- Page 6 SETUP STEP 3 Place the Meeting Owl in the center of the table at least 18 inches (0.5m) from the monitor/TV. Move it around to see what works best in your room.
- Page 7 SETUP STEP 4 Download the Meeting Owl App by visiting owllabs.com/download. Follow the instructions in the app to complete setup and register your Meeting Owl. Use the Meeting Owl App to control the camera, customize the view, adjust settings, and more.
- Page 8 Pairing with another Owl device? Make sure both devices are plugged into power. Select “Pair Devices” in the Meeting Owl App to proceed. Visit owllabs.com/pair-devices for additional guidance on device placement and pairing.
- Page 9 USING THE MEETING OWL Follow the steps below any time you’d like to use the Meeting Owl in a meeting. 1 Plug the Meeting Owl’s USB-C 2 Start a meeting in your video Cable into your computer. conferencing platform (Zoom, Make sure the Meeting Owl is Microsoft Teams, Google plugged into power.
-
Page 10: Device Management
DEVICE MANAGEMENT Administrators can visit owllabs.com/nest to manage all of your organization’s Owl Labs devices. Get updates, troubleshoot issues, and manage settings from anywhere. -
Page 11: Reference Card
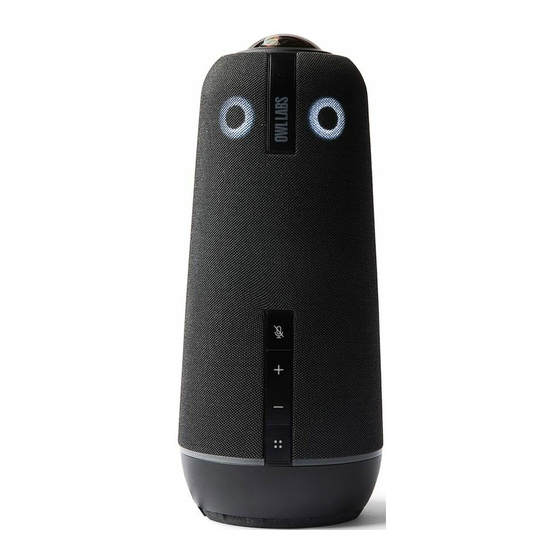
REFERENCE CARD Want to help others learn how to use the Meeting Owl? Leave the Reference Card nearby. Visit owllabs.com/accessories for information about Owl Labs accessories. - Page 12 ABOUT THE MEETING OWL Camera Lens Video Streaming Indicator Microphones Mute Speakers Volume Multipurpose Button Mute Indicator...
- Page 13 Alternate Video Streaming Indicator The Alternate Video Streaming Indicator can be enabled with the Meeting Owl App. Power Indicator Power Port USB-C Port...
-
Page 15: Guide D'installation
GUIDE D’INSTALLATION Setup Guide... -
Page 16: Dans La Boîte
DANS LA BOÎTE Meeting Owl 4+... - Page 17 Adaptateur Cordon d’alimentation Câble USB-C Fiche de référence + support...
- Page 18 CONFIGURATION – ÉTAPE 1 Branchez le cordon d’alimentation à l’adaptateur secteur. Ensuite, branchez-le à votre Meeting Owl et raccordez le tout au secteur. L’indicateur d’alimentation s’allume lorsque le Meeting Owl est sous tension.
- Page 19 CONFIGURATION – ÉTAPE 2 Branchez le Meeting Owl à votre ordinateur à l’aide du câble USB-C.
- Page 20 CONFIGURATION – ÉTAPE 3 Positionnez votre Meeting Owl au centre de la table, à au moins 50 cm du moniteur ou de la télévision. Faites les ajustements nécessaires en fonction de la salle.
- Page 21 CONFIGURATION – ÉTAPE 4 Téléchargez l’application Meeting Owl en accédant au site owllabs.com/download. Suivez les instructions indiquées dans l’application pour terminer la configuration et enregistrer votre Meeting Owl. Obtenir sur Utilisez l’application Meeting Owl pour contrôler la caméra, personnaliser la vue, ajuster les paramètres, etc.
- Page 22 Vous effectuez une connection avec un Owl ? Assurez-vous que les deux appareils sont raccordés au secteur. Pour continuer, sélectionnez « Appairer les appareils » dans l’application Meeting Owl. Accédez à owllabs.com/pair-devices pour obtenir des conseils supplémentaires sur le positionnement et l’appairage des appareils.
- Page 23 UTILISATION DU MEETING OWL Suivez les étapes ci-dessous chaque fois que vous souhaitez utiliser votre Meeting Owl lors d’une réunion. 1 Branchez le câble USB-C 2 Lancez une réunion sur votre du Meeting Owl à votre plateforme de visioconférence ordinateur. Assurez-vous que (Zoom, Microsoft Teams, le Meeting Owl est connecté...
- Page 24 GESTION DE L’APPAREIL Les administrateurs peuvent accéder à owllabs.com/nest pour gérer tous les appareils Owl Labs de votre organisation. Obtenez des mises à jour, résolvez les problèmes et gérez les paramètres où que vous soyez.
- Page 25 FICHE DE RÉFÉRENCE Vous voulez aider d’autres personnes à utiliser l’Owl Bar ? Laissez la carte de référence à proximité. Accédez à owllabs.com/accessories pour plus d’informations sur les autres accessoires proposés par Meeting Owl.
- Page 26 À PROPOS DU MEETING OWL Objectif de la caméra Indicateur de streaming vidéo Microphones Bouton de désactivation du microphone Haut-parleurs Boutons de volume Bouton multifonction Indicateur de désactivation du microphone...
- Page 27 Autre indicateur de streaming vidéo L’autre indicateur de streaming vidéo peut être activé à l’aide de l’application Meeting Owl. Indicateur d’alimentation Port d’alimentation Port USB-C...
- Page 28 Questions? We give a hoot. Vous avez des questions? Nous vous répondrons dès que possible. support@owllabs.com 1-857-214-4341 (US) owllabs.com/support...
- Page 29 FCC Caution: Changes or modifications to this product not authorized by Owl Labs could void the electromagnetic compatibility (EMC) and wireless compliance and negate your authority to operate the product. This product has demonstrated EMC compliance under conditions that included the use of compliant peripheral devices and shielded cables between system components.
- Page 30 Exposure to Radio Frequency Energy: The radiated output power of this device meets the limits of FCC/IC radio frequency exposure limits. This device should be operated with minimum separation distance of 20 cm (8 inches) between the equipment and a person’s body. This transmitter must not be co-located or operating in conjunction with any other antenna or transmitter.
- Page 31 Owl Labs pourraient annuler l’autorisation de l’utilisateur à utiliser cet équipement. EU Declaration of Conformity: Hereby, Owl Labs declares that the MTW405 is in compliance with Directive 2014/53/EU. The full text of the EU declaration of conformity is available at the following www.owllabs.com/mo3-info...
- Page 32 Recycling Device Properly In some areas, the disposal of certain electronic devices is regulated. Make sure you dispose of or recycle your device in accordance with your local laws and regulations.
Need help?
Do you have a question about the Meeting Owl 4+ and is the answer not in the manual?
Questions and answers