
Related Manuals for ION RETRO GLOW iSP112C


Summary of Contents for ION RETRO GLOW iSP112C
- Page 1 Quickstart Guide English ( 2 – 11 ) Guía de inicio rápido Español ( 12 – 20 ) Guide d’utilisation rapide Français ( 21 – 30 ) Appendix English ( 31 )
-
Page 2: Box Contents
Introduction Thank you for purchasing the Retro Glow™. At ION, your entertainment is as important to us as it is to you. That’s why we design our products with one thing in mind—to make your life more fun and more convenient. - Page 3 General Usage Fully charge the battery before using it. Avoid full discharge of the battery if possible. Li-Ion batteries are maintenance-free, and the battery will last longest when operating between 30–80% charged. Do not use the product while charging the battery.
-
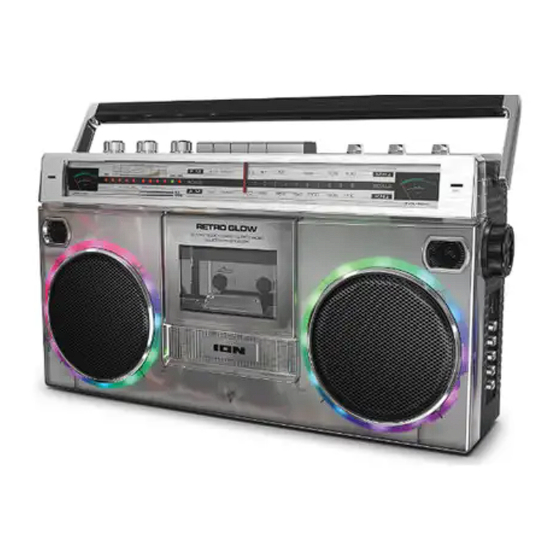
Page 4: Front Panel
Features Front Panel Cassette Holder: Press the Stop/Eject button Power LED: The LED will illuminate red when to open the cassette deck and insert a tape the unit is powered on by selecting Aux, here. Radio, or BT/USB/SD with the Function switch. Internal Mic: Use this microphone to record 6. -
Page 5: Top Panel
Top Panel Antenna: Adjust the antenna to get the best 8. Rewind: In Tape mode, press this button to radio station reception. rewind the tape. Note: The cassette mechanism will not auto- Volume: Adjust this to control the overall stop when rewinding. Press the Stop button playback volume. -
Page 6: Side Panels
Side Panels 9. Switch Folders: Press the Mode/Stop Rec and Previous Track buttons simultaneously to switch between the recorded tracks folder and other music folders on a USB flash drive or microSD card. 10. Previous Track: Press this button to go to the beginning of the current playing USB, microSD card, or Bluetooth track. -
Page 7: Operation
Operation Playback Playing a Tape: Listening to the Radio: Press the Stop/Eject button to open the Set the Function to Radio. cassette holder. Select the desired frequency band (AM or Insert a tape and close the cassette holder. FM). Set the Function switch to Tape. Note: When using AM radio, the lights are automatically disabled to improve reception. -
Page 8: Recording To Tape
Recording to Tape Note: Most cassettes feature a protective plastic strip which, when removed, will not allow any recording to be made to the cassette. When the plastic strip has been removed, the Retro Glow™’s Record button will not function when attempting to record to the cassette. - Page 9 Recording to USB/microSD Note: Only use either a USB flash drive or a microSD card at a time, but not both when recording. The unit may not record properly if both a USB and microSD card are plugged in at the same time. Recording from the Internal Microphone to a Recording from the Radio to a USB Flash Drive USB Flash Drive or microSD Card:...
-
Page 10: Cassette Care
Cassette Care Tape Head Cleaning avoid tape jamming, tape tangling, For continued high performance from Retro playback issues, please follow these tips: Glow™, periodically clean the head, pinch roller, and capstan every 10-20 hours of operation. • Check that there are no loose layers of tape visible through the cassette center window. -
Page 11: Troubleshooting
Troubleshooting If Retro Glow™ is not charging: Ensure that the power cable is connected securely. If the Retro Glow™ battery is draining quickly: Ensure that the Power switch is set to Off when not in use. Leaving the switch on will continue to drain the battery even if no sound is being played. If the sound is distorted: Try lowering the volume control of your sound source. -
Page 12: Contenido De La Caja
Guía de inicio rápido (Español) Introducción Gracias por comprar el Retro Glow™. En ION, su entretenimiento es tan importante para nosotros como para usted. Por eso es que diseñamos nuestros productos con una sola cosa en mente—hacer que su vida sea más divertida y cómoda. - Page 13 Si deja que el nivel de la batería baje y no la carga durante 6 meses, puede perder permanentemente su capacidad. Reparación Si la batería no se carga, póngase en contacto con ION Audio en ionaudio.com. Disposición final Lleve la unidad a un centro de reciclaje o deséchela de acuerdo a las ordenanzas...
-
Page 14: Panel Frontal
Características Panel frontal Casetera: Pulse el botón Stop/Eject para seleccionando Aux, Radio o BT / USB / SD abrir la casetera e insertar un casete aquí. con el interruptor de Función. Micrófono interno: Utilice el micrófono para 6. LED estéreo: El LED se iluminará en verde grabar fuentes de audio externas tales como el cuando se seleccione una estación FM estéreo. -
Page 15: Panel Superior
Panel superior Antena: Ajuste la antena para obtener la Rebobinar: En modo Casete, pulse este mejor recepción de la estación de radio. botón para rebobinar el casete. Nota: El mecanismo del cassette no se Volumen: Ajuste esta perilla para controlar detendrá... - Page 16 Paneles laterales se encuentren en una unidad de memoria USB o tarjeta microSD. 9. Pista anterior: Pulse este botón para pasar al comienzo de la pista de la unidad USB, tarjeta microSD, o Bluetooth que se esté reproduciendo actualmente. Durante reproducción, pulse este botón dos veces para ir a la pista anterior.
- Page 17 Funcionamiento Ajuste el interruptor Function a BT/USB/SD Reproducción y presione el botón Modo para cambiar al modo USB. Reproducción de un casete: Presiona el botón Play para comenzar la Pulse el botón Stop/Eject para abrir la casetera. reproducción. Inserte un casete y cierre la casetera. 4.
- Page 18 Grabación desde la entrada auxiliar al casete: Aparear un dispositivo Bluetooth: Conecte su teléfono inteligente (smartphone), Ajuste el interruptor Function del Retro reproductor MP3 o dispositivo similar a la Glow™ a la posición BT/USB/SD. entrada auxiliar utilizando un cable de 3,5 Encienda su dispositivo Bluetooth.
- Page 19 Grabación desde una unidad flash USB o Grabación desde la entrada auxiliar a una tarjeta MicroSD a casete: unidad de memoria USB o tarjeta microSD: Conecte su teléfono inteligente (smartphone), Pulse Stop/Eject para abrir la casetera. reproductor MP3 o dispositivo similar a la Inserte un casete y cierre la casetera.
-
Page 20: Solución De Problemas
Pruebe también reduciendo el volumen general del Retro Glow™. Cuidado de los casetes Si los graves son demasiado fuertes: Intente ajustando el control de tono o ecualización de su Para evitar que los casetes se atasquen, las Retro Glow™ o fuente de sonido para reducir el cintas se enreden o sufran problemas de nivel de graves. -
Page 21: Contenu De La Boîte
Guide d’utilisation rapide (Français) Présentation Merci d’avoir fait l’acquisition de l’enceinte Retro Glow™. Chez ION, votre divertissement est aussi important pour nous qu’il l’est pour vous. C’est pourquoi nous concevons nos produits avec une seule chose en tête — rendre la vie plus amusante et plus pratique. - Page 22 Si vous laissez le niveau de batterie s’affaiblir sans la recharger pendant 6 mois, elle risquerait de perdre sa capacité de charge de façon permanente. Réparation Si la batterie ne parvient plus à se recharger, contactez ION Audio à ionaudio.com. Élimination Apportez l’appareil dans un centre de recyclage ou disposez selon les règlements de...
-
Page 23: Caractéristiques
Caractéristiques Panneau avant Lecteur cassette : Appuyez sur la touche DEL d’alimentation : Cette DEL devient Stop/Eject pour ouvrir la platine cassette et rouge lorsque l’appareil est sous tension en insérez une cassette. sélectionnant Aux, Radio ou BT / USB / SD avec le commutateur de Fonction. -
Page 24: Panneau Supérieur
Panneau supérieur Antenne : Régler la direction de cette antenne 9. Play : mode cassette, cette touche permet d’obtenir la meilleure réception radio. permet de lancer la lecture de la cassette. Volume : Ce bouton permet de régler le Remarque : Il y aura un délai de lecture de volume général. - Page 25 Panneaux latéraux Bluetooth, USB ou carte microSD. Lors de l’enregistrement, cette touche permet d’arrêter l’enregistrement. 8. Changer de dossier : Appuyer simultanément sur les touches Mode/Stop Rec et piste précédente permet de basculer entre le dossier des pistes enregistrées et d’autres dossiers de fichiers audio sur une clé...
- Page 26 Fonctionnement Appuyez sur le bouton Play pour commencer Lecture la lecture. 4. Pour arrêter la lecture, appuyer sur la touche Lecture d’une cassette : Stop. Appuyer sur la touche Stop/Eject pour ouvrir le compartiment à cassette. Lecture d’une carte microSD : Insérez cassette refermez...
-
Page 27: Enregistrement Sur Cassette
Enregistrement d’un appareil branché à Jumelage d'un périphérique Bluetooth l’entrée auxiliaire sur cassette : Réglez le sélecteur Function du Retro Glow™ Branchez un téléphone intelligent, un lecteur sur BT/USB/SD. MP3 ou autre appareil similaire à l’entrée Mettez l’appareil Bluetooth sous tension. auxiliaire en utilisant un câble 3,5 mm (non Accédez à... - Page 28 Enregistrement depuis une clé USB ou une 6. Pour lancer l’enregistrement, maintenez carte MicroSD sur cassette : enfoncée la touche Rec./Rep. du panneau latéral. Appuyez sur la touche Stop/Eject pour ouvrir le compartiment à cassette. Pour arrêter l’enregistrement, appuyez sur la touche Mode/Stop Rec du panneau latéral.
- Page 29 Enregistrement d’un appareil Bluetooth sur clé Nettoyage des têtes de lecture et USB ou sur carte microSD : d’écriture Insérez la clé USB dans le port USB ou insérez une carte microSD dans le lecteur de Afin que la performance du Retro Glow™ soit carte microSD.
-
Page 30: Dépannage
Dépannage Si le Retro Glow ne se recharge pas : assurez-vous que le câble d'alimentation est bien branché. Si la batterie du Retro Glow se décharge trop rapidement : assurez-vous que l'interrupteur d'alimentation est réglé sur OFF lorsqu'il n'est pas utilisé. Si vous laissez l'interrupteur d’alimentation sur la position ON, la batterie continuera à... -
Page 31: Technical Specifications
ION Audio is a trademark of inMusic Brands, Inc., registered in the U.S. and other countries. The Bluetooth word mark and logos are owned by the Bluetooth SIG, Inc. and any use of such marks by ION Audio is under license. All other product names, company names, trademarks, or trade names are those... - Page 32 i o n a u d i o . c o m Manual Version 1.2...
Need help?
Do you have a question about the RETRO GLOW iSP112C and is the answer not in the manual?
Questions and answers
Does the Retro Glow need other attachments to be able to work?
The ION RETRO GLOW iSP112C comes with a built-in rechargeable battery and can also operate using six D-cell batteries. It includes a power cable for charging. No additional attachments are required for basic functionality, but optional D-cell batteries can be used for a retro experience.
This answer is automatically generated