Advertisement
Quick Links
Optional PCB for ECOi, ECO G and PACi indoor units
Model No.
PCB type
PAW-T10
For installation in the following indoor units
System
ECOi / ECO G
PACi
Installation manual for PAW-T10 PCB
Release Ref.:
Release Date:
Installation Instructions
PAW-T10 PCB
Indoor unit type
K1 / K2
F1 / F2
P1
R1
E1 / E2
U1
Y1 / Y2
L1
D1
T1 / T2
M1
WX
K1
F1
E1 / E2
U1
Y1 / Y2
T1 / T2
N1
Description
Wall-mounted
Low silhouette ducted
Floor-standing
Concealed floor-standing
High static pressure ducted
4-way cassette (90x90)
4-way cassette (60x60)
2-way cassette
1-way cassette
Ceiling
Slim low static ducted
Water heat exchanger
Wall-mounted
High static pressure ducted
High static pressure ducted
(20 – 25 kW)
4-way cassette (90x90)
4-way cassette (60x60)
Ceiling
Low static pressure ducted
Advertisement

Related Manuals for Panasonic PAW-T10


Summary of Contents for Panasonic PAW-T10
- Page 1 High static pressure ducted High static pressure ducted E1 / E2 (20 – 25 kW) 4-way cassette (90x90) Y1 / Y2 4-way cassette (60x60) T1 / T2 Ceiling Low static pressure ducted Installation manual for PAW-T10 PCB Release Ref.: Release Date:...
- Page 2 Main features of PAW-T10 PCB • Easy to connect to the indoor units by a simple electrical connector without special tools and fits mechanically to most units in predrilled holes. • Provides easily accessible screw terminals for all inputs and outputs.
-
Page 3: For Your Safety
Instructions for the electrical installer PAW-T10 PCB for ECOi, ECO G and PACi indoor units For your safety Read the following instructions carefully, and carry out secure installation and electrical work. The precautions given in this manual consist of specific “Warnings” and “Cautions”. They provide important safety-related information. -
Page 4: Parts Supplied
• Avoid installing in any location that is subject to excessive vibration or physical impacts. Installation procedure Install the PAW-T10 PCB (see Fig. 1-1) to each individual controlled indoor unit or to one single unit of each group (master or slave) by inserting the PCB holder into the appropriate holes. - Page 5 Figures of installation position on each indoor unit type Protective ground screw Slim low static ducted (M1 type) Fig. 2-1 As viewed from B PAW-T10 Protective ground screw As viewed from A Low silhouette ducted (F1 type) Fig. 2-2 As viewed from A...
- Page 6 73 – 140 type Protective ground screw High static pressure ducted (E1 type) Fig. 2-4 PAW-T10 Protective ground screw Floor-standing (P1 type) and Concealed floor-standing (R1 type) Fig. 2-5...
- Page 7 Tab for holding indoor control PCB PAW-T10 PCB Lower tab Mounting position Protective ground screw Clamp position for T10 wiring Wall-mounted (K1 type) Fig. 2-6 Protective ground screw 4-way cassette 90x90 (U1 type) Fig. 2-7...
- Page 8 Protective ground screw 4-way cassette 60x60 (Y1 type) Fig. 2-8 Protective ground screw 1-way cassette (D1 type) Fig. 2-9 Protective ground screw 2-way cassette (L1 type) Fig. 2-10...
- Page 9 36 – 56 type 73 – 140 type Protective ground screw Ceiling (T1 type) Fig. 2-11...
- Page 10 Fig. 2-12 Functionality The optional PAW-T10 PCB, complete with relays, T10 connector and connection cable, is ready to be fit into any indoor unit. It can be directly connected to the T10 terminal connector to provide combined extended functions. This spares the installer the need to install extra field-supplied relays and devices.
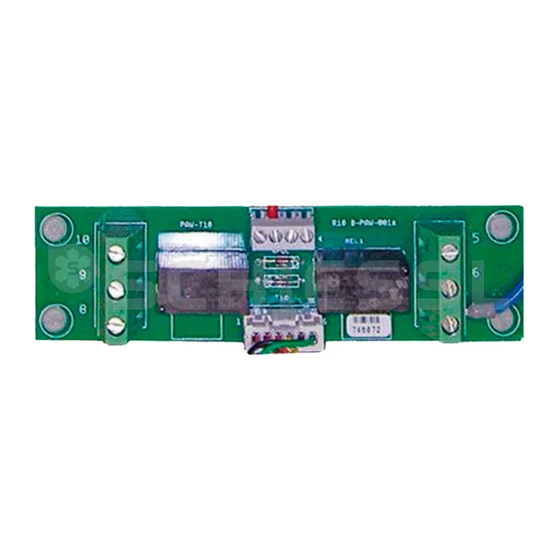
- Page 11 PAW-T10 terminal layout 1 Operating signal digital input (potential free dry 6 NO contact for operating signal output (max. 5 A / contact) 250 V AC) 2 COM used as 2nd contact for operating signal input 7 COM contact for operating signal output 3 COM used as 2nd contact for prohibit signal input 8 NC contact for alarm signal output (max.
- Page 12 1.00 m (overall) Weight of kit (PCB + cable): 0.075 kg Accessories If the PAW-T10 connection PCB is to be installed outside of the indoor unit, use the optional CZ-CAPE2 PCB casing, which consists of the following parts: CV6233169552 Terminal box...
- Page 14 www.aircon.panasonic.eu...
Need help?
Do you have a question about the PAW-T10 and is the answer not in the manual?
Questions and answers