Table of Contents

Related Manuals for aTli ATL4500


Summary of Contents for aTli ATL4500
- Page 1 ATL4500 4K Construction Timelapse Camera Instruction Manual English Version 1.1 For the electronic version of the manual, scan the QR code to access it on your computer or mobile. https://www.atlitimelapse.com/pages/download-manual...
-
Page 2: Safety Precautions And Warnings
Safety Precautions & Warnings Installation Handle the camera with care and avoid dropping it which could cause § internal hardware damage. Keep the camera clean, especially the front protective glass. § Do not connect the camera to a third-party power adaptor. §... - Page 3 Environment The recommended operating temperature is between -10°C/14°F to § 50°C/122°F. Avoid aiming the camera lens directly to the sun to avoid pictures § from overexposure and may possibly damage the camera image sensor in the long run. Installing the camera under a roof or shelter could help to improve §...
-
Page 4: Table Of Contents
Registering the camera to the app ............... 11 Starting to shoot timelapse ................... 11 Operating on ATLI Cam+ .................. 12 Basic icons displayed on ATLI Cam+ app ............12 Camera List ......................14 Me ........................15 Share My Camera ....................15 Messages ......................... - Page 5 Grid .......................... 20 Timestamp ......................21 Schedule ........................21 Realtime Playback ....................22 System Settings ....................23 WLAN ........................23 Memory Card ......................24 Advanced ........................ 25 About ........................26 Reset to factory defaults ..................26 Remote Access ....................27 Album ........................
-
Page 6: Getting Started
§ Format: exFAT Downloading ATLI Cam+ app This camera requires app-control. Scan the QR code on the right to download the ATLI Cam+ app. The ATLI Cam+ app can also be download via the Apple App Store and Google Play. -
Page 7: Quick Setup
Quick Setup Installing Wi-Fi Antenna Assemble Wi-Fi Antennas to the camera by turning the base ring clockwise against the base mount on the camera body by hand only until tightened. *Do not use excess force or a tool to over- tighten the antenna. - Page 8 The wall mount bracket is adjustable with 360 degrees swivel on the base, 90 degrees tilting angle, and 360 degrees swivel on the camera body. This offers more flexibility when installing the camera. The other mounting option is to remove the wall mount, then mount a c- clamp (not included) to the ¼”...
-
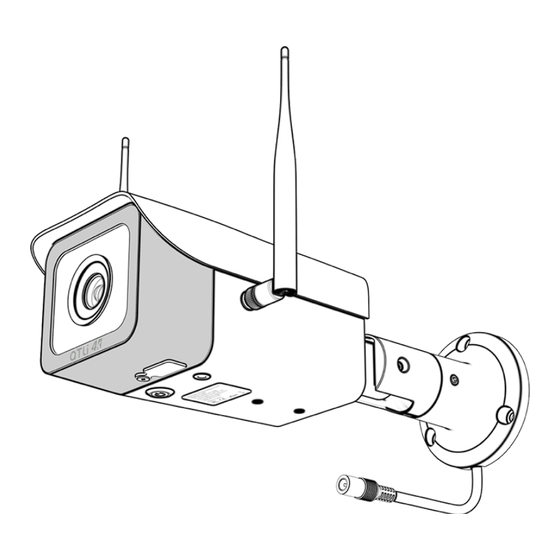
Page 9: Names Of Parts
Names of Parts Camera Parts Protective Glass Wi-Fi Antenna ¼” Storage Card Slot Cover Tripod Mount Power Source Indicating LED IP65 Camera Roof Power Button with Status Power Connector (5.5*2.5mm Indicating LED Female Plug) Safety Label Wall Mount (Removable) -
Page 10: Camera Status Led
Camera Status LED Two LEDs located at the bottom of the camera are used to display the camera status. Power Button with Status Indicating LED Status Green LED Description Powering On for 10 secs Camera is getting ready. If the camera does not blink, please contact customer support for help. -
Page 11: First Time Connecting To The Camera
First Time Connecting to the Camera Registering the camera to the app Follow the steps below to register your camera to the ATLI Cam+ app. 1 Open the ATLI Cam+ app, go to Camera. 2 Turn the camera up Turn the camera upside down to view the camera QR code as shown on the right. -
Page 12: Operating On Atli Cam
Operating on ATLI Cam+ Basic icons displayed on ATLI Cam+ app Dashboard More Settings Rotate Auto/Manual Image Settings Resolution Record Camera List System Settings Remaining Battery Photo Mode Charging Time Lapse Mode Remaining Storage | Frame Album... - Page 13 During Time Lapse Recording Current Interval Realtime Playback Details Pause/Stop Current Output Mode...
-
Page 14: Camera List
Camera List Find detailed information and the status of the camera. Local Access When [ ] turns green, the camera can be accessed locally via direct camera Wi-Fi connection. Local Access Remote Access After logging in ,the [ ] will show up. -
Page 15: Share My Camera
Share My Camera Create a group and share access to the camera with your group members. 1 Click on "Add a new group" and enter a name for the group. 2 Choose the camera you wish to share in this group, then click the checkmark in the upper right corner to proceed. -
Page 16: Messages
Messages Users will receive system-generated messages here, including camera status updates and group invitations. -
Page 17: Cloud Drive
Cloud Drive Connect a third-party cloud drive for automatic synchronization of your videos and photos from the camera to your personal drive. 1 Ensure that the WLAN <Page 23> is properly configured and connected. 2 Access the settings, configure the connection, and grant access to the app for your chosen third-party cloud drive. -
Page 18: Notifications
Notifications The camera will send notifications to the camera admin under the following situations: § Low Battery: Alert when low battery condition occurs. § Cloud Drive Storage space<2GB: Warning when cloud storage is low. § Online: Confirmation that the camera is connected. §... -
Page 19: Basic Operations
Basic Operations Auto/Manual Auto Mode Shutter Speed: Automatic adjustment § ISO: Automatic adjustment § White Balance: Adjustable § Exposure Value (EV): Adjustable § Manual Mode Shutter Speed: Adjustable § ISO: Adjustable § White Balance: Adjustable § Setting Name Range Shutter Speed 1/20K, 1/15K, 1/10K, 1/8000, 1/6000, 1/5000, 1/4000, 1/3200, 1/2500, 1/2000, 1/1250, 1/1000, 1/640, 1/400, 1/320, 1/250, 1/200, 1/160, 1/125,... -
Page 20: Output
Output Video Only: Outputs MP4 files only. Video + Photo: Outputs both MP4 files and JPEG Files. Important Note Saving photos will consume a significant amount of storage space. § Please ensure you have enough space on your device. The output settings cannot be changed during shooting. Please §... -
Page 21: Timestamp
Timestamp Timestamp appears in the bottom left corner of both the photo and video. By default, the timestamp follows the app's time. If you're in different time zones, manually adjust the camera's Time Zone settings <Page 25> for accurate time display. Schedule Program the camera to shoot during specific time slots. -
Page 22: Realtime Playback
Realtime Playback Review the recorded content to ensure it meets your expectations. Click [ ] to preview. Click[ ] to view detail information on the video being recorded. Important Note This camera captures at 25 frames per second (fps), meaning it takes 25 pictures to produce 1 second of video. -
Page 23: System Settings
System Settings WLAN The WLAN settings configures the camera to connect to your local Wi-Fi network. 1 Navigate to the WLAN under System Settings. 2 Choose your local Wi-Fi network. 3 Enter the Wi-Fi password if prompted and initiate the connection. 4 Once connected, check the camera status in the camera list. -
Page 24: Memory Card
Memory Card Detail about the total capacity of the memory card and the available storage space. Memory cards that can be used § Type: microSD § Capacity: 512GB § Speed Class: Class 10 § Format: exFAT Important Note Do not insert or remove the memory card during shooting, as this may cause storage errors or damage the memory card. -
Page 25: Advanced
Advanced Remote Support Remote support for your camera is a feature that allows technical support teams to access your camera settings for troubleshooting purposes. To enable remote support for your camera, please follow these steps: 1 Ensure the camera is plugged in and powered on to maintain the connection. -
Page 26: About
About The following information of the camera can be check here. Firmware Version: The current version of the camera's firmware. § Keeping it updated ensures optimal performance and security. Serial Number: The unique identifier assigned to your camera for § warranty and support purposes. -
Page 27: Remote Access
Remote Access The camera can be configured to support remote access via the ATLI Cam+ app and the ATLI Remote desktop client under the following conditions: Camera WLAN <page 23> is Set Up: Ensure the camera is § connected to a local Wi-Fi network with internet access. -
Page 28: Album
] located at the bottom. Important Note The photo sequence folder cannot be downloaded through the § ATLI Cam+ mobile app. To download the entire photo sequence album, use the ATLI § Remote desktop client or use a card reader. -
Page 29: Troubleshooting
Troubleshooting Symptom Solution Unable to Green LED is off: Press and hold the power button connect the until the green LED turns on. Wait for the LED to blink, camera indicating the camera is ready. Fast Blinking (every 0.5 seconds): WLAN is not setup; camera can be connected via the camera hotspot only. -
Page 30: Technical Specifications
Technical Specifications Video Resolution 3840*2160 Photo Resolution 3840*2160 Processor Dual-Core Cortex A7@1.2GHz Image Sensor 1/2.8" Sony STARVIS™ CMOS 110° Aperture F2.4 Capture Mode Timelapse, Photo Interval 1second – 24 hours Output Option Video+Photo, Video Video Format MP4(H.264) Photo Format JPEG Video Frame Rate 25 fps ±4EV... - Page 31 FCC WARNING This device complies with part 15 of the FCC Rules. Operation is subject to the following two conditions: (1) this device may not cause harmful interference, and (2) this device must accept any interference received, including interference that may cause undesired operation. WARNING: Any changes or modifications not expressly approved by the party responsible for compliance could void the user's authority to operate the equipment.
Need help?
Do you have a question about the ATL4500 and is the answer not in the manual?
Questions and answers