Advertisement
Quick Links
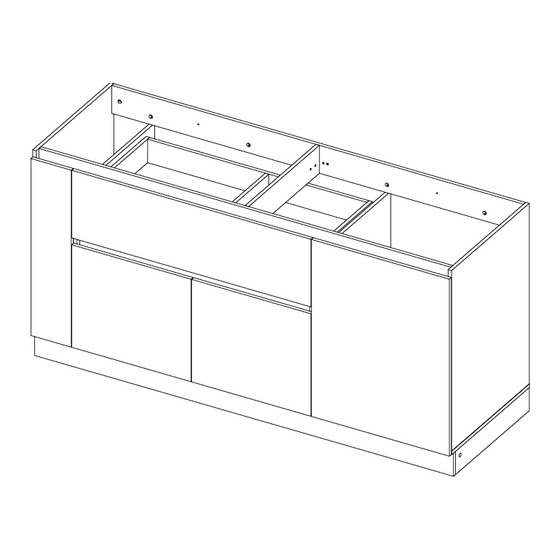
MUEB
MUEB
LE INFERIOR COCINA
LE INFERIOR COCINA
Alto: 89 cm
Ancho: 79,9 cm
1
Fondo: 59,2 cm
LOTE No:
INSTRUCCIONES DE ENSAMBLE
SAVONA 8
/
/ASSEMBL INSTRUCTIONS
1. 0 KITCHEN BASE CABINET
Y
SAVONA 8
SAVONA 8
Para mesón con pozuelo
Derecho
For countertop with
1. 0
1. 0
right
sink
Advertisement

Related Manuals for CORONA SAVONA


Summary of Contents for CORONA SAVONA
- Page 1 INSTRUCCIONES DE ENSAMBLE /ASSEMBL INSTRUCTIONS MUEB MUEB LE INFERIOR COCINA LE INFERIOR COCINA SAVONA 8 SAVONA 8 1. 0 1. 0 SAVONA 8 1. 0 KITCHEN BASE CABINET Alto: 89 cm Ancho: 79,9 cm Para mesón con pozuelo Fondo: 59,2 cm...
- Page 4 PLANO DE PUNTOS HIDRÁULICOS Y ELÉCTRICOS Pozuelo Izquierdo Piso Medidas en cm Desagüe Punto Hidráulico Punto Eléctrico 110 V Punto de Gas...
- Page 5 PLANO DE PUNTOS HIDRÁULICOS Y ELÉCTRICOS Pozuelo Derecho 70 60 Medidas en cm Piso Desagüe Punto Hidráulico Punto Eléctrico 110 V Punto de Gas...
- Page 6 BAÑOS Y COCINAS “Lea muy bien el instructivo antes de armar el producto, ármelo en un lugar limpio y preferiblemente en una superficie plana” SE RECOMIENDA aplicar silicona en el empalme entre el lavaplatos y el mesón de cocina para evitar filtraciones de agua.
- Page 7 fi GARANTÍA: Este mueble par a cocina CORONA® tiene una garantía de 1 año en partes de madera y en herrajes, a partir de la fecha de compra. La garantía cubre defectos de fabricación y mala calidad de materiales que impidan el armado y uso del mueble.
-
Page 8: Assembly Hardware
HERRAJES PARA ARMADO ASSEMBLY HARDWARE x 3 2 x 3 2 Tarugo/ Bisagra parche Minifix/ Perno minifix/ Tapa adhesiva/ Fluted dowel pin cierre lento 35mm / Minifix connector Cover Caps Spreading bolt Soft Close full verlay hinge (incluye tornillos) Tornillo lámina/ Tornillo de Cantonera/ Riel Extensión... -
Page 9: Assembly Parts
8 Kg. 17.63 lbs. PIEZAS DE ARMADO ASSEMBLY PARTS TENER PRECAUCIÓN AL ABRIR LA BOLSA DE HERRAJES PARA NO EXTRAVIAR NINGUNO. COMPRUEBE QUE EL CONTENIDO DE LAS PIEZAS SEA EL CORRECTO. EN CASO QUE FALTE ALGUNA PIEZA O ESTE DEFECTUOSA LE AGRADECEMOS LLAMAR DE INMEDIATO A LA LÍNEA DE ATENCIÓN COLOMBIA: 01 8000 51 20 30... - Page 10 (Herramientas NO incluidas) - Taladro - Broca de muro de 5/16 - Destornillador de estrella - Destornillador de pala...
- Page 11 Leer las recomendaciones de ensamble antes de comenzar con el armado del mueble. SE RECOMIENDA ARMAR EL MUEBLE SOBRE LA CAJA O SOBRE UNA SUPERFICIE LISA, PARA NO RAYARLO Y CON LA AYUDA DE OTRA PERSONA. VOLTEAR TURN OVER...
- Page 12 VOLTEAR TURN OVER Girar 180° / Rotate 180° VOLTEAR TURN OVER Girar 180° / Rotate 180°...
- Page 13 Tornillo de ensamble 2"/ Drywall Screw...
- Page 14 Bisagra Parche Cierre Lento / Soft Close Full Overlay hinge Riel Extensión VOLTEAR Total 0 cm/ TURN OVER PARA PONER RIEL EN Drawer Slides LATERAL DEL MUEBLE When placing the slide on the side of the Cabinet Revisar que el tope plástico del riel quede en la PARTE TRASERA/ The plastic stop should be...
- Page 15 Girar 180° / Rotate 180° Tornillo de ensamble 2"/ Drywall Screw...
- Page 16 Bisagra Parche Cierre Lento / Soft Close Full Overlay hinge...
- Page 17 Tornillo de ensamble 2"/ Drywall Screw...
- Page 18 Girar 180° / Rotate 180° Girar 180° / Rotate 180° Girar 180° / Rotate 180°...
- Page 19 Tornillo de ensamble 2"/ Drywall Screw...
- Page 20 PARA PONER RIEL EN LATERAL DEL CAJóN/ When placing the slide on the side of the drawer: VOLTEAR Revisar que el tope metálico del riel quede en TURN OVER la PARTE DELANTERA/ The metallic stop should be placed on the front. VOLTEAR TURN OVER...
- Page 23 Girar 180° / Rotate 180°...
- Page 24 2"...
- Page 26 Instale la pieza L como soporte para el mesón. Use the “L” panel as the countertop support Deslice el cajón dentro del mueble /Slide the drawer inside the cabinet...
- Page 27 INSTALACIóN BISAGRAS/ HINGES INSTALLATION Hinge adjustment Ajuste de las bisagras Depht adjustment Side adjustment Height adjustment Ajuste lateral Ajuste de altura Ajuste de profundidad...
- Page 28 PARA INSTALAR A PARED WALL INSTALLATION Utilizar una broca Herramientas de 5/16" para hacer NO incluidas/ Tools not las perforaciones included en el muro/ Tornillo 2" + Use a 5/16" drill bit Chazo Mariposa/ to drill the wall. Wall Anchor 3 8 , 6 5 2 2 1 Medidas en centímetros /...
Need help?
Do you have a question about the SAVONA and is the answer not in the manual?
Questions and answers