Table of Contents
Advertisement
FENWAL Safety Systems
ABBREVIATED COMPONENT MAINTENANCE MANUAL (ACMM)
35303
TO: HOLDERS OF WIRE END FITTINGS 35303-XXX ABBREVIATED COMPONENT
MAINTENANCE MANUAL
HIGHLIGHTS
This is a reissue of the manual in its entirety. All procedures in the manual have been re-
vised. Discard the previous manual when you receive this manual.
26-14-14
Page 1 of 1
Mar 31/04
Advertisement
Table of Contents

Related Manuals for Fenwal 35303 Series

Summary of Contents for Fenwal 35303 Series
- Page 1 FENWAL Safety Systems ABBREVIATED COMPONENT MAINTENANCE MANUAL (ACMM) 35303 TO: HOLDERS OF WIRE END FITTINGS 35303-XXX ABBREVIATED COMPONENT MAINTENANCE MANUAL HIGHLIGHTS This is a reissue of the manual in its entirety. All procedures in the manual have been re- vised. Discard the previous manual when you receive this manual.
-
Page 2: Part Numbers
4200 Airport Drive NW Wilson, North Carolina 27896-8630 U.S.A. CAGE: 73168 Telephone: 252-246-7004 Fax: 252-246-7183 WIRE END FITTINGS PART NUMBERS 35303-XXX (Refer to Table 1 for all available part numbers.) ABBREVIATED COMPONENT MAINTENANCE MANUAL CONFIDENTIAL This document and the information contained herein are the property of Kidde Technologies, Inc. (KTI) and contain confidential and proprietary information of KTI. -
Page 3: Description And Operation
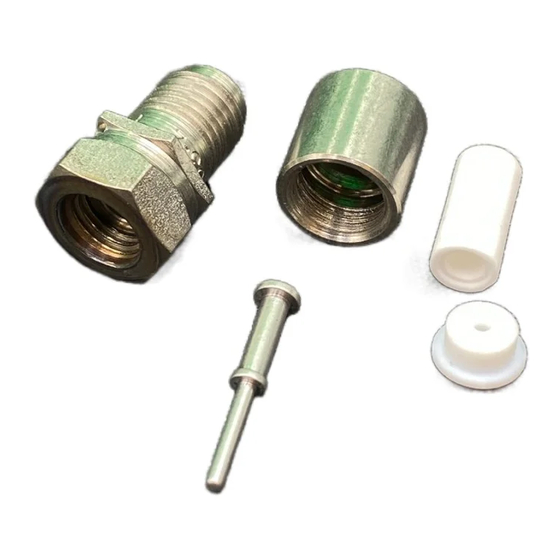
FENWAL Safety Systems ABBREVIATED COMPONENT MAINTENANCE MANUAL (ACMM) 35303 1. DESCRIPTION AND OPERATION A. Description 1. This manual describes wire end fittings, called fittings in the pages that fol- low, that begin with part number 35305-. All available part numbers are given in Table 1. - Page 4 FENWAL Safety Systems ABBREVIATED COMPONENT MAINTENANCE MANUAL (ACMM) 35303 XXX, 35XXX-311-XXX, 35XXX-400-XXX, and 35-XXX-411-XXX. They can also connect to 35000 series control units. Refer to Table 3. C. Configurations 1. Figure 1 shows the two types of assembled fittings. Many fitting configura- tions are available.
- Page 5 FENWAL Safety Systems ABBREVIATED COMPONENT MAINTENANCE MANUAL (ACMM) 35303 Table 2. Fitting Configurations (Continued) FITTING FITTING PART PART NUMBER SHIELDED NUMBER SHIELDED WIRE WIRE 35303- CONFIGURATION 35303- CONFIGURATION Socket Socket Socket Socket Socket Socket Socket Socket Socket Socket Socket Socket...
- Page 6 FENWAL Safety Systems ABBREVIATED COMPONENT MAINTENANCE MANUAL (ACMM) 35303 Table 3. Fitting and Sensor Elements FITTING PART WORKS WITH SENSOR ELEMENT 35XXX- NUMBER 35303- 47 200 211 300 311 400 411 26-14-14 Page 5 of 61 Mar 31/04...
- Page 7 FENWAL Safety Systems ABBREVIATED COMPONENT MAINTENANCE MANUAL (ACMM) 35303 Table 3. Fitting and Sensor Elements (Continued) WORKS WITH SENSOR ELEMENT 35XXX- FITTING PART NUMBER 35303- 47 200 211 300 311 400 411 26-14-14 Page 6 of 61 Mar 31/04...
-
Page 8: Testing And Fault Isolation
FENWAL Safety Systems ABBREVIATED COMPONENT MAINTENANCE MANUAL (ACMM) 35303 Table 3. Fitting and Sensor Elements (Continued) FITTING PART WORKS WITH SENSOR ELEMENT 35XXX- NUMBER 35303- 47 200 211 300 311 400 411 2. TESTING AND FAULT ISOLATION A. General 1. This section gives the procedures and data necessary to do tests of the fit- ting. - Page 9 FENWAL Safety Systems ABBREVIATED COMPONENT MAINTENANCE MANUAL (ACMM) 35303 NOTE: If two fittings are installed on both ends, record the distance of the entire assembly. (b) Attach all necessary accessories to the push-pull gauge. (c) Zero the push-pull gauge as specified in the manufacturer’s instructions.
- Page 10 FENWAL Safety Systems ABBREVIATED COMPONENT MAINTENANCE MANUAL (ACMM) 35303 (b) If a fitting is a socket end connector, put a test pin in the end of the shell and insert assembly. NOTE: A shell and insert assembly must be installed in a socket end connector to do a test.
- Page 11 FENWAL Safety Systems ABBREVIATED COMPONENT MAINTENANCE MANUAL (ACMM) 35303 CAUTION: METER LEADS CAN DAMAGE THE SHELL AND INSERT ASSEMBLY. INSTALL A TEST PIN IN THE END OF THE SHELL AND INSERT ASSEMBLY BEFORE THE TEST (a) If a fitting is a socket end connector, put a test pin in the end of the shell and insert assembly.
- Page 12 FENWAL Safety Systems ABBREVIATED COMPONENT MAINTENANCE MANUAL (ACMM) 35303 5. CLEANING A. General 1. This section gives the procedures, equipment, and materials needed to clean the fittings. B. Equipment and Materials 1. Table 6 gives the cleaning equipment and materials needed to clean the fit- tings.
- Page 13 FENWAL Safety Systems ABBREVIATED COMPONENT MAINTENANCE MANUAL (ACMM) 35303 WARNING: ALWAYS POINT COMPRESSED GASES AWAY FROM PERSONS AND USE APPLICABLE EYE PROTECTION. COMPRESSED GASES CAN CAUSE INJURY TO THE EYES. 2. Dry the fittings with nitrogen or dry air at a maximum pressure of 30 psi (207 kPa).
- Page 14 FENWAL Safety Systems ABBREVIATED COMPONENT MAINTENANCE MANUAL (ACMM) 35303 (f) Check the shield wires. The shield wires must be inside the braid grip sleeve. Replace the fitting if the shield wires are pulled loose from the fitting. NOTE: Do not replace the fitting if most of the shield wires are at- tached.
- Page 15 FENWAL Safety Systems ABBREVIATED COMPONENT MAINTENANCE MANUAL (ACMM) 35303 C. Shell and Insert Assembly 1. Remove the shell and insert assembly as follows. See Figures 4 and 5. (a) Remove the protective cap from the socket end fitting. (b) With the handle pointed toward you, hold the body of the insert replacement tool (3).
- Page 16 FENWAL Safety Systems ABBREVIATED COMPONENT MAINTENANCE MANUAL (ACMM) 35303 (b) Remove the straightening fixture (2). (c) Put a new shell and insert assembly into the insert tool (1) with the black dot pointed away from the tool. See Figure 7.
- Page 17 FENWAL Safety Systems ABBREVIATED COMPONENT MAINTENANCE MANUAL (ACMM) 35303 EQUIPMENT AND MATERIAL PART NUMBER Crimp Die Y1661P Open Frame Crimp Tool Pin Crimp Positioner TP673 Pin Crimp Tool Strap Wrench SW12A Torque Wrench Adapter TH-1599, Detail 7 Torque Wrench Adapter...
- Page 18 FENWAL Safety Systems ABBREVIATED COMPONENT MAINTENANCE MANUAL (ACMM) 35303 Fittings that Use Unshielded Wire Figure 8 Table 9. Fitting Parts FIGURE 8 REFERENCE DESCRIPTION Shell and Insert Assembly (Used with #3) Housing Assembly (Socket End) Housing Assembly (Pin End) Pin Shield...
- Page 19 FENWAL Safety Systems ABBREVIATED COMPONENT MAINTENANCE MANUAL (ACMM) 35303 End Cap Installation Figure 9 CAUTION: DO NOT CUT OR DAMAGE THE WIRE STRANDS ON THE CENTER CONDUCTOR. A WEAK ASSEMBLY OR DEFECTIVE WIRE CAN RESULT. 6. Use wire strippers to remove 0.50 in (1.27 cm) of insulation from the wire (11) to show the center conductor.
- Page 20 FENWAL Safety Systems ABBREVIATED COMPONENT MAINTENANCE MANUAL (ACMM) 35303 9. Put the wire guide (7) on the wire and into the insulator grip ferrule. See Fig- ure 12. Wire Guide Installation Figure 12 10. Put the contact pin on the center conductor. Push the contact pin (6) on the center conductor until the insulator grip ferrule (8), the wire guide (7), and the contact pin (6) are pushed together as far as they will go.
- Page 21 FENWAL Safety Systems ABBREVIATED COMPONENT MAINTENANCE MANUAL (ACMM) 35303 Insulator Installation Figure 14 14. Put thy pin shield (4) into the housing assembly (2 or 3). See Figure 15. Pin Shield Installation Figure 15 15. Put thread sealer on the first three threads on the end of the housing assem- bly (2 or 3) that will join with the end cap.
-
Page 22: Table Of Contents
FENWAL Safety Systems ABBREVIATED COMPONENT MAINTENANCE MANUAL (ACMM) 35303 16. Put the pin shield (4) and housing assembly (2 or 3) on the contact pin (6) and push the parts together. Assemble the end cap (9) to the housing (2 or 3) with all of the other parts already in the middle of the assembly. - Page 23 FENWAL Safety Systems ABBREVIATED COMPONENT MAINTENANCE MANUAL (ACMM) 35303 Use a torque wrench and 5/16 in. socket to torque the fitting to 50 to 60 lbf in. (5.65 to 6.78 Nm). Remove the torque wrench, socket, and torque wrench adapter.
- Page 24 FENWAL Safety Systems ABBREVIATED COMPONENT MAINTENANCE MANUAL (ACMM) 35303 F. First Configuration of Fittings that Use Shielded Wire. 1. Figure 20 shows the sequence used in the assembly of the parts. Table 10 gives the parts used in this fitting configuration.
- Page 25 FENWAL Safety Systems ABBREVIATED COMPONENT MAINTENANCE MANUAL (ACMM) 35303 4. Use Tables 13 thru 17 to find the pin crimp tools necessary to install the con- tact pin (6) on the wire (11). See Figure 20. 5. Put the braid grip sleeve (10) and the end cap (9) on the wire (11) and move them back on the wire.
- Page 26 FENWAL Safety Systems ABBREVIATED COMPONENT MAINTENANCE MANUAL (ACMM) 35303 9. Unbraid and open the shield braid. See Figure 23. Unbraid and Open Shield Figure 23 CAUTION: ALL SHIELD WIRES MUST BE ABOVE THE INSULATOR GRIP FERRULE. IF A STRAND OF WIRE IS UNDER THE FERRULE AND TOUCHES THE CENTER CONDUCTOR, IT WILL CAUSE A SHORT.
- Page 27 FENWAL Safety Systems ABBREVIATED COMPONENT MAINTENANCE MANUAL (ACMM) 35303 12. Put the contact pin on the center conductor. Push the contact pin (6) on the center conductor until the insulator grip ferrule (8), the wire guide (7), and the contact pin (6) are pushed together as far as they will go. See Figure 26.
- Page 28 FENWAL Safety Systems ABBREVIATED COMPONENT MAINTENANCE MANUAL (ACMM) 35303 16. Push the shield wire strands down on the insulator grip ferrule (8). The wire strands must go all the way around the insulator grip ferrule (8). 17. Put the pin shield (4) into the housing assembly (2 or 3). See Figure 28.
-
Page 29: Thread. Refer To Special Tools, Fixtures, Equipment, And Consumables. See Figures 61 And
FENWAL Safety Systems ABBREVIATED COMPONENT MAINTENANCE MANUAL (ACMM) 35303 Assemble Parts Figure 30 20. Put a strap wrench on the end cap (9) and tighten the wrench. 21. Use the correct sub-paragraph below for the housing used. (a) Do the next steps to torque a pin end fitting: Select the correct torque wrench adapter, TH-1599, for the thread size used. - Page 30 FENWAL Safety Systems ABBREVIATED COMPONENT MAINTENANCE MANUAL (ACMM) 35303 Use a torque wrench and a 3/8 in. socket to torque the fitting to 50 to 60 lbf in. (5.65 to 6.78 Nm). Remove the torque wrench and socket. 22. Remove the strap wrench.
- Page 31 FENWAL Safety Systems ABBREVIATED COMPONENT MAINTENANCE MANUAL (ACMM) 35303 G. Second Configuration of Fittings that Use Shielded Wire. 1. Figure 33 shows the sequence used in the assembly of the parts. Table 11 gives the parts used in this fitting configuration.
- Page 32 FENWAL Safety Systems ABBREVIATED COMPONENT MAINTENANCE MANUAL (ACMM) 35303 2. Make sure all parts needed are in the package. See Table 11 and Figure 33. 3. Visually examine each part as specified in CHECK. 4. Use Tables 13 thru 17 to find and prepare the pin crimp tools necessary to in- stall the contact pin (6) on the wire (11).
- Page 33 FENWAL Safety Systems ABBREVIATED COMPONENT MAINTENANCE MANUAL (ACMM) 35303 9. Unbraid and open the shield braid. See Figure 36. Unbraid and Open Shield Figure 36 CAUTION: ALL SHIELD WIRES MUST BE ABOVE THE INSULATOR GRIP FERRULE. IF A STRAND OF WIRE IS UNDER THE FERRULE AND TOUCHES THE CENTER CONDUCTOR, IT WILL CAUSE A SHORT.
- Page 34 FENWAL Safety Systems ABBREVIATED COMPONENT MAINTENANCE MANUAL (ACMM) 35303 12. Put the contact pin on the center conductor. Push the contact pin (6) on the center conductor until the insulator grip ferrule (8), the wire guide (7), and the contact pin (6) are pushed together as far as they will go. See Figure 39.
- Page 35 FENWAL Safety Systems ABBREVIATED COMPONENT MAINTENANCE MANUAL (ACMM) 35303 16. Push the shield wire strands down on the insulator grip ferrule (8). The wire strands must go all the way around the insulator grip ferrule (8). See Figure 41 for a detail of the shield.
- Page 36 FENWAL Safety Systems ABBREVIATED COMPONENT MAINTENANCE MANUAL (ACMM) 35303 19. Put the pin shield (4) and housing assembly (2 or 3) on the contact pin (6) and push the parts together. Assemble the end cap (9) to the housing (2 or 3) with all of the other parts already in the middle of the assembly.
- Page 37 FENWAL Safety Systems ABBREVIATED COMPONENT MAINTENANCE MANUAL (ACMM) 35303 Remove the torque wrench, socket, and torque wrench adapter. (b) Do the next steps to torque a socket fitting: Use a torque wrench and 3/8 in. socket to torque the fitting to 50 to 60 lbf in.
- Page 38 FENWAL Safety Systems ABBREVIATED COMPONENT MAINTENANCE MANUAL (ACMM) 35303 Fittings that Use TWINAX or Two Core Wire Figure 47 Table 12. Fitting Parts FIGURE 47 REFERENCE DESCRIPTION Shell and Insert Assembly (Used with #3) Housing Assembly (Socket End) Housing Assembly (Pin End)
- Page 39 FENWAL Safety Systems ABBREVIATED COMPONENT MAINTENANCE MANUAL (ACMM) 35303 3. Visually examine each part as specified in CHECK. 4. Use Tables 13 thru 17 to find and prepare the pin crimp tools necessary to in- stall the contact pin (6) on the wire (11). See Figure 47.
- Page 40 FENWAL Safety Systems ABBREVIATED COMPONENT MAINTENANCE MANUAL (ACMM) 35303 (b) If the fitting is to be installed on a wire without a fitting installed on the other end of the wire, make the decision of which conductor to use as the center conductor.
- Page 41 FENWAL Safety Systems ABBREVIATED COMPONENT MAINTENANCE MANUAL (ACMM) 35303 CAUTION: THE SHIELD WIRE MUST BE ABOVE THE INSULATOR GRIP FERRULE. IF A STRAND OF WIRE IS UNDER THE FERRULE AND TOUCHES THE CENTER CONDUCTOR, IT WILL MAKE A SHORT CIRCUIT.
- Page 42 FENWAL Safety Systems ABBREVIATED COMPONENT MAINTENANCE MANUAL (ACMM) 35303 Change the crimp tool setting to the correct setting. Do steps 15 thru 17 again with a new contact pin. Refer to Table 14 for the contact pin part numbers. 18. Put the insulator (5) on the contact pin (6). See Figure 54.
- Page 43 FENWAL Safety Systems ABBREVIATED COMPONENT MAINTENANCE MANUAL (ACMM) 35303 21. Put the pin shield (4) and housing assembly (2 or 3) on the contact pin (6) and push the parts together. Assemble the end cap (9) to the housing (2 or 3) with all of the other parts already in the middle of the assembly.
- Page 44 FENWAL Safety Systems ABBREVIATED COMPONENT MAINTENANCE MANUAL (ACMM) 35303 23. Put a strap wrench on the end cap (9) and tighten the wrench. 24. Use the correct sub-paragraph below for the housing used. (a) Do the next steps to torque a pin end fitting: Select the correct torque wrench adapter, TH-1599, for the thread size used.
- Page 45 FENWAL Safety Systems ABBREVIATED COMPONENT MAINTENANCE MANUAL (ACMM) 35303 Crimp Figure 60 30. Install the shell and insert assembly. Refer to REPAIR. NOTE: The shell and insert assembly is applicable to socket end fittings only. 31. Do all the tests as specified in TESTING AND FAULT ISOLATION.
- Page 46 FENWAL Safety Systems ABBREVIATED COMPONENT MAINTENANCE MANUAL (ACMM) 35303 Table 13. Crimp Tools and Settings (Continued) DANIELS PIN CRIMP DANIELS FITTING TOOL (AF8) WITH FERRULE CRIMP WIDTH ACROSS POSITIONER (TP673) TOOL (HX4) WITH: FLATS PART NUMBER WIRE CRIMP GAUGE SETTING...
- Page 47 FENWAL Safety Systems ABBREVIATED COMPONENT MAINTENANCE MANUAL (ACMM) 35303 Table 13. Crimp Tools and Settings (Continued) DANIELS PIN CRIMP DANIELS TOOL (AF8) WITH FERRULE CRIMP WIDTH ACROSS FITTING POSITIONER (TP673) TOOL (HX4) WITH: FLATS PART WIRE CRIMP NUMBER GAUGE SETTING...
- Page 48 FENWAL Safety Systems ABBREVIATED COMPONENT MAINTENANCE MANUAL (ACMM) 35303 Table 14. Fittings with Contact Pin Part Numbers FITTING PART NUMBER 35303- CONTACT PIN PART NUMBER 06-134724-000 06-134724-000 06-134724-000 06-134724-000 06-134724-000 06-134724-000 06-232356-001 06-134724-000 06-232356-001 06-134724-000 06-134724-000 06-134724-000 06-134724-003 06-134724-003 06-134724-000...
- Page 49 FENWAL Safety Systems ABBREVIATED COMPONENT MAINTENANCE MANUAL (ACMM) 35303 Table 14. Fittings with Contact Pin Part Numbers (Continued) FITTING PART NUMBER 35303- CONTACT PIN PART NUMBER 06-134724-003 06-134724-000 06-134724-000 06-232356-001 06-232356-001 06-134724-003 06-134724-003 06-232356-001 06-134724-000 06-232356-001 06-134724-003 06-232356-001 06-134724-004 06-232356-003...
- Page 50 FENWAL Safety Systems ABBREVIATED COMPONENT MAINTENANCE MANUAL (ACMM) 35303 K. Fittings are used with different wire gauges. The pin crimp changes with the wire gauge used. Tables 15, 16, and 17 give general data needed to configure the fit- tings with different gauge wire. Use the table letter given in Table 15 to the table letter and wire gauge in Table 16 to find the correct pin crimp setting.
- Page 51 FENWAL Safety Systems ABBREVIATED COMPONENT MAINTENANCE MANUAL (ACMM) 35303 Table 17. Insulation Diameter Dimensions (Continued) OUTER INSULATION DIAMETER FITTING PART NUMBER WIRE # OF MIN. MAX. MIN. MAX. 35303- GAUGE CORES (in.) (in.) (cm) (cm) 0.090 0.150 0.229 0.267 —...
-
Page 52: Fits And Clearances
FENWAL Safety Systems ABBREVIATED COMPONENT MAINTENANCE MANUAL (ACMM) 35303 Table 17. Insulation Diameter Dimensions (Continued) OUTER INSULATION DIAMETER FITTING PART NUMBER WIRE # OF MIN. MAX. MIN. MAX. 35303- GAUGE CORES (in.) (in.) (cm) (cm) — 0.083 — 0.211 —... - Page 53 FENWAL Safety Systems ABBREVIATED COMPONENT MAINTENANCE MANUAL (ACMM) 35303 1. This section gives the necessary fits, clearances, and torque values applica- ble to the fittings. B. Fits and Clearances 1. There are no necessary fits and clearances applicable to the fittings.
- Page 54 FENWAL Safety Systems ABBREVIATED COMPONENT MAINTENANCE MANUAL (ACMM) 35303 Table 19. Special Tools, Fixtures, and Equipment (Continued) DESCRIPTION PART NO. MINIMUM SPECIFICATION CAGE CODE Pin Crimp Tool M22520/1-01 11851 Push-Pull Gauge FB-50 0 to 40 lbs 1GHM7 Strap Wrench SW12A 0.40 to 0.50 in.
- Page 55 FENWAL Safety Systems ABBREVIATED COMPONENT MAINTENANCE MANUAL (ACMM) 35303 Table 20. Consumable Materials DESCRIPTION PART NO. MINIMUM SPECIFICATIONS CAGE CODE Isopropyl Alcohol None TT-I-735, Grade A Commercial Nitrogen None A-A-59503, Type I, Grade A, Commercial Class 1 Protective Cap None...
- Page 56 FENWAL Safety Systems ABBREVIATED COMPONENT MAINTENANCE MANUAL (ACMM) 35303 VENDOR’S CAGE VENDOR’S NAME AND ADDRESS 73168 Fenwal Safety Systems (Kidde Aerospace) 4200 Airport Dr. NW Wilson, NC 2896-8630 89536 Fluke Corp. 6920 Seaway Blvd Everett, WA 98206-9090 99017 Protective Closures (Caplug Div.) 2150 Elmwood Ave.
- Page 57 FENWAL Safety Systems ABBREVIATED COMPONENT MAINTENANCE MANUAL (ACMM) 35303 Torque Wrench Adapter, TH-1599, Detail 8 Figure 62 F. Manufacture of Repair Kit, Part Number TZ-6368 1. Use the data in Figures 63 thru 69 to make the tools in the repair kit. Use the repair kit to replace the shell and insert assembly.
- Page 58 FENWAL Safety Systems ABBREVIATED COMPONENT MAINTENANCE MANUAL (ACMM) 35303 Repair Kit, TZ-6368 Figure 63 26-14-14 Page 57 of 61 Mar 31/04...
- Page 59 FENWAL Safety Systems ABBREVIATED COMPONENT MAINTENANCE MANUAL (ACMM) 35303 Inset Replacement Tool, TZ-2255, Part 1 Figure 64 Insert Replacement Tool, TZ-2255, Part 2 Figure 65 26-14-14 Page 58 of 61 Mar 31/04...
- Page 60 FENWAL Safety Systems ABBREVIATED COMPONENT MAINTENANCE MANUAL (ACMM) 35303 Insert Replacement Tool, TZ-2255, Part 3 Figure 66 Insert Replacement Tool, TZ-2255, Part 4 Figure 67 26-14-14 Page 59 of 61 Mar 31/04...
- Page 61 FENWAL Safety Systems ABBREVIATED COMPONENT MAINTENANCE MANUAL (ACMM) 35303 Straightening Fixture, TZ-3658 Figure 68 Insert Tool, TZ-3600 Figure 69 26-14-14 Page 60 of 61 Mar 31/04...
-
Page 62: Illustrated Parts List
FENWAL Safety Systems ABBREVIATED COMPONENT MAINTENANCE MANUAL (ACMM) 35303 11. ILLUSTRATED PARTS LIST A. Not Applicable. 26-14-14 Page 61 of 61 Mar 31/04...
Need help?
Do you have a question about the 35303 Series and is the answer not in the manual?
Questions and answers