
Summary of Contents for UGO BASILE 47300
- Page 1 Instruction manual Treadmill for rodents Revision 4.0 - Sept. Y24 MOUSE Motory Coordination SKU: 47300, 47303, 47302, 47350, 47353, 47352...
- Page 2 Service and adjustments should be carried out by qualified personnel, authorized by Ugo Basile organization. Any adjustment, maintenance and repair of the powered instrument should be avoided.
- Page 3 Fax n. +39 0332 745488 We hereby declare that Instrument. RODENT TREADMILL 47300 / 47302 / 47303 / 47350 /47352 /47353 Catalog number is manufactured in compliance with the following European Union Directives and relevant harmonized standards • 2006/42/CE on machinery •...
-
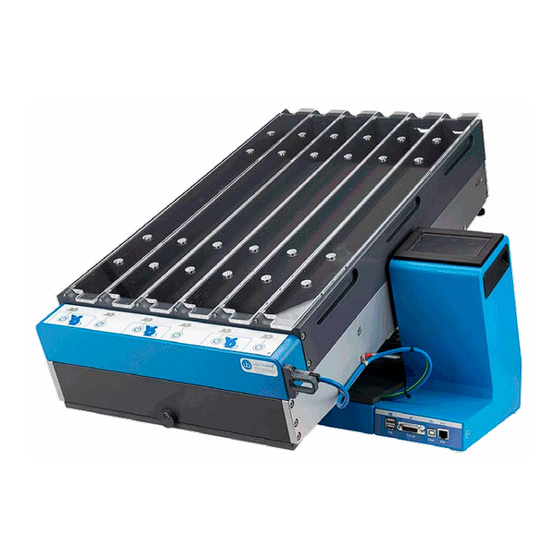
Page 4: Product Features And General Information
X-PAD software to set up the lane assembly. experiment and manage the results is included. The Ugo Basile Treadmill is a compact... -
Page 5: What's In The Box And Options
1 Power chord according to your country outlet. 1 USB pen drive containing this instruction manual and the quality control and warranty certificate. SKU: 47300 Combination package content: 1 Treadmill base device. 1 Mouse lane assembly (up to 6 mice). - Page 6 Back to content Optional items ordering informations: Item description 47300-013 6-lane assembly (each lane 45x5.5, height 15cm, without lid, for thered mice) Page: 6 < Treadmill Instruction Manual Product features and general information...
-
Page 7: Table Of Contents
Back to content Contents Product features and general information ......4 What’s in the box and options ........5 Contents . -
Page 8: Principle Of Operation
Back to content 1 Principle of Operation Treadmills are rolling belts (tapis-roulants) with presettable speed and adjustable uphill and downhill inclination (slope), enabling forced exercise training and accurate testing of fatigue in lab animals. “Treadmill running has been used extensively over the past decades to study behavioral, physiological, biochemical, and, more recently, molecular responses to both acute exercise stress and chronic exercise training. -
Page 9: Notes On The Instruction Manual
Do not spray any liquid on the connectors, or other parts. Ugo Basile cannot in any way and form be held responsible for damage caused to things and people and warranty will be void, due to: • Incorrect electrical supply. -
Page 10: Intended Use
Back to content 1.3 Intended use The device is intended for investigation use on laboratory animal only. DO NOT USE THIS DEVICE ON HUMANS Page: 10 < Treadmill Instruction Manual 1 Principle of Operation... -
Page 11: Instrument Description
2.1 Running Belt Rodents running on the treadmill must be able to maintain good traction while walking or running, to prevent slipping. The running surface of the 47300 consists of an easy-to-clean alimentary-grade white belt, providing suitable grip. The walking surface is not porous and is soft enough to eliminate foot problems that may arise from daily bouts of exercise training. -
Page 12: Rat Lane Assembly
7cm high, and the running belt is divided into 6 lanes, each 45x5.5cm. Each lane is provided with a transparent lid. A special lane assembly for tethered mice (47300-013) is also available: each lane 45x5.5, height 15cm, without lid, see “What’s in the box and... -
Page 13: Controller With Touch-Screen
Back to content The assembly incorporating the grid, its circuit, and the array of START buttons can be easily removed for cleaning: see “7.3 Running Belt”. The same grid also functions as detection system: the controller detects absolute and relative distances, which are recorded together with speed. 2.5 Controller with Touch-Screen The controller is part of the main unit, attached to the tapis-roulant. -
Page 14: Treadmill Features
Back to content When the test is started the lane back-ground colour, which is normally grey, becomes white. The test results for each section, can be browsed in a condensed view. The X-PAD software, included as standard, provides a user-friendly interface to set the experiment and a powerful tool to manage the results easily on one’s PC. -
Page 15: Installation
Back to content 3 Installation 3.1 Unpacking & preliminary check Check the content of the shipment for completeness and visually inspect the instrument as soon as you take it out from the packaging. If the box looks damaged, inform the carrier and provide a conditional signature (not a full signature). -
Page 16: Before Applying Power
7-47300 SPECIFICATIONS. 5. Do not spray any liquid on the connectors and on the geared motor. UGO BASILE DOES NOT ACCEPT ANY RESPONSIBILITY FOR PROBLEMS OR HARM CAUSED TO THINGS OR PERSONS, ARISING FROM: • Incorrect electrical supply •... -
Page 17: Lan Connection
Communication between the Treadmill and a PC is possible via a Local Area Network (LAN). This connection allows to load experiment data created with the Ugo Basile X-Pad software (Windows app.) and to download he experimental data result from the Treadmill directly to the PC, without USB storage. - Page 18 Back to content Set the IP Assignment to Manual and assign an IP address pressing on the number at the of the text “IP Address”, delete the inserted number and digit 10.0.0.1, then press OK (this number will be the ID to reach the Treadmill). Now press right the text “Subnet mask”, delete the inserted number and digit 255.255.0.0, then press OK.
- Page 19 Back to content Gateway, Primary DNS and Secondary DNS does not need to be configured. Exit the Network page pressing the rounder arrow on top of the screen. On your PC (depending of the operating system You are running, Mac OSX or Windows or Linux) go to the Ethernet card settings (the one cabled to the Treadmill).
- Page 20 Back to content Scenario 2 - Treadmill connected to an Ethernet Switch (Lab LAN) • Use a standard Ethernet cable (UTP Cat 5 minimum) to connect theTreadmill to the Lab LAN • Go to the Network page into the Treadmill and set the IP Assignment as Automatic (DHCP) and go back to the previous page using the top screen arrow button.
-
Page 21: Preliminary
Speaking about animal/machine interface, rodents running on the treadmill must be able to maintain good traction while walking or running, to prevent slipping. The running surface of the 47300 consists of an easy-to-clean alimentary-grade white belt, providing suitable grip; the walking surface is not porous and is soft enough to eliminate toenail and foot problems that may arise from daily bouts of exercise training. -
Page 22: Operation
Back to content 5 Operation To start using the Ugo Basile Treadmill you first need to power the unit up; use the rear ON/OFF switch to power the unit ON. A splash screen window will appear on the touch-screen for 4” indicating the device name. -
Page 23: Experiment Menu
Back to content 5.2 Experiment Menu Entering this menu the user will be able to manually fill the experiment tags (Treatment, Protocol, Stage, Inclination, Trial, ID) lane by lane. Depending on the “Animal type” selected in the Setup menu, the user willbe asked to fill the information for each lane: •... -
Page 24: Device Setup Menu
Back to content 5.3 Device Setup menu The parameters that characterize an experiment are set in the “Device Setup” Menu. From this menu the user can set: Speed Mode: Constant, Linear Ramp, Custom Ramp, Page: 24 < Treadmill Instruction Manual 5 Operation... - Page 25 Back to content • Costant: With Constant Speed mode, the belt rotates at a speed which remains constant, for the duration of the test. To change the Speed, tap on the preset speed and insert the new information via the virtual keyboard. •...
- Page 26 Back to content • Custom Ramp: the user can upload a custom ramp durectly via USB storage or LAN. Animal Type: Since the whole hardware, except the lane assembly, is the same for both rats and mice, it’s important to specify which animals the device is going to deal with. •...
- Page 27 Back to content Cutoff levels can be set for: • Maximum Distance. • Maximum Time. • Maximum Shocks. • Maximum Shock Time. Shock Settings: defines the shock stimulus which will be delivered during the trial, setting the intensity (0-2.0 mA). Other settings: Belt tilt, Airpuff minimum time 5 Operation Treadmill Instruction Manual >...
-
Page 28: Performing Experiments (General)
Back to content Network settings: 5.4 Performing experiments (general) All experiments done with animals need to be performed after an habituation phase; refer to your lab director for the correct habituation procedure provided by your Lab standard for Treadmill experiment. 5.5 Starting at Constant Speed In the constant speed mode, during IDLE state, the motor and the counters are disabled. - Page 29 Back to content Please note the - and + buttons at the bottom of the panel: these enable the user to increase or decrease the speed even while the test is running. In constant speed mode The user can manually decide to end single lane experiments, by pressing the on/off button on the shock grid When the test in a specific lane is over, a fresh mouse can be positioned and a new test started.
-
Page 30: Starting A Ramp
Back to content 5.6 Starting a Ramp In the accelerating mode, when the START button is depressed, the Treadmill will pass from the IDLE state (motor and counters disabled), to the initial speed. The test proper is started by the START button, which should be pressed as soon as the initial speed is reached. - Page 31 Back to content The test proceeds until one of the conditions entered in the Cutoff Settings is met (Maximum Distance, Maximum Time, Maximum Shocks, Maximum Shock Time). The user can manually decide to end single lane experiments, by pressing the on/ off button on the shock grid As soon as the FINAL SPEED is reached, the belt will keep rotating at constant speed and the timers will continue counting.
-
Page 32: Results
Back to content 5.7 Results Data are saved in the internal memory and they can be scrolled on the touch-screen. Reach the results section by depressing the “RESULTS” icon from the home page. As in the example, all the Experiment-related information entered by the user will appear in this page: •... -
Page 33: Important Note On Shock Frequency/Detection
Back to content 5.8 Important Note On Shock Frequency/ Detection In our model, the detection of the animal stepping on the grid at the bottom of the running surface, is carried out by the same circuit which administers the shock. The sampling frequency is 3Hz. -
Page 34: Utilities
Your device serial number and actual firmware version that can be seen on the About screen. You can reach the About page pressing the Ugo Basile logo at the main page top centre. -
Page 35: Using Lan Connection
If your Treadmill is LAN connected (see ”3.7 LAN connection”) you can load experiment parameters file generated by the Ugo Basile X-Pad app into the Treadmill and download experimental data result without the need to use the USB storage. LAN Connection is done by a standard web browser. We suggest Google Chrome, however you ca use other web browsers. - Page 36 Back to content It is advisable to secure store the password set for feature use. If you loose the password, you can reset it from the device touch panel. Be aware that the password reset will delete all the stored experiment result data. To reset the password (and the stored result data): On the device touch screen panel from the main page press the Utility button and then the Device Setup button, then press Factory reset and you will be asked for a...
- Page 37 • Experiment data • Ramp experiment Both the file can be created by the Ugo Basile Windows app X-Pad which is included in Your Treadmill device. Create the Experiment file and/or a Ramp file in X-Pad and safe it on Your PC.
- Page 38 Back to content Use the button Select File (is in Italian in the pics while this Windows is an Italian edition) to select the Experiment or the Ramp file on your drive and then press the relative button “Send to device”. You will receive a confirmation message.
-
Page 39: Connections
Back to content 6 Connections 6.1 I/O port connection The Treadmill is provided with a D-sub (DA-15 female) TTL I/O port. This port could be used to synchronize some events with external instruments or acquisition systems. TTL Output signal are electrical isolated in order to guarantee an electrical barrier. The 15-pin D-SUB connector provides different output trigger, in the form of TTL signals. - Page 40 Back to content DB-15 Pin# Description Level Low Level High LANE 1 SHOCK NO SHOCK SHOCK DELIVERED LANE 2 SHOCK NO SHOCK SHOCK DELIVERED LANE 3 SHOCK NO SHOCK SHOCK DELIVERED LANE 4 SHOCK NO SHOCK SHOCK DELIVERED LANE 5 SHOCK NO SHOCK SHOCK DELIVERED LANE 6 SHOCK...
-
Page 41: Maintenance
Back to content 7 Maintenance While any service of the instrument have to be carried out by Ugo Basile personnel or by qualified personnel authorized by UGO BASILE organization, this manual section describes normal maintenance procedures which can be carried out at your facility. - Page 42 Back to content A blade positioned below the running belt will remove the animal droppings: enhance the action of the blade by adding a moderate quantity of disinfectant on the belt during the cleaning phase. Aligning the Belt Make sure that the belt is always centred to the chassis of the Treadmill. When the belt is misaligned with respect to the axis of the Treadmill, it is necessary to reset it by regulating the screws placed in the rear part of the Treadmill.
- Page 43 Back to content 1. Enter the “Start experiment” page and select the button 2. Press the button “+” to increase the speed up to 20 m/min 3. If the belt slips then slow down the belt until it stops, rotate both screws of a quarter of a turn in clockwise sense and, if necessary, repeat points 2 and 3.
- Page 44 Back to content Drop Pan The drop-pan positioned below the grid at the bottom of the running surface can be removed for cleaning. Please follow the steps in sequence, to avoid any damage to the cleaning blade positioned between the belt and the drop-pan: A.
- Page 45 Back to content E. Unlatch the drop-pan drawer, by turning the stopper, see picture: F. Pull-out the drawer, and the attached cleaning blade. After cleaning, reposition the drop-pan by repeating the same actions in reverse order: reassemble the grid, connect the cable, re-position the lane assembly. 7 Maintenance Treadmill Instruction Manual >...
- Page 46 Back to content Grid Assembly UNPLUG THE MAINS CORD BEFORE CLEANING THE GRID To assure correct operation, shock delivery and detection, the grid needs to be clean. When necessary, it can be easily removed, following the steps outlined below: A. First remove the lane assembly as shown in the picture on paragraph 6.3.1. B.
-
Page 47: Lubrication
Back to content 7.4 Lubrication Our Treadmills do not require any lubrication: all its rotating components are lubricated for life. 7.5 Long Inactivity The instrument does not require any particular maintenance after long inactivity, except cleaning. It is be possible that after years of inactivity the internal battery needs to be replaced. -
Page 48: Specification
Back to content 8 Specification General Command Input 4,3 inches touch-screen (Resistive) Read-out 4,3 inches touch-screen (Resistive), PC Power Requirements Universal input 100-240 VAC, 50-60Hz, 1500W max Sound Level 80 dB ca. at maximum speed Operating environment 10°C to 40°C Detection By pedal switch and via numeric key pad Operation... -
Page 49: Warranty
Back to content 9 Warranty Your device is covered by 12 months on factory warranty period. Registering the device on our registering web site page will give you a 12 months free warranty period. To make the product registration. Take a picture or a note of the device serial number which is written in a metallic label at the of the instrument case. -
Page 50: Related Products
Activity Cage - Spontaneous Activity Grip Strength Meter (GSM) for Mice for Mice and Rats and Rats Ugo Basile SRL Via Giuseppe Di Vittorio 2, 21036 Gemonio (VA) ITALY - Tel. +39 0332 744574 - sales@ugobasile.com Page: 50 < Treadmill Instruction Manual... - Page 51 Back to content Running Wheels - Rodents Motor Hole Board Device - Boissier-Simon Activity Measurement method 10 Related Products Treadmill Instruction Manual > Page: 51...
- Page 52 Your Companion in Discovery since 1963 ugobasile.com more than 40,000 citations in the main bibliographic search engines. Ugo Basile SRL Società Unipersonale Via Giuseppe Di Vittorio, 2 21036 Gemonio (VA) ITALY Tel. +39 0332 744574 sales@ugobasile.com service@ugobasile.com...
Need help?
Do you have a question about the 47300 and is the answer not in the manual?
Questions and answers