Table of Contents
Advertisement
Quick Links
USER MANUAL
INDICATOR/CONTROLLER/
For Service Support: +91 70469 60991
Accumax Instruments Pvt. Ltd.
B-95, Electronic Estate, G.I.D.C., Sector-25,
Gandhinagar, Gujarat, India. 382024
Call us: +91 70469 60991, 88496 70588
Mail:
accumaxinstruments@gmail.com
service@accumaxinstruments.com
accumaxinstruments.com
Web:
1 |
P a g e
pH
TRANSMITTER
USER MANUAL
www.accumaxinstruments.com
Version 1.1.1
Advertisement
Table of Contents

Summary of Contents for Accumax AI-01
- Page 1 USER MANUAL INDICATOR/CONTROLLER/ TRANSMITTER USER MANUAL For Service Support: +91 70469 60991 Accumax Instruments Pvt. Ltd. B-95, Electronic Estate, G.I.D.C., Sector-25, Gandhinagar, Gujarat, India. 382024 Call us: +91 70469 60991, 88496 70588 Mail: accumaxinstruments@gmail.com service@accumaxinstruments.com accumaxinstruments.com Web: Version 1.1.1 P a g e...
- Page 2 USER MANUAL The operator shall bear responsibility for the suitability of the device for the specific purpose: 1. Improper installation and operation of the devices (systems) will cause the warranty to be void. 2. The manufacturer will not be liable for any damage of any kind by using its product, including, but not limited direct, indirect, incidental, punitive, and consequential damages.
-
Page 3: Table Of Contents
USER MANUAL TABLE OF CONTENT 1 Introduction 1.1 Overview 1.2 Key feature 1.3 Package Contents 2 Setup and Configuration 2.1 Installation 2.2 Hardware connections 2.2.1 RS485 Connection 2.2.2 4-20mA Connection 2.2.3 Relay connection 2.2.4 Sensor connection 3 Software Settings 3.1 Configuration Menu 3.2 4 –... -
Page 4: Introduction
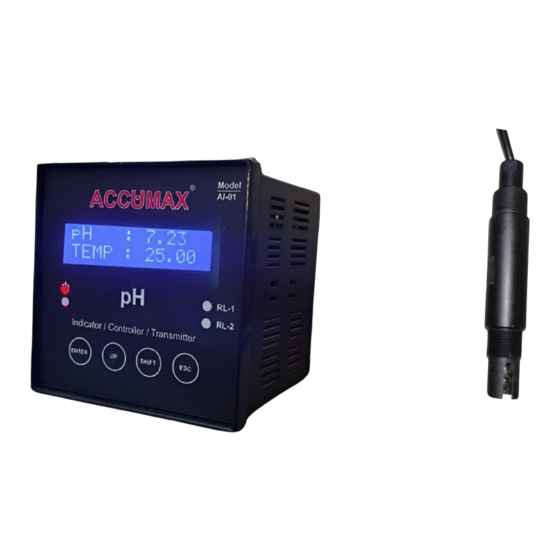
USER MANUAL 1. Introduction Overview Accumax Instruments Pvt Ltd, a leading provider of precision instrumentation solutions, offers a state-of-the-art pH meter designed to accurately measure the pH of various solution in various industries. This manual is designed to provide you with all the necessary information for the proper installation, operation, calibration, and maintenance of your pH Controller. -
Page 5: Hardware Connections
USER MANUAL Hardware Connections FRONT SIDE BACK SIDE 2.2.1 RS485 Connection Connect D+ (PIN 3) & D- (PIN 4) of pH Controller to master controller. RS485 Version 1.1.1 P a g e www.accumaxinstruments.com... -
Page 6: Relay Connection
USER MANUAL 2.2.2 4-20 mA Connection Connect I+ (PIN 5) and GND (PIN 7) of pH controller to the master controller. 2.2.3 Relay Connection The provided relay connection is shown below. NO COM NC NO COM NC Relay 1 Relay 2 2.2.4 Sensor Connection ... -
Page 7: Software Settings
USER MANUAL Software Settings Key 1 - ENTER Key 2 - UP Key 3 - SHIFT Key 4 - ESC Note – ESC Key generally used to skip to next Screen/Menu Password Settings: o Press ENTER key for 2 seconds for setting mode. o Press UP key to enter a number and SHIFT key to shift the cursor (set password XXXX). - Page 8 USER MANUAL PASSWORD 1111 Temperature Type o Press UP key for selection of temperature type (AUTO, MANUAL) o Press Enter key after the selection of required temperature type o If AUTO type temperature is selected then temperature will be according to temperature sensor TEMPERATURE AUTO...
-
Page 9: Temp Offset
USER MANUAL o Note: User can set up to 170 °C TEMPERATURE 025.00 C Enter valid Temperature o If Temperature is above 170 then below warning will appear when temperature type is manual ENTER VALID TEMPERATURE Temperature offset o Temperature offset is difference between actual temperature and measured temperature by pH electrode. - Page 10 USER MANUAL EXIT? Activate relays o Press ENTER key (YES) to activate relays and to set Low and High Set Point. Relay Set Point o Press UP key for selection of relay set point (TWO, FOUR) o Press Enter key after the selection of required relay set point RELAY SET POINT Available option (TWO, FOUR) ...
- Page 11 USER MANUAL Relay-2 High Set Point setting o Press ENTER key to enter High pH Set point and SHIFT key to shift cursor right. o Press ENTER key to enter. o If user presses ESC key device will save previous set value. o Relay will be energized when the pH value goes above a High Set Point.
- Page 12 USER MANUAL Relay-1 High Set Point setting o Press ENTER key to enter High pH Set point and SHIFT key to shift cursor right. o Press ENTER key to enter. o If user presses ESC key device will save previous set value o Relay will be stop when the pH value goes above a High 1 Set Point.
-
Page 13: 20Ma Calibration Menu
USER MANUAL EXIT? 4 – 20mA Calibration Menu o Press ENTER key button for 2 seconds for setting mode. o Press UP key to enter number and SHIFT key to shift cursor (Set password 2222) o Press ENTER key to enter. PASSWORD 2222 ... -
Page 14: Modbus Menu
USER MANUAL COUNT @ 20mA 2800 Calibration Completed o Press Enter key at “calibration successful” menu CALIBRATION SUCCESSFUL Entry Complete : o If user have pressed ESC key at any one of calibration point it will show “Exit” menu, because calibration data has not been saved. o Press ENTER(YES) key to go on home screen. - Page 15 USER MANUAL 1. BAUD RATE 9600 Available option (2400, 4800, 9600, 19200, 38400) Parity select: o Press UP key to select parity o Press ENTER key to enter. PARITY NONE Available option (NONE, ODD, EVEN) Stop bit select: o Press UP key to select stop bit.
-
Page 16: Output Format
USER MANUAL 5. OUTPUT FORMAT Float Write configuration setting: o Press UP key to select write configuration.(ENABLE,DESABLE) o Press ENTER key to enter 6. WRITE CONFIG ENABLE Complete Modbus setting mode: o Press ENTER(YES) key to save changes. o Press ESC key to return “3333”... -
Page 17: Ph Calibration Menu
USER MANUAL pH Calibration Menu o Press ENTER key button for 2 seconds for setting mode. o Press UP key to enter number and SHIFT key to shift cursor (Set password 6666) o Press ENTER key to enter. PASSWORD 6666 ... - Page 18 USER MANUAL Calibration Point 2 o Press UP key to enter buffer solution pH and SHIFT key to shift cursor.(Default value will be 7.00 pH) o Immerse the pH electrode in a buffer solution with same pH value. o Wait for 60-120 seconds to complete the calibration process. o Press ENTER key to save the data and to move for 3 point calibration.
-
Page 19: Slop
USER MANUAL pH CALIBRATION 3 09.00 09.00 Calibration Completed o Press Enter key at “calibration successful” menu CALIBRATION SUCCESSFUL Entry Complete : o If user have pressed ESC key at any one of calibration point it will show “Exit”... -
Page 20: Technical Specification
USER MANUAL 4 Technical specification Measurement pH/Temperature. pH Range 0.00-14 pH pH Resolution 0.01 Digit pH Accuracy 0.10 pH i/p impedance Ohms Temp range 0 to 150 C Temperature resolution 1 Digit Temp. Accuracy +/-0.5% Of F.S Temp Compensation Auto /Manual Temp Sensor I/P Pt-100 RTD (2 wire connection) Display... -
Page 21: Troubleshooting
USER MANUAL solution for a minimum of 30 minutes before recalibrating and returning the sensor to service. Step-4. Plugged or Dry Liquid Junction: Remove any observed contaminant with one of the above procedures, then soak in 3.8M KCl solution for a minimum of 30 minutes.
Need help?
Do you have a question about the AI-01 and is the answer not in the manual?
Questions and answers