Advertisement
Available languages
Available languages
Hardware List
**Please ensure all contents are included before installation.
Control Box
Switch Panel
Mounting Brackets
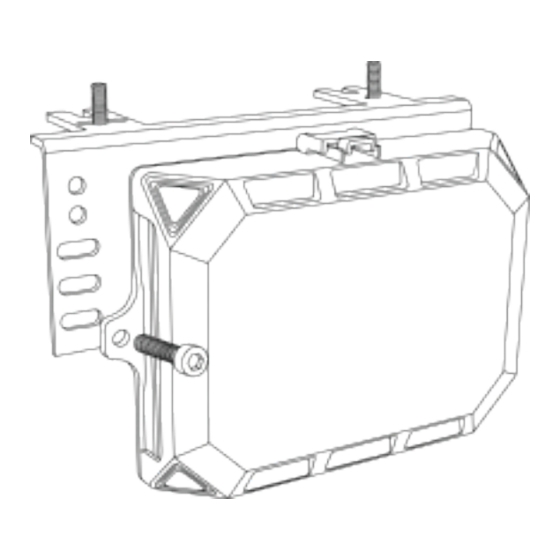
Control Box Installation
**Control box can be installed in 2 different methods individually.
METHOD #1
METHOD #2
INSTALLATION MANUAL
Circuit Breaker
x1
Mounting Hardware
x1
Positive Red Wire
x5
Align the bracket with hole position
Installation Completed
Align the bracket with hole position
Installation Completed
Panel Button Stickers
x1
Zipties
x19
Negative Black Wire
x2
SG800
Screw Driver
x2
In-Line Fuse
x10
ACC Wire
x1
Tighten the screws
Tighten the screws
Last Updated: 07/18/2024
x1
x1
x1
1
Advertisement
Table of Contents

Summary of Contents for Uni-bond SG800
- Page 1 Last Updated: 07/18/2024 INSTALLATION MANUAL SG800 Hardware List **Please ensure all contents are included before installation. Control Box Circuit Breaker Panel Button Stickers Screw Driver Switch Panel Mounting Hardware Zipties In-Line Fuse Mounting Brackets Positive Red Wire Negative Black Wire...
-
Page 2: Specifications
Switch Panel Installation **Switch panel can be installed in 2 different methods individually. METHOD #1 Align the bracket with hole position Tighten with flat head screws Installation Completed METHOD #2 Align the base plate with hole position Tighten the base plate screws Put on the bracket Tighten the bracket screws Installation Completed... -
Page 3: Wiring Diagram
Wiring Diagram Wiring Instructions **Follow instructions to prevent troubleshooting issues. Wiring Instructions continued on next page. Connect the Positive Red Wire to positive terminals on the battery & control box. Connect the Negative Black Wire to negative terminals on the battery &... -
Page 4: Button Introduction
Wiring Instructions (continued) Using the waterproof connecter (included with switch panel), connect the control box to the switch panel. OPTIONAL Connect your lights to control box. OPTIONAL: negative wires can be connected to the common cathode. Button Introduction ON-OFF Button Short Press - Turn ON or OFF. - Page 5 Switch Panel Modes CONSTANT MODE This mode is the basic ON - OFF mode. All 8 switches are set to CONSTANT MODE by default. MOMENTARY MODE This mode is the MomentaryON - OFF mode. This means the Switch will only supply a moment of output when pressed. Long press the brightness button Press the button you want to set Press ON/OFF button to confirm...
- Page 6 SAFETY FIRST - READ THIS INFORMATION BEFORE INSTALLATION Proper installation of this product requires the installer to have a good understanding of automotive electronics systems and procedures. All products must have proper fuse installed. If mounting this product requires drilling holes, the installer MUST be sure that no vehicle components or other vital parts could be damaged by the drilling process.
-
Page 7: Mode D'installation
MODE D’INSTALLATION SG800 Liste de pièces **Veuillez-vous assurer que tout le contenu est inclus avant l'installation. Autocollants Boîtier de commande Disjoncteur Tournevis de panneau Le matériel Panneau de commutation Attaches zippées Porte-fusibles en ligne de montage Supports de montage Fil rouge positif Fil noir négatif... - Page 8 Installation du panneau de commutation **Le boîtier de commande peut être installé individuellement selon 2 méthodes différentes. MÉTHODE #1 Alignez le support avec Serrer avec des vis à tête plate la position du trou Installation terminée MÉTHODE #2 Alignez la plaque de base Serrez la plaque de base la position du trou avec des vis...
-
Page 9: Schéma De Câblage
Schéma de câblage BATTERIE Le commutateur du boîtier de commande offre deux façons d’obtenir de l’énergie. Connectez l'ACC ou la batterie. Il est suggéré d'obtenir de l'énergie à partir de la batterie. Instructions de câblage **Suivez les instructions pour éviter les problèmes de dépannage. Suite des instructions de câblage à... - Page 10 Instructions de câblage (a continué) À l'aide du connecteur étanche (inclus avec le panneau de commutation), connectez le boîtier de commande au panneau de commande. OPTIONNEL Connectez vos lumières au boîtier de commande. OPTIONNEL : les fils négatifs peuvent être connectés à la cathode commune. Présentation du bouton ALLUMÉ...
- Page 11 Changer les modes du panneau MODE CONSTANT Ce mode est le mode ON – OFF de base. Les 8 commutateurs sont réglés en mode constant par défaut. MODE MOMENTANÉ Ce mode est le mode Momentary ON - OFF. Cela signifie que le commutateur ne fournira qu'un moment de sortie lorsqu'il sera enfoncé.
- Page 12 LA SÉCURITÉ EN PREMIER - LIRE LES INSTRUCTIONS AVANT DE COMMENCER L’INSTALLATION Afin de procéder à l’installation adéquate de ce produit, le technicien doit avoir une connaissance approfondie des systèmes électroniques de l’automobile et de ses procédures. Tous les produits doivent être installés avec les fusibles appropriés. Si des trous doivent être percés pour l’installation, le technicien DOIT s’assurer qu`aucun des composants du véhicule ou tout autre pièce importante ne soit endommagés durant le processus de perçage.
Need help?
Do you have a question about the SG800 and is the answer not in the manual?
Questions and answers