Table of Contents
Advertisement
Quick Links
Advertisement
Table of Contents

Summary of Contents for Elecrow ThinkNode-G1
- Page 1 ThinkNode-G1 Indoor Gateway For LoRaWAN User Manual...
-
Page 2: Table Of Contents
Indicator Connection Button 2. Quick Start Step 1. Set up ThinkNode-G1 Step 2. ThinkNode-G1 Internet Connection Configuration (1) Setting up WiFi Connection Mode (2) Gateway ETH Internet Connection Configuration (3) Gateway LTE (4G) Internet Connection Configuration 3. Customer Support 4. Manufacturers Address... -
Page 3: About Thinknode-G1
About ThinkNode-G1 Thank you for selecting the ThinkNode-G1 for your impressive IoT project. This LoRaWAN indoor gateway is designed to connect to a diverse range of network servers, supporting both WiFi and Ethernet connections, as well as an optional LTE module for 3G/4G cellular network bridging. -
Page 4: Specifications
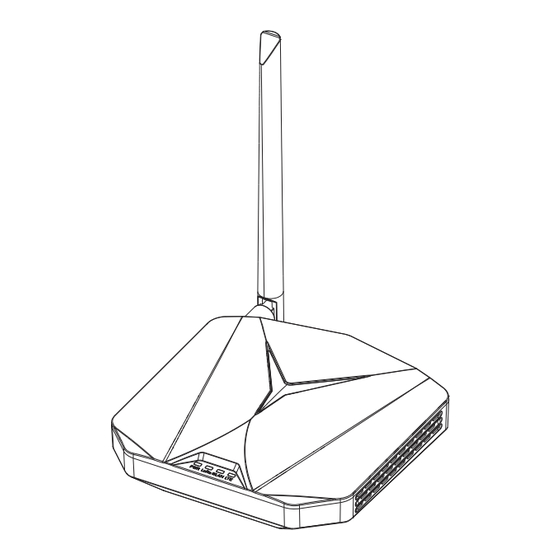
Specifications Processor MT7628(MIPS24KEc@580MHz) DDR2 128MB Flash LoRa Gateway Chip SX1302(8-Channel) LoRa Sensitivity -125dBm @125K/SF7, -139dBm @125K/SF12 LoRa TX power Up to 26 dBm WiFi Support 2.4 GHz 802.11 b/g/h Bluetooth Dual-mode Bluetooth-BR /EDR+BLE5.0 LTE Cat(Optional) Global Frequency Band(SIM7670) Ethernet RJ45 (10M / 100 M) LoRa: 3dBi External Antenna, Wi-Fi: Internal Antenna, BLE: Ceramic Antenna Antenna Antenna Impedance... -
Page 5: Interface
Interface DC-12V Nano SIM LoRa ANT GPS ANT (Optional) Button Micro SD USB-C Note: •SD and SIM cards are not hot-swappable. Always ensure the gateway is powered off before inserting or removing the SIM or SD card. •Do not power the gateway without connecting the antenna, as this may damage the radio function. - Page 6 Interface Indicator Power LED 4G LTE LED WLAN LED LoRa LED...
-
Page 7: Indicator
Indicator Mode Description Solid Operating normally, good internet connection. Green Device/hotspot is starting up. Slow Blink Solid Device is ready to connect to the network and requires further configuration. Configuration mode, will automatically exit if there is no activity in 5 minutes. Slow Blink Blue Device reset indication, press the button for 20 seconds, the light will... -
Page 8: Connection
Connection Mode Description Device powered on. Not connected to power. Connected to LoRa wireless network. LoRa Not connected. Connected to WLAN Ethernet network. WLAN Not connected. Connected to 4G cellular network. Not connected. -
Page 9: Button
Button Mode Description Double Click Software reboot. Slow blue light blink, entering configuration mode, will automatically exit if Press for 5s there is no activity in 5 minutes. Press for 20s Rapid blue light flash, triggering factory reset and software reboot. -
Page 10: Quick Start
Quick Start Step 1. Set up ThinkNode-G1 Connect the antenna, power adapter, and Ethernet cable (not necessary) to the gateway, then turn on the power. The power LED turns green, then the top indicator flashes green after 15 seconds, indicating startup. - Page 11 Note: •Ensure that all antennas are connected before powering the gateway. •LoRa antennas must be selected based on frequency bands, such as 868MHz or 915MHz; install the appropriate frequency band antenna for your region. Connect to power, then press and hold the gateway's setup button for 5 seconds to enter configuration mode.
- Page 12 Once in configuration mode, connect to the gateway's AP and log in to the Luci network configuration interface using a mobile device or a computer/laptop with a wireless network interface, connecting to the gateway AP- "ThinkNode-G1_XXXXXX".
- Page 13 Connect to the IP address assigned to the gateway via a browser, which defaults to 192.168.1.1. You should see the login window as shown in the figure below. Click to access the URL and log in to the Luci network configuration interface. Username: root Password: root http://192.168.1.1...
-
Page 14: Step 2. Thinknode-G1 Internet Connection Configuration
Step 2: ThinkNode-G1 Internet Connection Configuration After entering the Luci interface, begin configuring the gateway's internet connection. There are three network configuration modes: WiFi, ETH, and LTE (4G). (1) Setting up WiFi Connection Mode Click on Network in the interface and select Wireless. - Page 15 Click "Remove" to delete the previous WiFi hotspot. (Skip this step if you haven't connected the device before.) Click on the "Scan" option to select a new WiFi hotspot, click "Join Network" , enter the WiFi password, and submit.
- Page 17 Return to the Luci start interface, select the LoRa Gateway in the LoRaWAN dropdown menu to enter the gateway configuration interface. Choose the WiFi option.
- Page 18 Select the LoRa gateway frequency band, choose either 868MHz or 915MHz based on the product. Enter the gateway ID, which needs to be registered on the TTN server website. Use the default settings for all other configurations.
- Page 19 Click “Save & Apply”, then exit the Luci website and wait for the gateway to restart. Note: GPS ANT LoRa ANT •1. Quickly press the gateway's side setup button DC-12V Nano SIM Button twice to restart the gateway! •2. Wait until the "WLAN" and "LoRa" green lights illuminate and the middle status light turns solid green on the gateway, confirming successful network configuration and normal operation.
-
Page 20: Gateway Eth Internet Connection Configuration
(2) Gateway ETH Internet Connection Configuration You will need to connect an Ethernet cable to the gateway's side port, then press and hold the setup button for 5 seconds to connect to the AP and log in to the Luci interface. Since the WiFi network is not used, there is no need to enter the Network settings for WiFi;... - Page 21 Log in to the Luci interface, select the LoRa Gateway in the LoRaWAN dropdown menu to enter the gateway configuration interface, and choose the ETH internet connection method. Click “Save & Apply”, then exit the Luci website and wait for the gateway to restart. After the restart, if the "WLAN", "LoRa"...
-
Page 22: Gateway Lte (4G) Internet Connection Configuration
(3) Gateway LTE (4G) Internet Connection Configuration To use the 4G network for internet connection, insert 4G SIM Card into the SIM card slot on the side of the gateway. Refer to the configuration steps in (1) and (2), in the initial interface of Luci, select the LoRa Gateway in the LoRaWAN dropdown menu to enter the gateway configuration interface, choose the LTE internet connection method, save the settings, exit Luci, and wait for the gateway to restart. - Page 23 Note: •When the gateway is using the 4G network and operating normally, the LTE indicator light on the gateway will flash, the LoRa indicator light will be solid, and the status indicator light will be solid. LoRa WLAN LTE LoRa WLAN LTE...
-
Page 24: Customer Support
Customer Support If you have any questions, customer support is always standing by. info@elecrow.com techsupport@elecrow.com For more technical details, please visit the relevant webpage: https://www.elecrow.com/thinknode-g1-indoor-8-channels-lorawan-gateway-powered-by-sx1302-chip.html Manufacturers Address 5th Floor,Fengze Building B,Nanchang Huafeng Industrial Park,Baoan District, Shenzhen,China.
Need help?
Do you have a question about the ThinkNode-G1 and is the answer not in the manual?
Questions and answers